The team at Coolearth Architecture Inc. in combination with a dedicated and passionate set of clients and builders, had the fortune and pleasure of working to create a beautiful renovation to a newly acquired home, while also performing a substantial deep-energy retrofit as well as switching to all-electric and getting off natural gas.
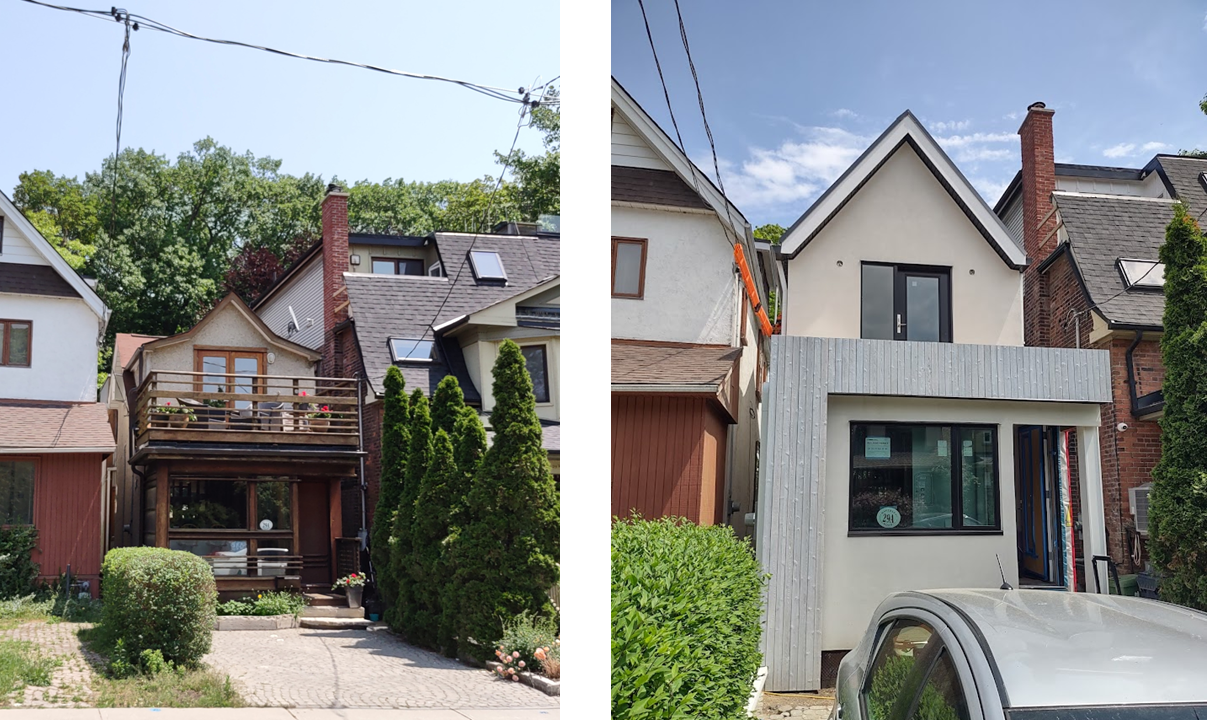
The original house (left) and an in-progress photo of the updated design (right).
The project is a modest sized urban home in Toronto’s beaches neighbourhood. The home was originally a charmingly proportioned residence built in the early 1900’s, but it was alas subjected to multiple renovations, which included what is literally a “top hat” roof, and a dark overhanging front deck (top left photo). The client wanted a design which was bright, minimal, and expressive.
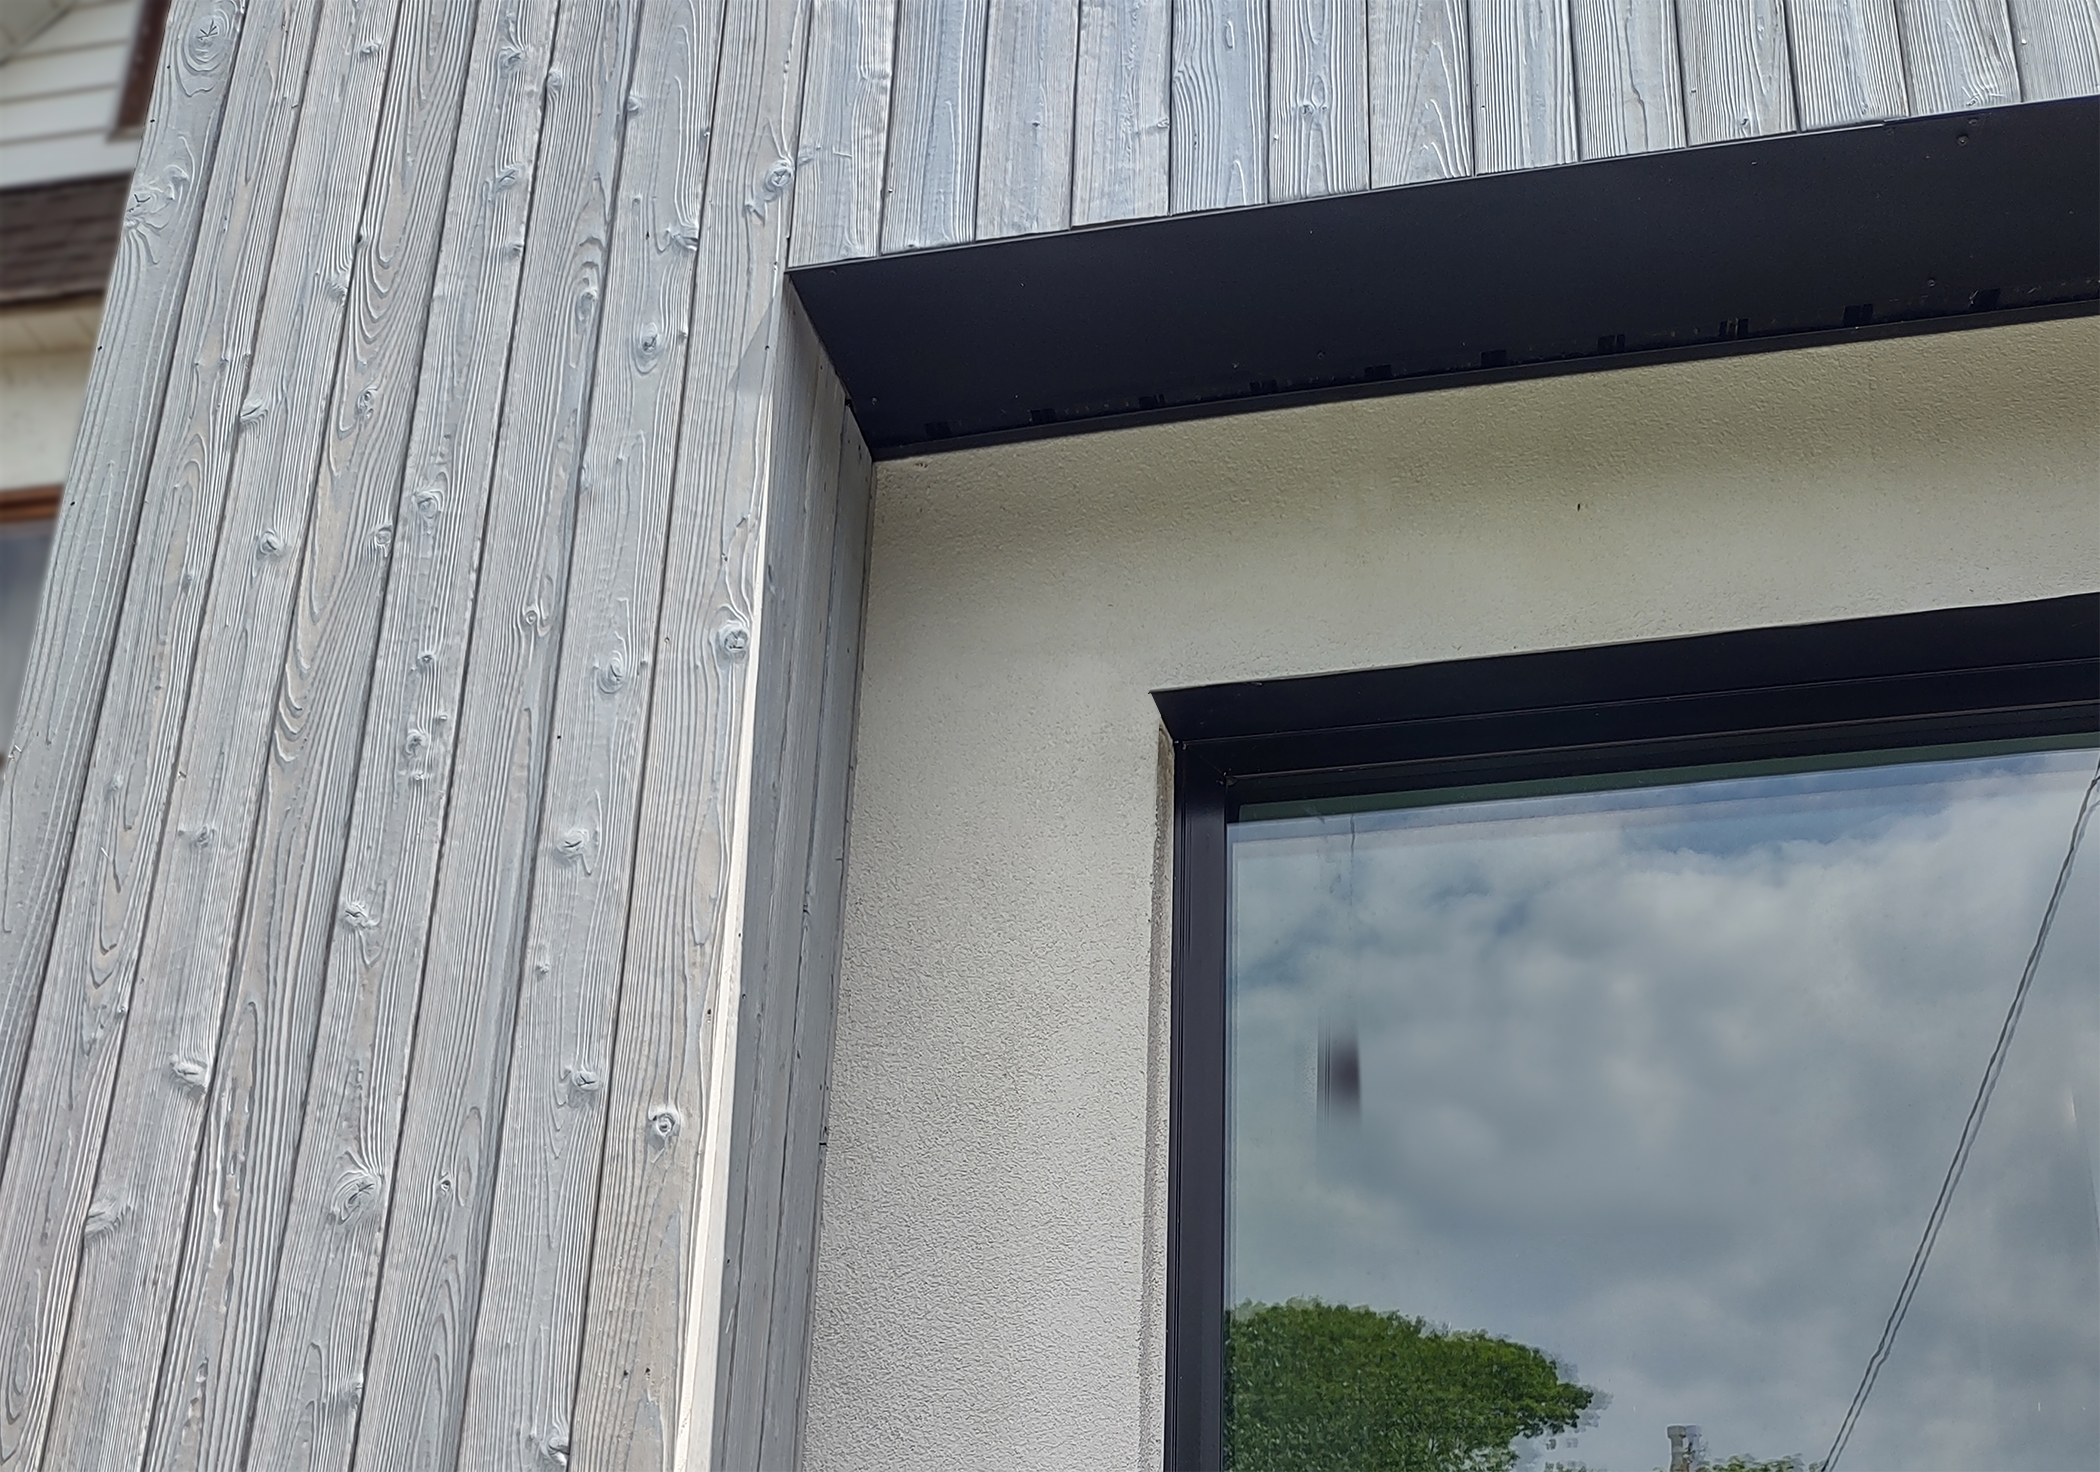
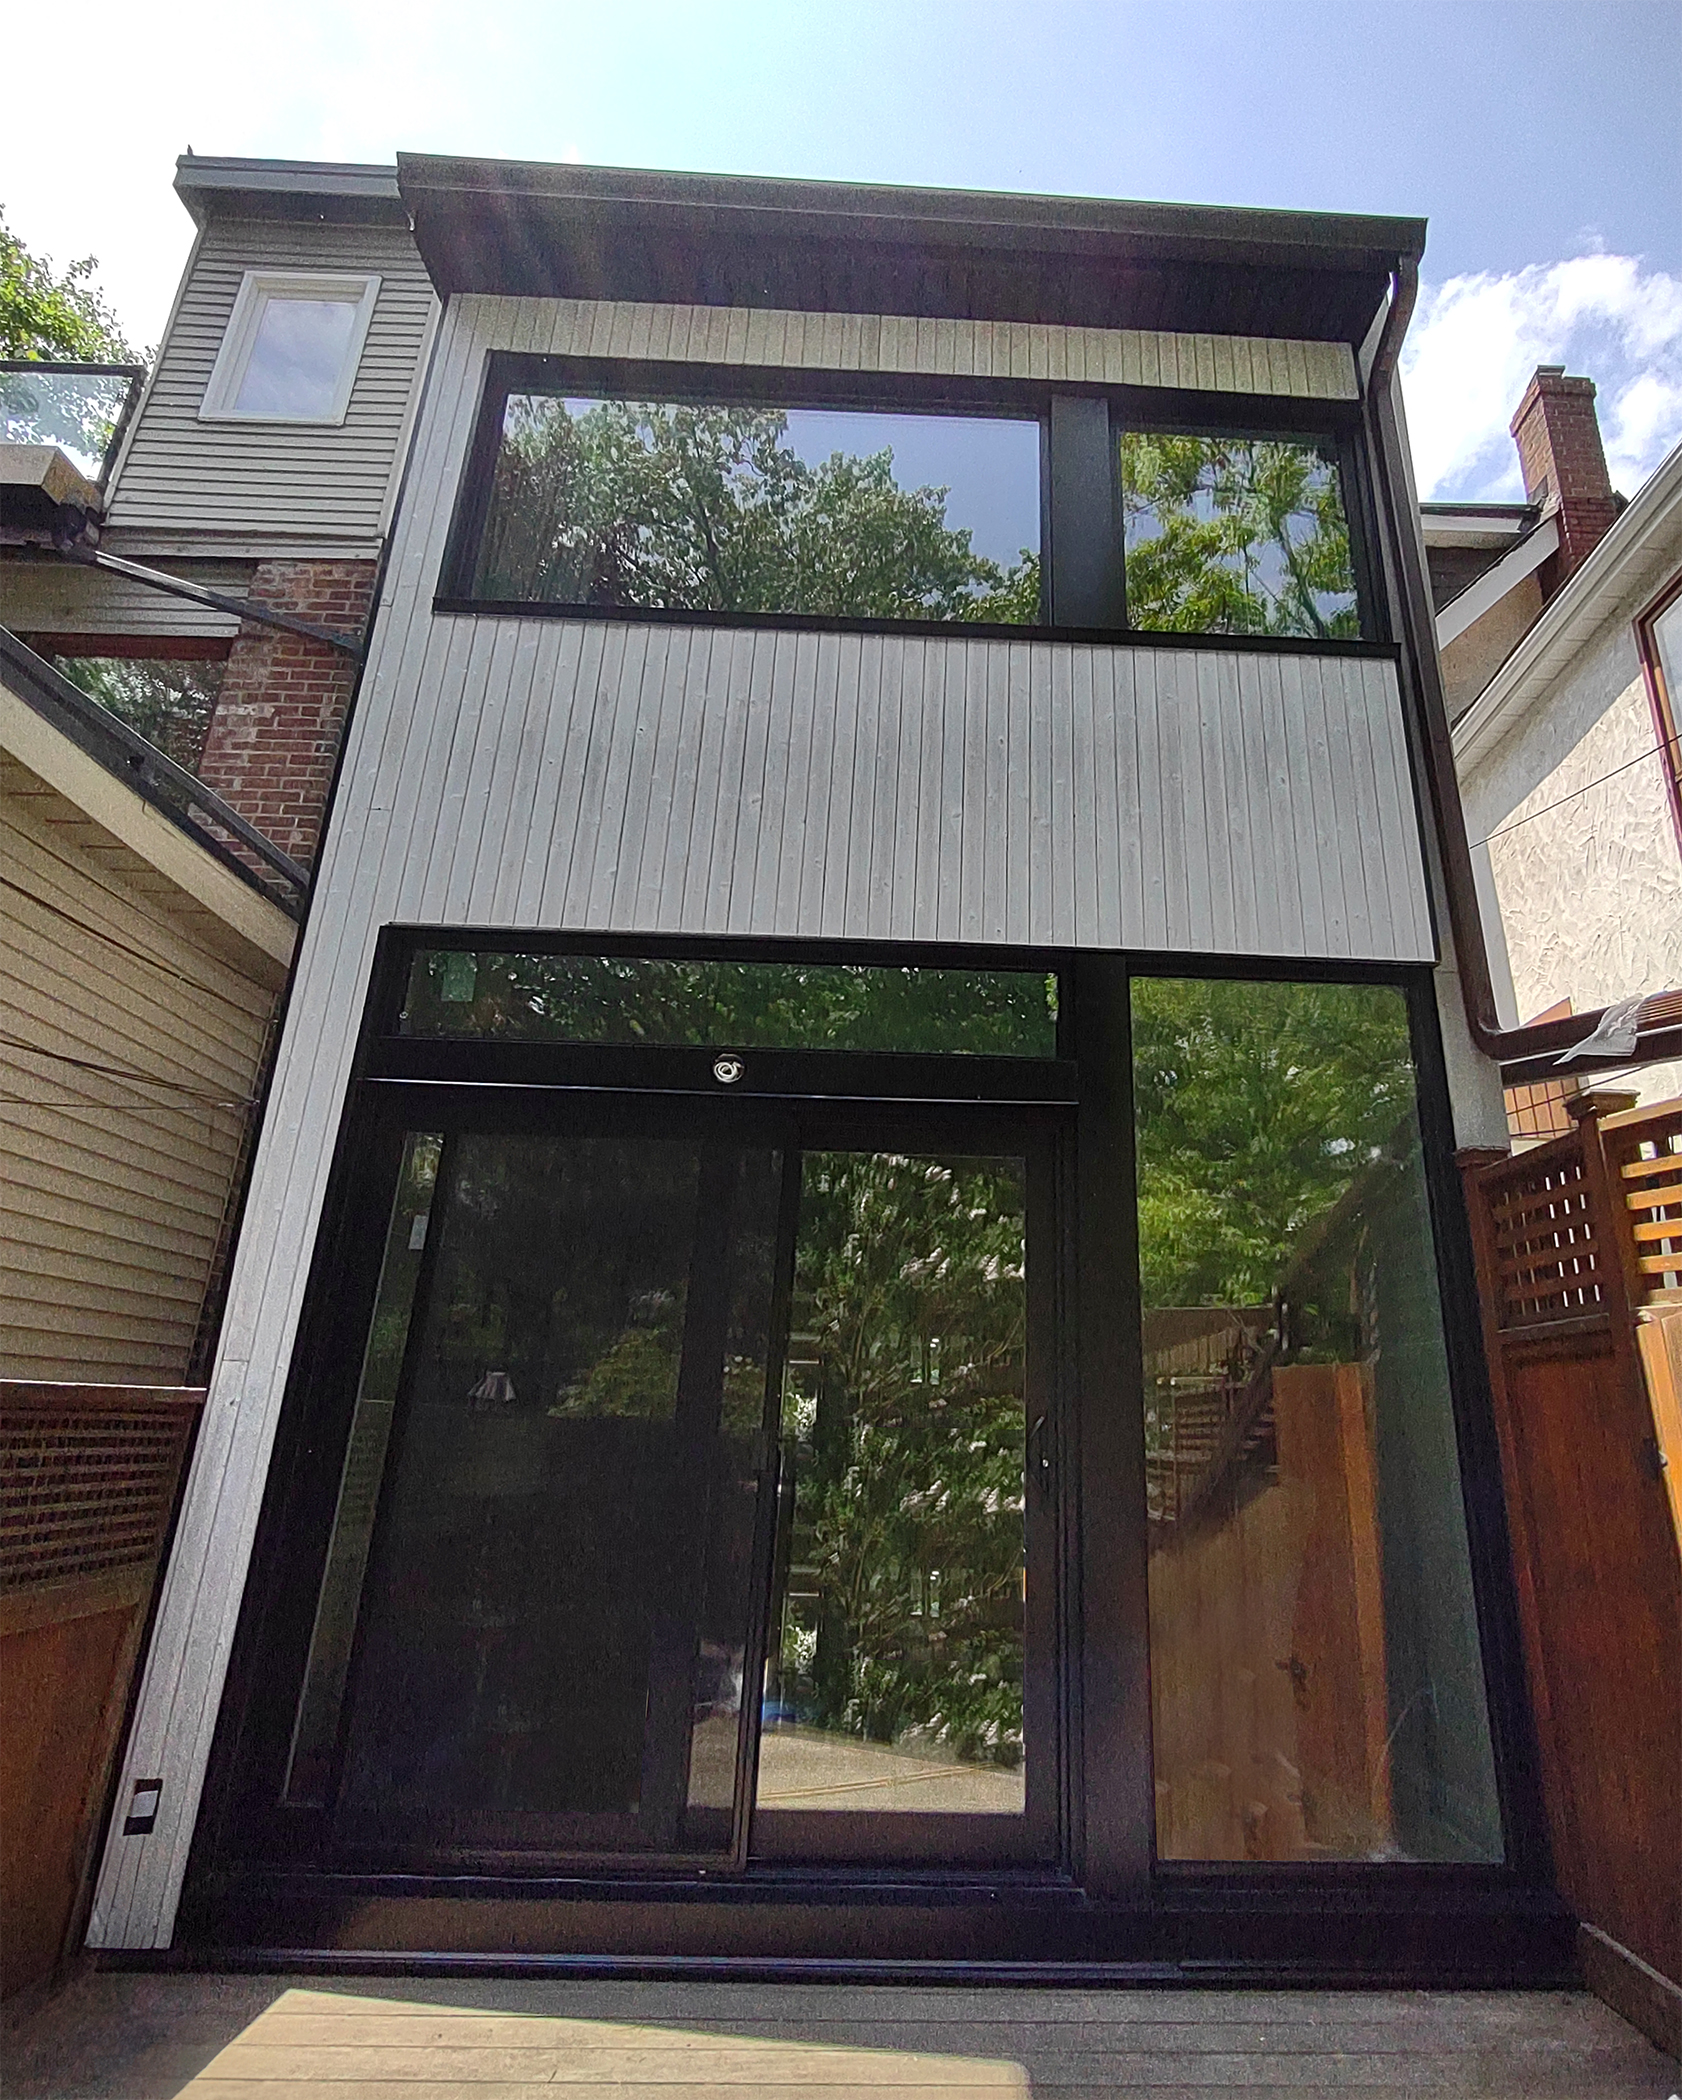
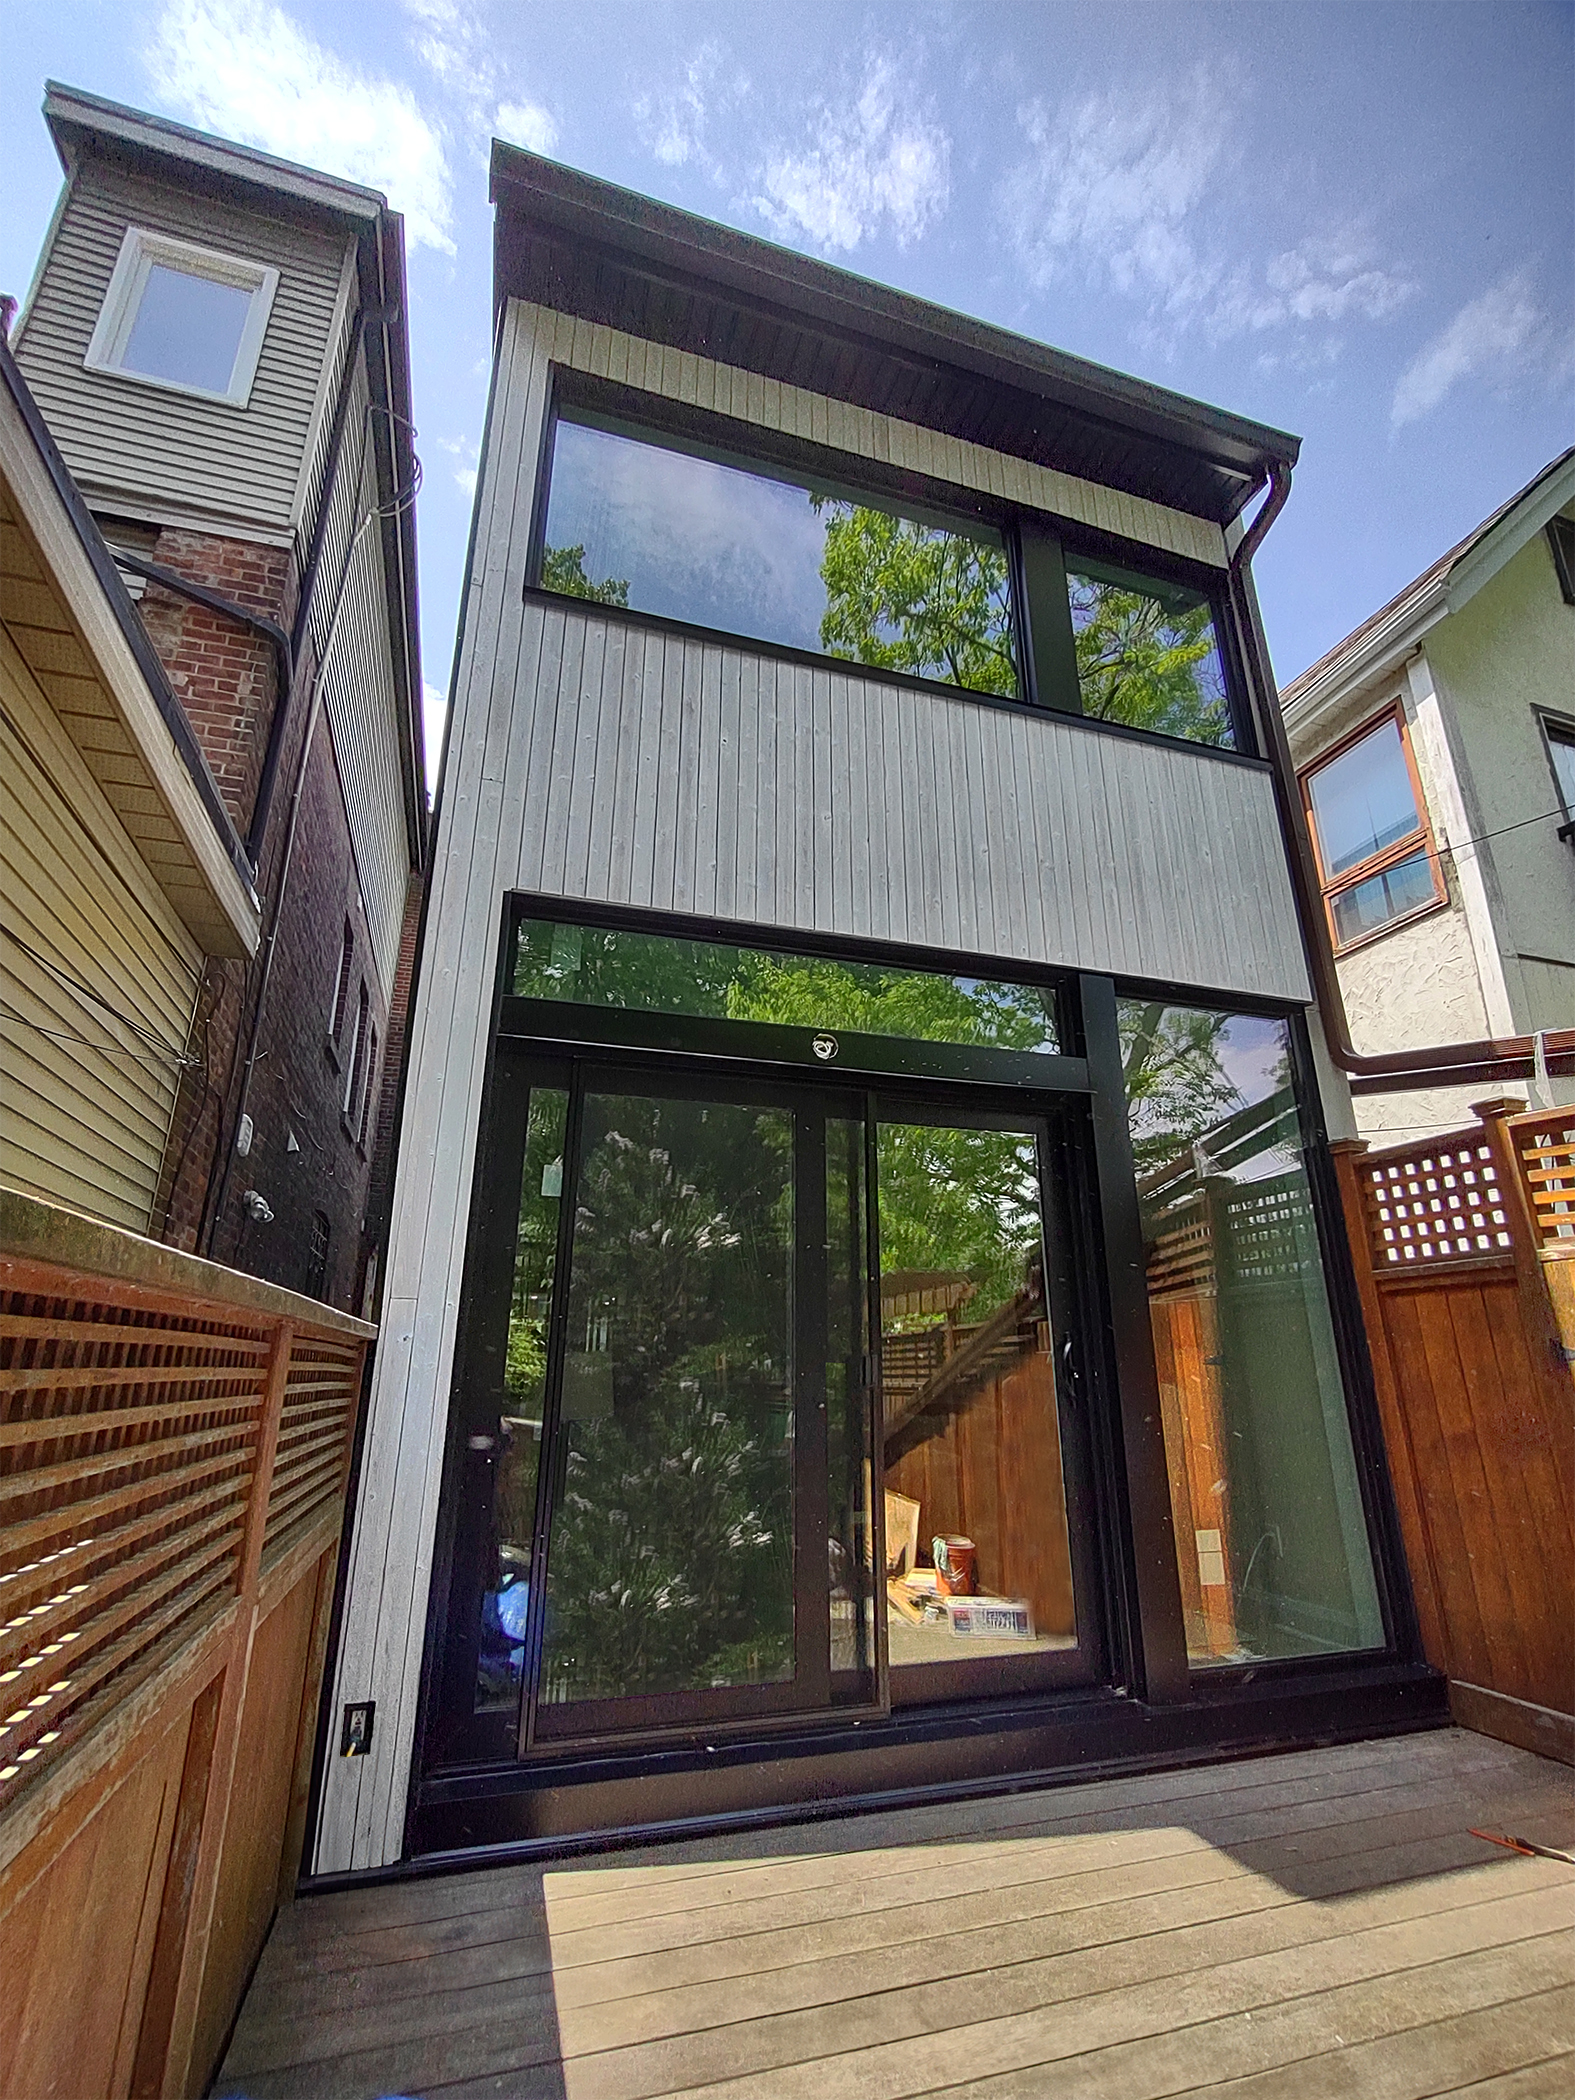
In our design we sought to improve performance of the building, but also to restore the homes original simple but elegant proportions. We substantially brightened the feel of the home from the street by removing the overhangs on the design, and added warm, light coloured, and expressive natural materials, including a stained burnt wood finish, and limestone entry steps.
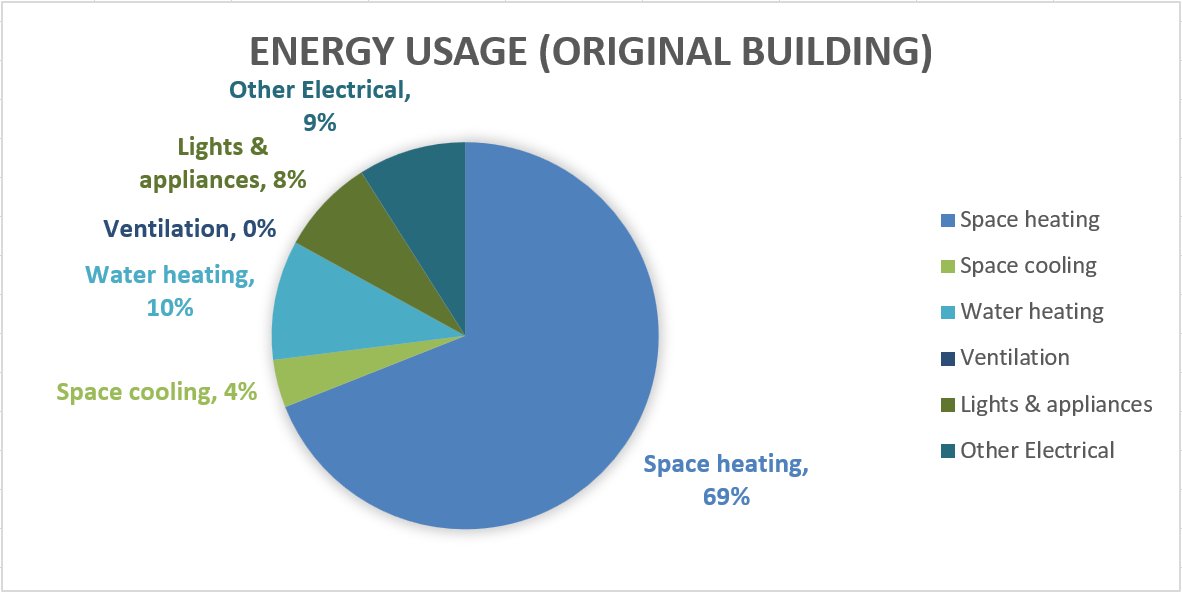
With attention to detail and data-based decision making the team which included Novalux Construction, and Goldfinch Energy, made careful upgrades to the building which have resulted in dramatic changes to the building’s performance and energy efficiency. The original building was measured by Goldfinch Energy, an environmental consulting firm here in Toronto, to consume 150 GJ/year (gigajoules per year) most of which was used to heat the house. A typical new home only uses approximately 75 GJ/year, meaning that the original building was using double the energy of a comparable new build. Below are the energy and heat loss statistics of the original building. As you can see below almost 70% of the energy was going to heating the home. Therefore our low carbon energy retrofit strategy focused on increasing the insulation, reducing the air leaks, and replacing the windows.
A further breakdown of the original building’s energy-use (below) shows the source of the heat loss in the building by element. You can see how major the energy loss is via air leaks — almost a third of the building alone. The walls also make-up a large portion of the heat loss. The basement/foundation renovation/retrofit was not in the scope of work for this renovation, but we hope the homeowners can make improvements there in the future and further reduce the energy use.
Retrofit Strategy
Based on data above and the goals of the client, we made a few big improvements. We replaced the doors and windows with triple-pane argon filled fibreglass frames, which increased the performance of those elements, but also was a chance to increase the air tightness of the project by tying all the window/door openings into an externally applied air and weather barrier. Additionally, all the doors included gaskets and triple-latches/multi-point locks which increase airtightness as well security. We also added a continuous external mineral wool insulation layer clad with stucco for further air sealing and thermal performance on the accessible walls above grade. Insulating the attic areas we could easily access with mineral wool batt, was an easy and simple improvement to address attic/ceiling heat loss.
To virtually eliminate the homes Greenhouse Gas emissions, we switch to 100% electrical energy via the use of an Air Source Heat Pump, which leveraged the existing duct work, as well as decrease the amount of energy needed to heat the building due to the heat pumps co-efficient of performance (COP). In Ontario, the Greenhouse Gas Emissions Intensity of electrical energy is very low, making it a much more clean form of energy than gas. The switch to electric power also minimizes harmful fumes that could pollute the indoor air quality from natural gas appliances such as nitrogen oxides.
Results
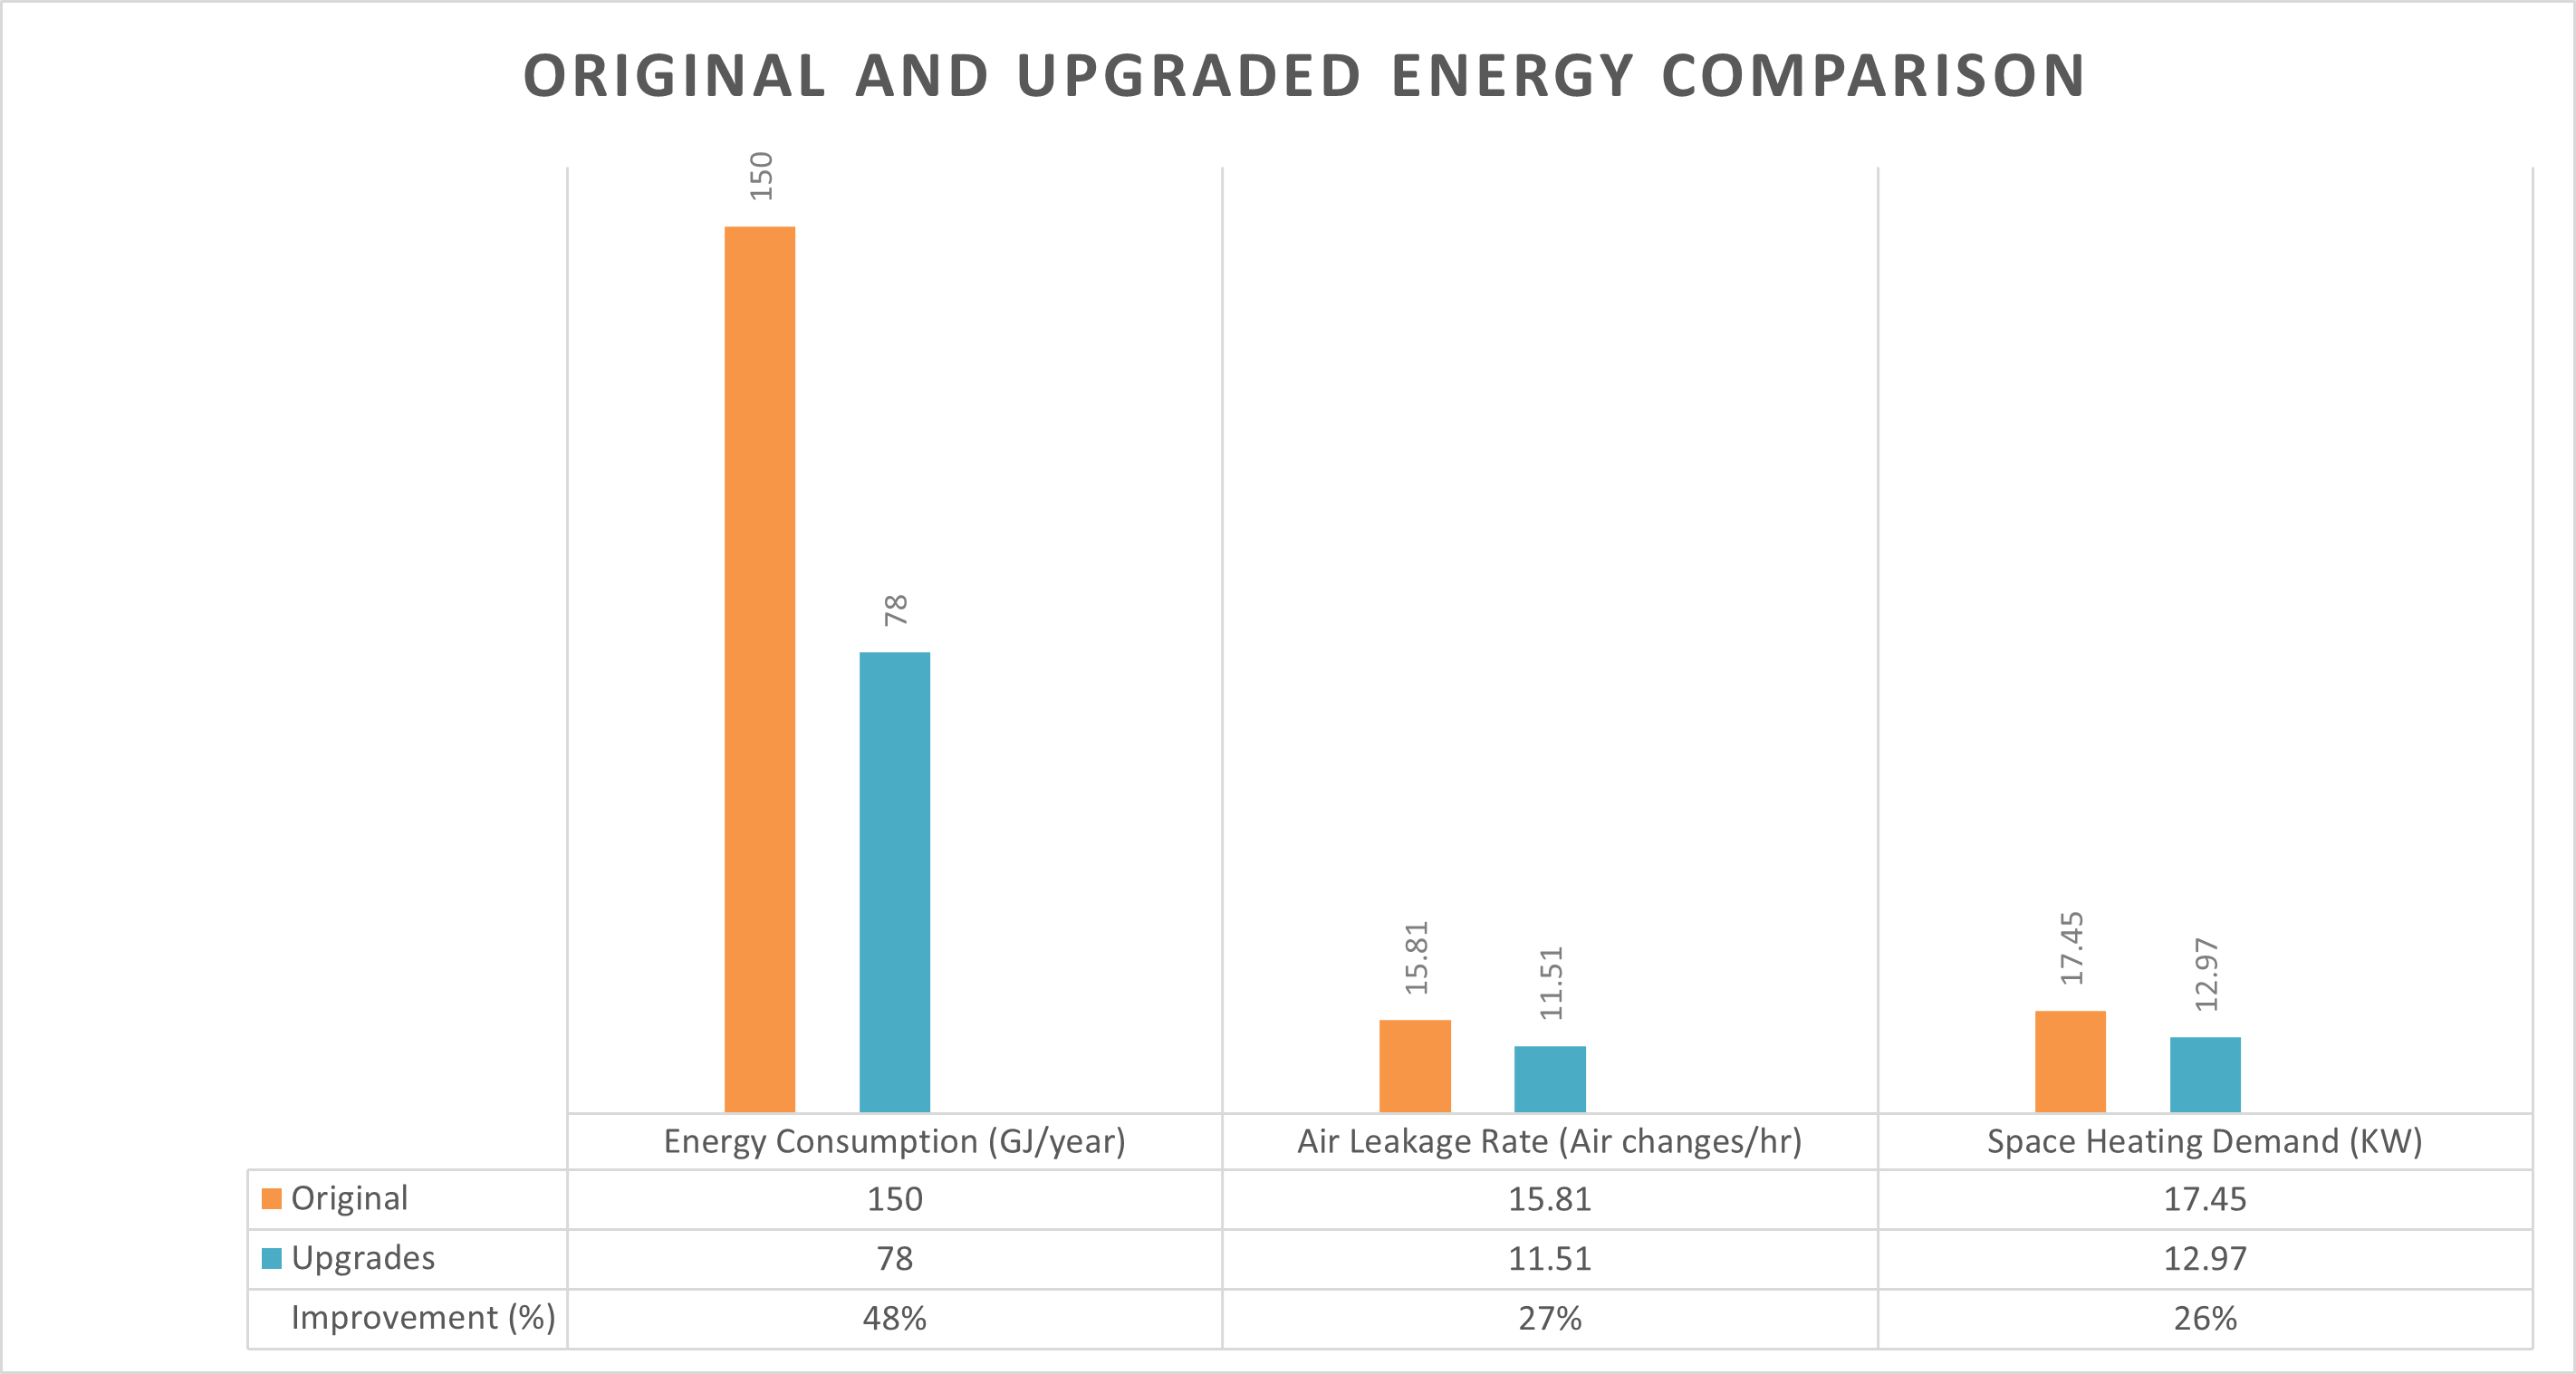
Overall we were able to reduce the energy consumption of the building by 48%, the air leakage rate by 27% and the space heating demand by 26%. Below is a table that shows a comparison between the energy consumption, air leakage rate, and space heating Demand of the original building and the building once the retrofit was completed.
The project will receive $10,600 of grants from the HER program. The HER program is a rebate program that helps Ontario households reduce their energy consumption through renovations and design, but unfortunately it is not accepting new applicants currently.
Next Steps
An exterior pergola with louvered sun-shade will be installed on the front deck to create a shaded summer gather area. We will post more pictures once the project is completed!
High Performance and Passive house design is based on both rigorous Building Science principles, but also inherited tradition. In this blog post we propose an alterative wall assembly based on first principles: high performance, low-cost, low embodied carbon, durable, efficient use of materials, and flexible.
But first, we will dive into the Building Science principles behind a wall and explain why the most common walls in Ontario are not so-much sound Building Science, as ‘inherited tradition’ . We’ll then explain our proposed 21st Century Wall (spoiler: using 8″ external insulation with long-screws to support the cladding, no insulation in the stud cavities, and a single air/water/vapour barrier on the outside of the sheathing, but on the warm side of the wall).
Building Science 101 – What makes a ‘good’ wall?
The walls of a building act as an environmental separator/moderator; keeping the outside and inside environmental conditions separate — all in order to keep the interior environment within the human comfort zone. The environmental conditions a wall must separate/moderate include rain, water vapor, wind, light, cold, and heat. These conditions are always combined together in varying proportions annually and diurnally.
Beyond simply separating/moderating the environment, Cooelarth believes a ‘good’ wall is also durable, low-carbon, and non-toxic.
Like the skin of our bodies or the cell wall, the walls in a building perform many functions, however in general these can be broken down into the following layers
– Rain Control
– Air Control
– Vapour Control
– Thermal Control
– Structural Support
– Finishing (inside and outside)
A good wall should be air-tight. From Building Science we learn that the best place for the air barrier is on the “warm” side of the wall, which prevent warm moist interior air from meeting cold dry exterior air, causing condensation (in the winter) and prevents the reverse in the summer.
A good wall should allow any vapour which enters the wall to escape and prevent vapour from entering unwanted areas. Issues can arise if multiple impermeable vapour control layers are included in the wall: these layers trap moisture (sandwich it) within the walls and thereby prevent the walls from drying out, causing mold and structural deterioration. This could happen if an impermeable house wrap is used on the exterior sheathing, and a impermeable vapour/air barrier, such as poly-vinyl, is used on the interior.
A ‘good’ wall has minimal thermal bridges. In Passive House design 8″ of continuous insulation is considered ‘thermal bridge free’. Issues which can arise when the thermal control layer is dis-continuous (i.e where there are thermal bridges). The danger with thermal bridges, other then increasing heating/cooling loads depending on the season, relates to building durability. In winter, thermal bridges can carry cool exterior temperature indoors and cause condensation on the interior, which can facilitate mold formation or degradation of the finishes and structure. In summer there can also be thermal bridges which can cause condensation for different reasons.
A ‘good’ wall minimizes the potential for water to be driven into the wall. This is why we always strive to use a ‘vented rainscreen’ approach and to provide multiple planes of protection for bulk water ingress. A vented rainscreen creates a zone behind the cladding which is the same pressure as the outside air, this means any wind-blown water is captured on the front face of the cladding, and is not driven into the wall assembly itself.
A ‘good’ wall is easy to build, has minimal layers, and minimizes the tradespeople and steps to assemble it.
There are many other attributes which make a ‘good’ wall, but we feel the above are some of the most important. In the short-space of this blog post we can’t get into the full Building Science of a wall, but suffice to say: a wall must deal with many, changing conditions, that can even work together to amplify or damped effects (i.e mositure can build-up in a wall over many years before it becomes a problem).
Inherited Tradition and Walls in Ontario
What we mean by ‘inherited tradition’ in the opening paragraph of this blog post is clearly exemplified in typical wood frame walls in Ontario.
In Ontario, over the last century, wood-frame walls were built with little to no insulation or air/vapour barriers. As time progressed in the 70’s and 80’s people started sealing the outside of the buildings with “housewrap”, filling the cavities between the wall studs with insulation, and placing a plastic vapour barrier on the warm inner-side of the walls, underneath the gypsum wall board. The typical wall studs were 2×4’s.
In 2016 the Ontario Building implemented minimum Energy Efficiency measures (via SB-12) which required continuous external insulation as well as set minimum insulation levels for the entire wall (among other things). To meet this requirements builders in Ontario started using 2×6 studs instead of 2×4’s (you can get R-22 in the 5.5″ of space within a 2×6 wall, compared to R-13 in a 2×4 wall), and also added 1.5-2″ of exterior insulation, typically foam or mineral wool.
As interest in Passive House design and an awareness of the important of highly insulated envelopes increased over the years, people have begun using a lot more insulation within the wall. We see the emergence of double-stud walls which are two sets of wood studs with a wider cavity in the middle which is then filled with insulation, as well as over 6″ of external insulation (with insulation also in the 2×4/2×6 stud cavities). From Coolearth’s point of view, these walls, while checking all the “boxes” of Building Science, often include many seperate layers of air, vapour, and rain membranes, multiple thermal control layers, and an uncessary amount of structural support (i.e in the case of double stud walls).
A further downside to many contemporary approaches to high performance walls in Ontario is that the structure (wood studs) is not kept at room temperature. What we mean by this is that whatever the indoor and outdoor temperatures are, there is always a thermal gradient within the wall which connects the two temperatures. Depending on where the thermal and structural layers are placed within the wall, the structural layer might be colder or warmer then the interior temperature — this can open up the risks of degradation or mold formation on the structural elements.
Therefore, let us introduce, what we might call a wall for the 21st centry!
A High Performance Wall for the 21st Century: 8″ External Woodfibre insulation with Long-screws
After much research and synthesis we present to you a wall system for Ontario that is high performance, low-cost, simple to build, durable, and long lasting.
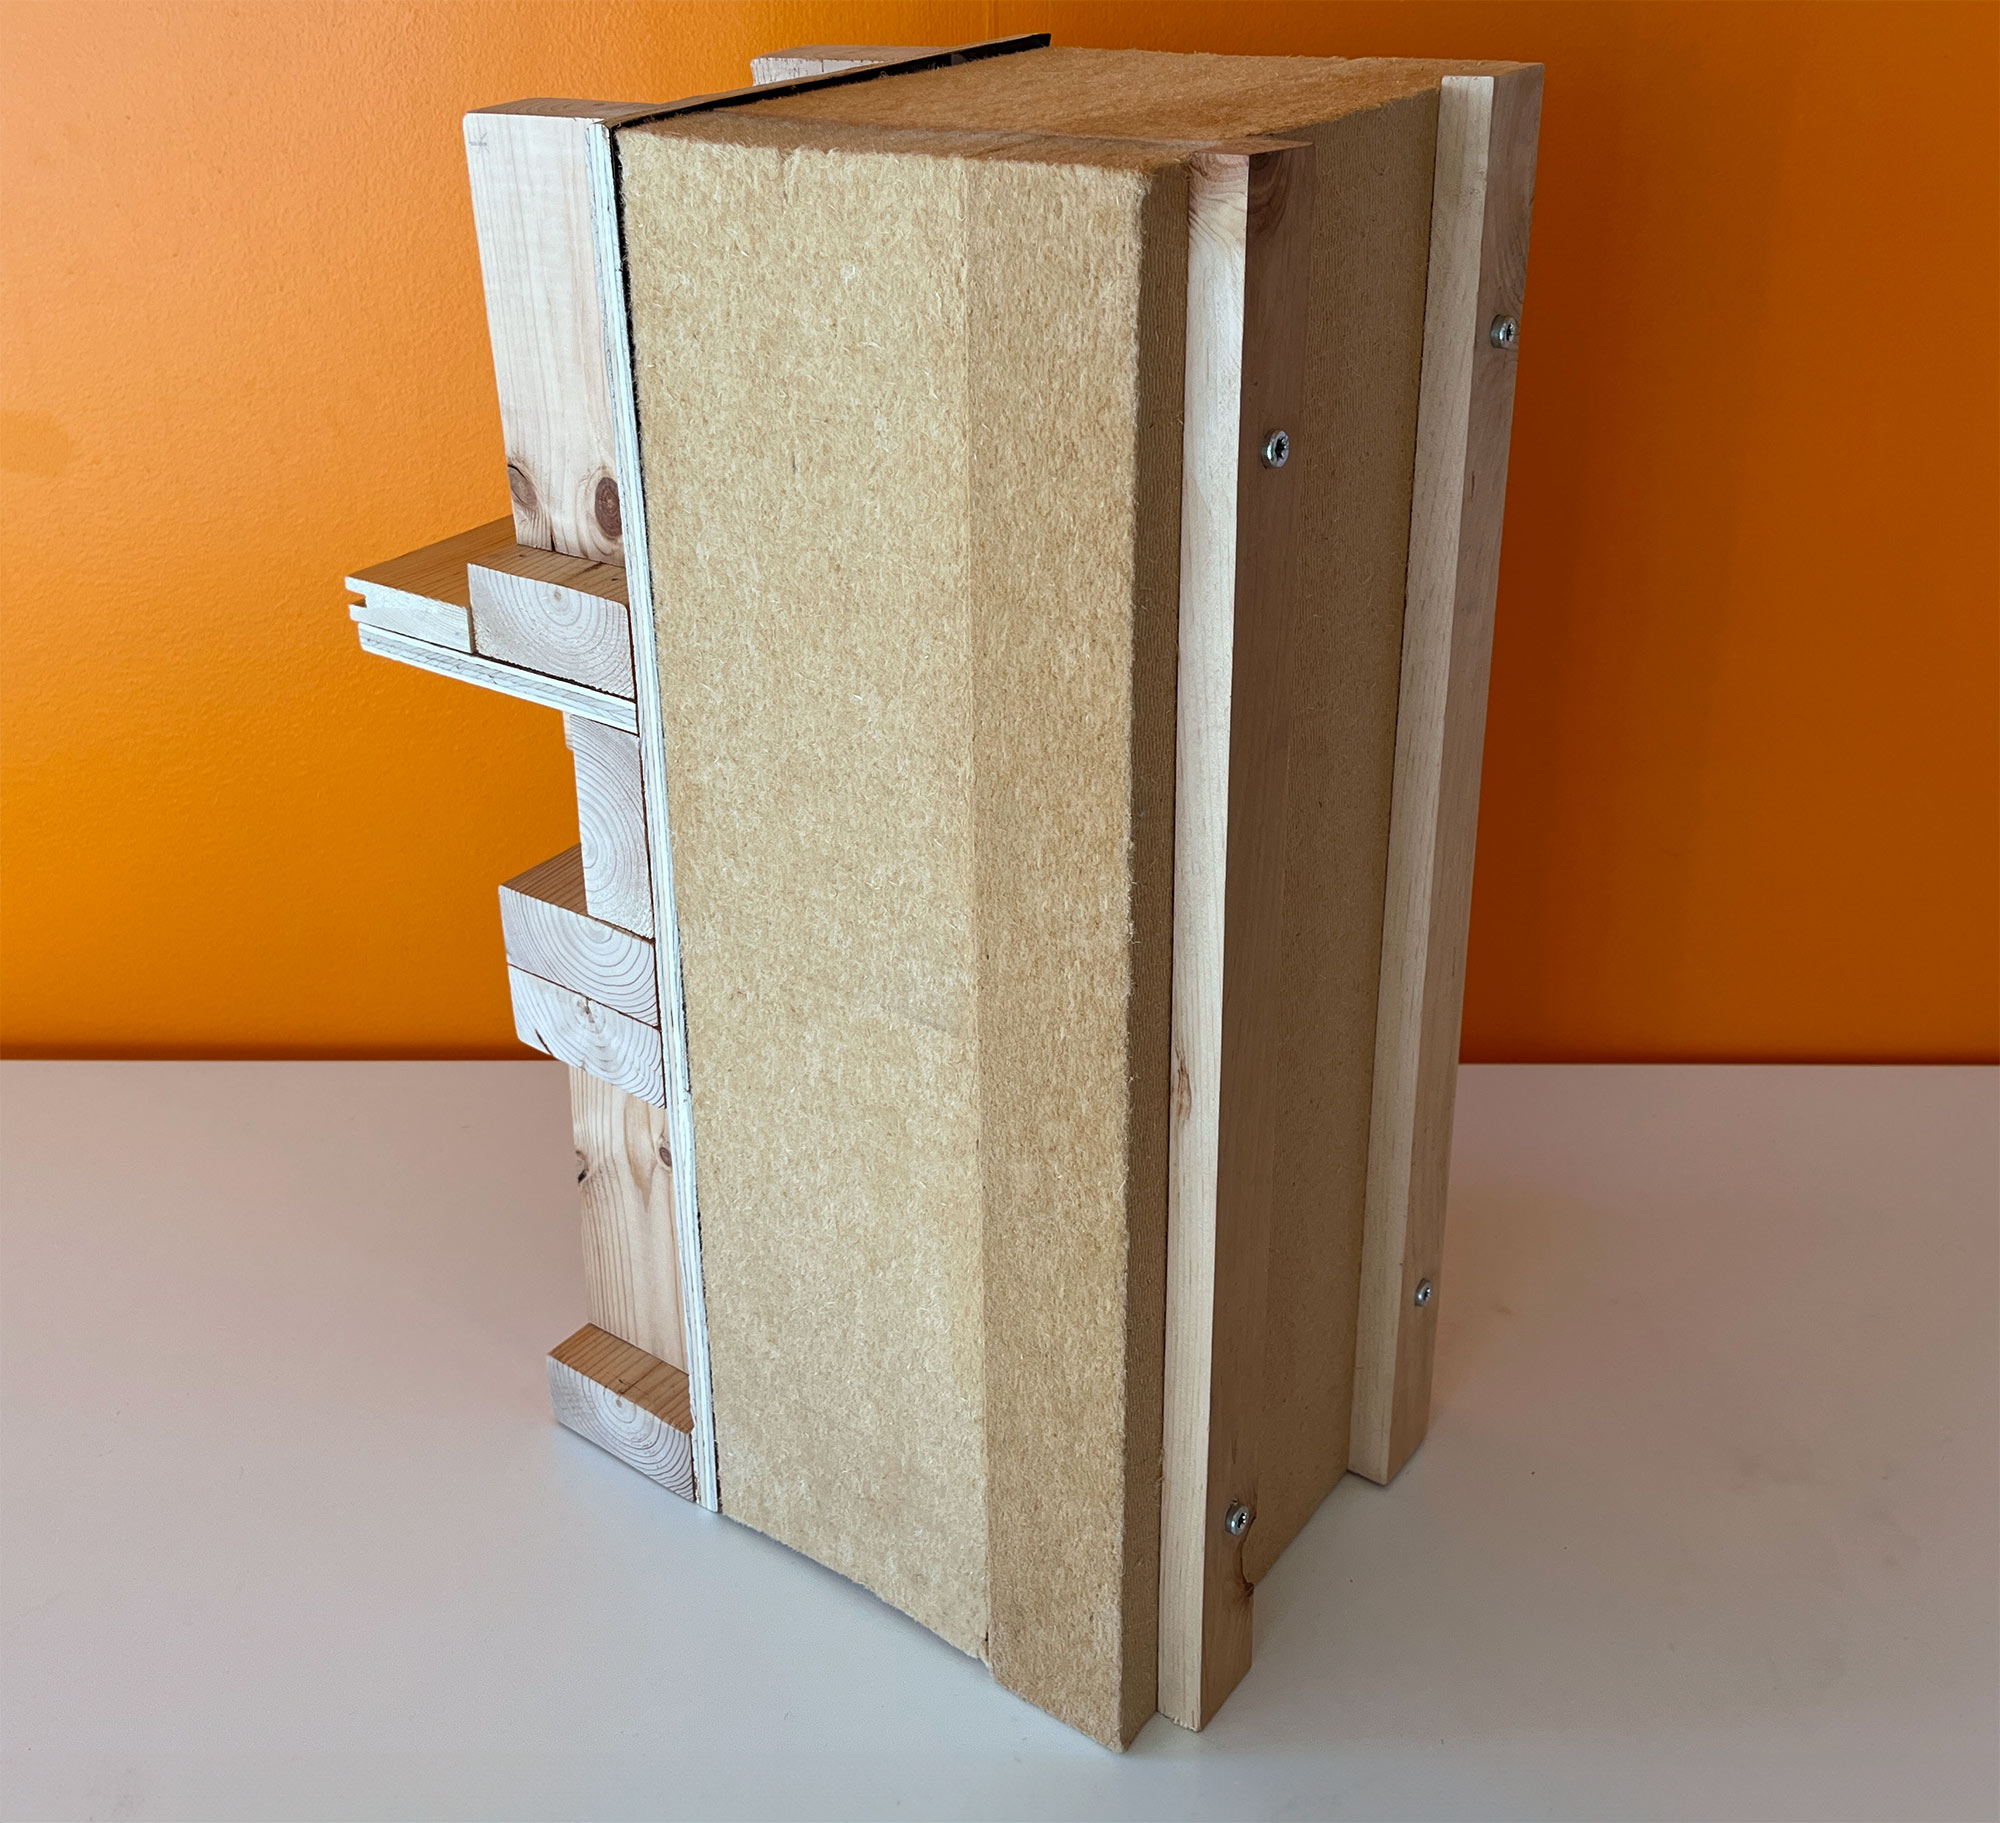
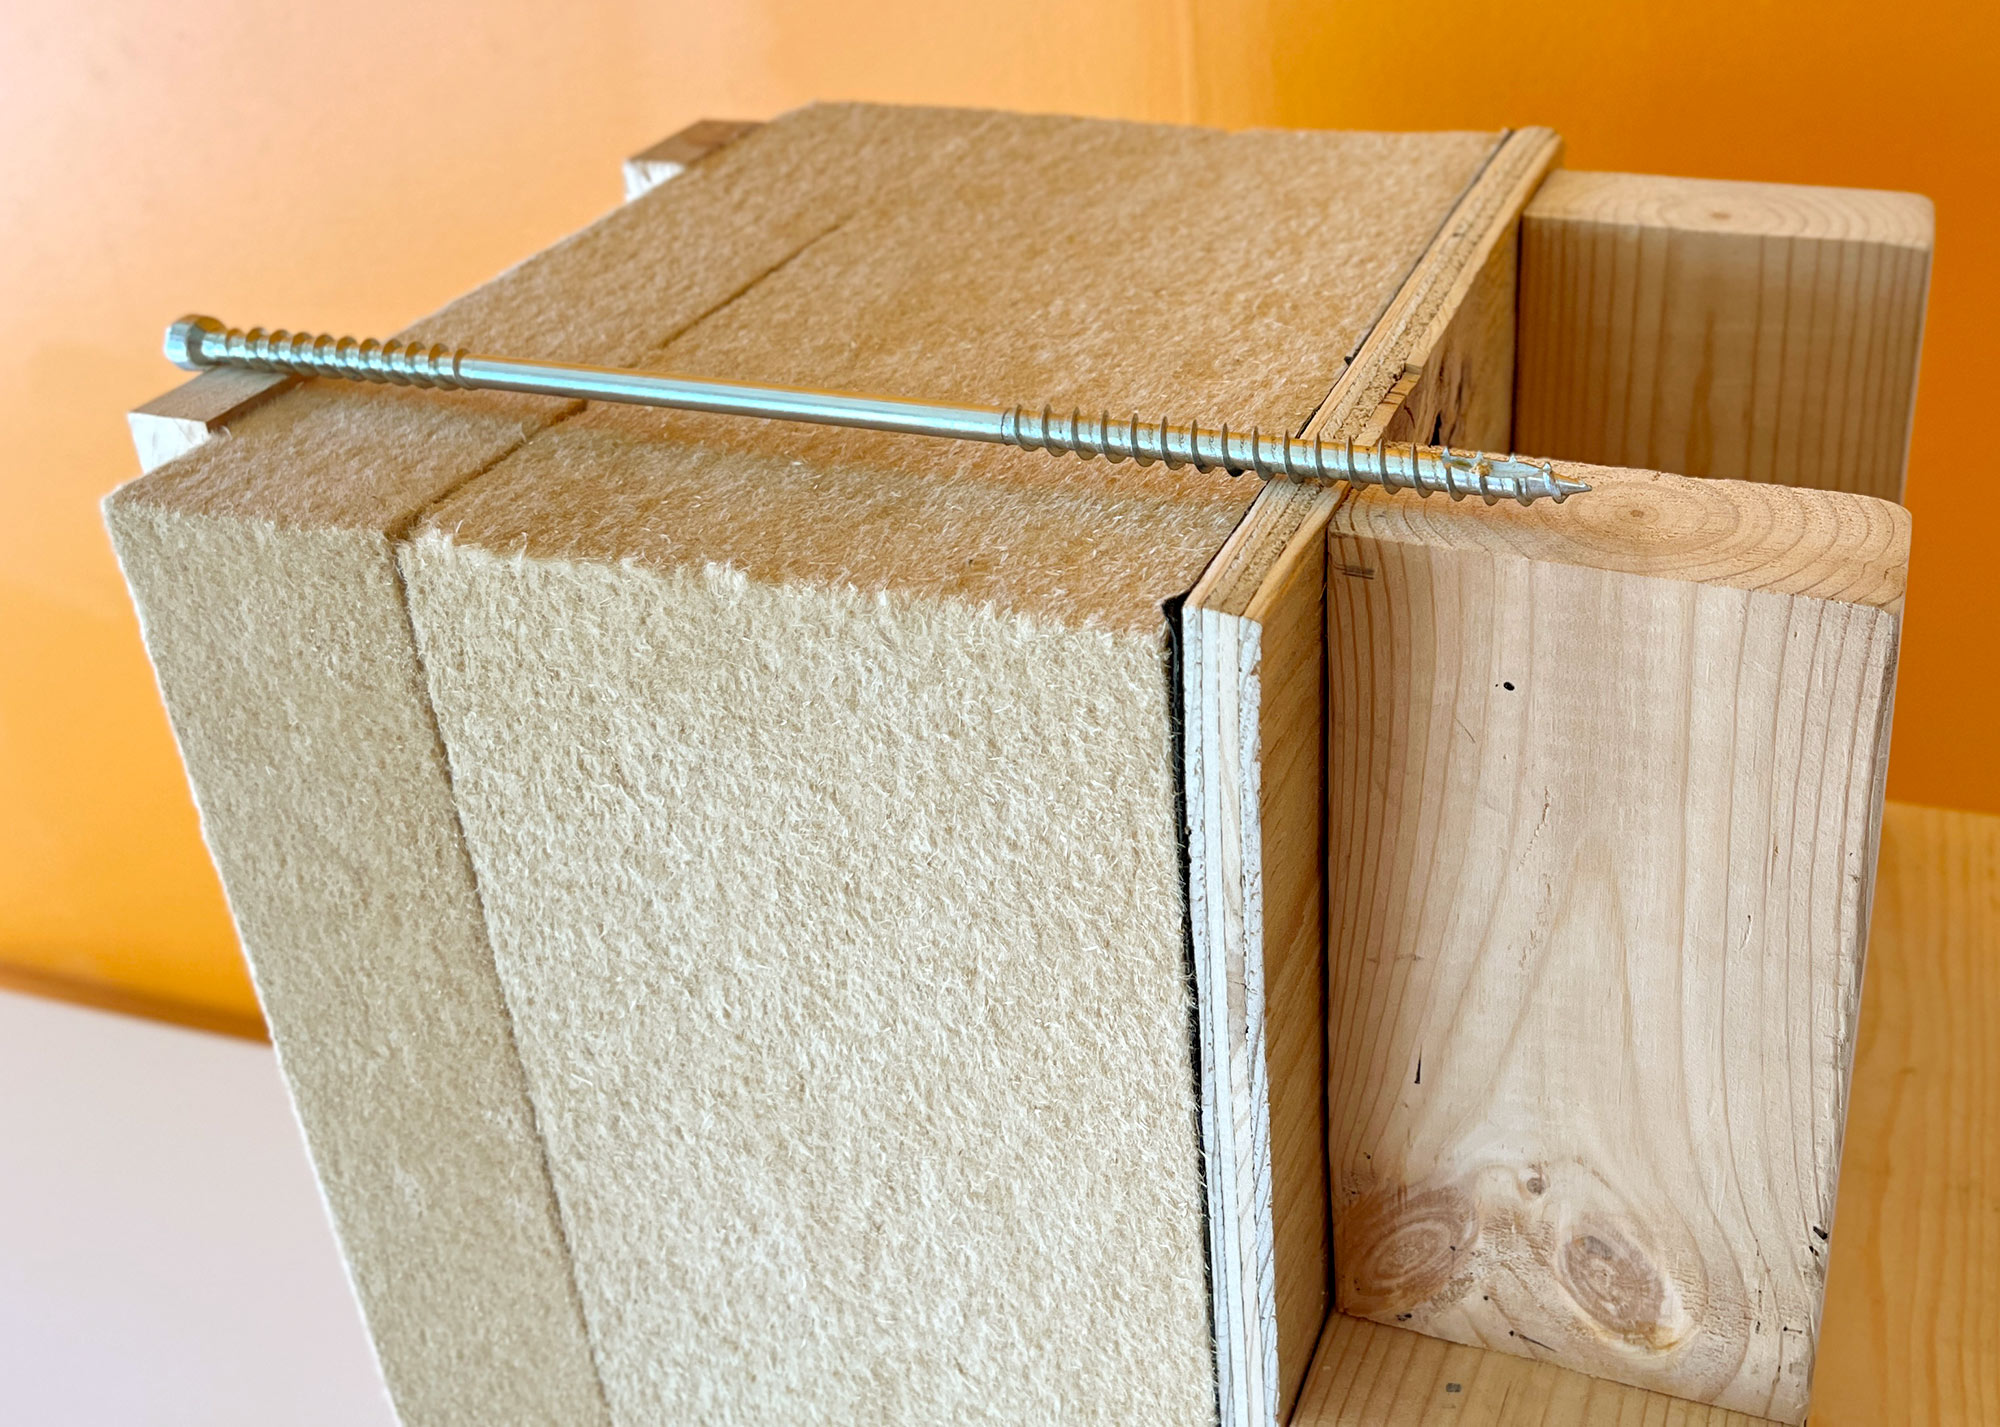
We created a 1:1 prototype of the wall to illustrate the concept:
The wall is composed of (from interior to exterior):
– Vapour and Air and Water Impermeable Membrane. There is only one membrane in the whole wall! (in our prototype it is Blueskin SA).
– 8″ of Continuous wood-fibre insulation (in the case of the 1:1 model prototype we created it is composed of 4.5″ of STEICO ThermDry and 2.5″ of STEICO UniversalDry insulation). In our view as architects, this insulation is both dense and water-repellant and thus acts as a secondary plane of protection, however some municipalities interpret the Ontario Building Code as requiring a further ‘Secondary Plane of Protection’ in which case a vapour permeable house wrap (stapled, not taped) such as Tyvek would be sufficient and cost-effective to address ther concerns.
– Steel long-screws with wood strapping (in our prototype it is Rothoblaas DGZ).
– A 3/4″ vented cavity (as narrow as possible to minimize risk of forming fire in the cavity — although this is dependent on the required strapping dimensions).
– Lightweight cladding of choice (metal, wood, fibrecement).
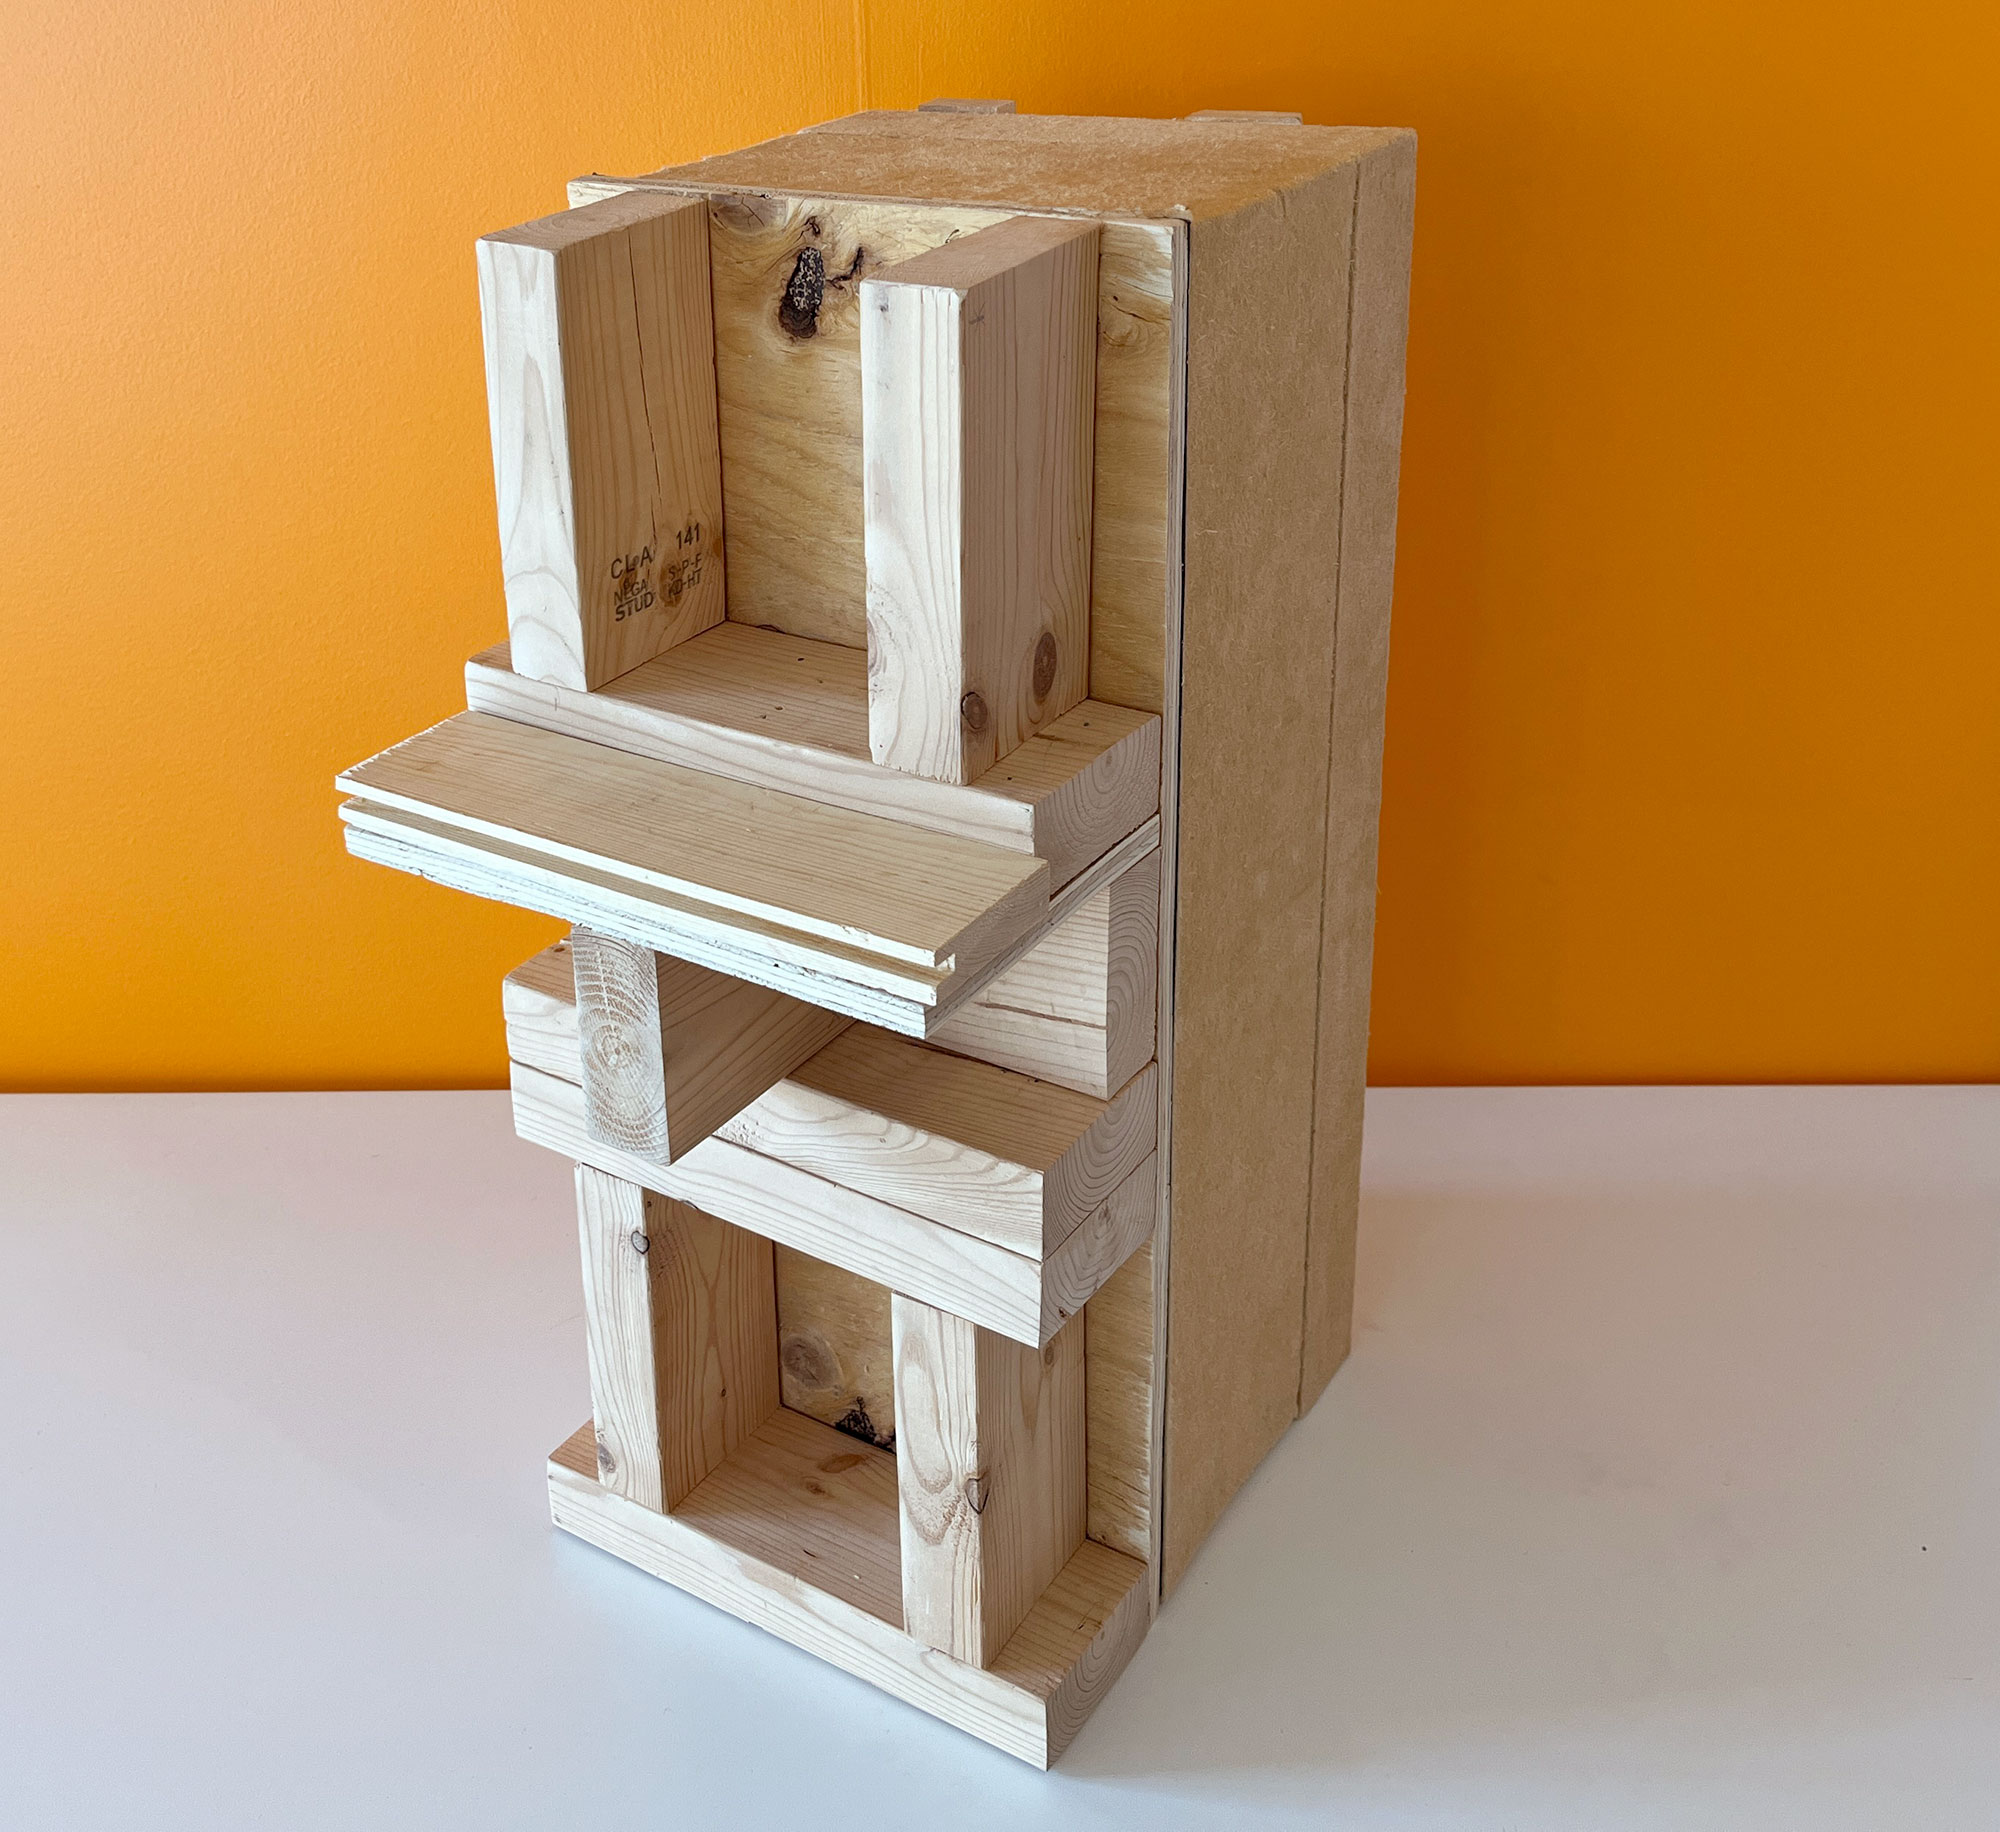
You can see the interior view of the wall below. We haven’t shown it with drywall. Some clients opt to use this wall with the wood framing exposed and painted white. Others elect to use the traditional gypsum wall board (drywall). Other opt for wood boards, or plaster.
You can see that the structure of the home (floor, walls, and roof) is all within the thermal, air, and vapour control layers — the structure is kept room temperature at all times. Any vapour which builds up within the interior or exterior of the wall can dry. The thermal control layer is 8″ of insulation with the only thermal bridges being the long-screws.
Below is a photo of the DGZ long-screw from Rothoblaas, and the two layers of STEICO woodfibre insulation. This same wall wood also work with the rigid mineral wool insulation (such as Rockwool Comfortboard). You can see the Blueskin SA air/water/vapour membrane, and the 2×4 studs.
Now, woodfibre insulation is not that common in North America at the moment, but it seems to us that there is a lot of potential for it to become commonplace.
What is woodfibre and what are its benefits?
“Woodfibre insulation is a safe, natural, and high performing insulation alternative to other common synthetic insulation options.”
Woodfibre boards are typically made from waste woodfibre that is collected from sawmill factories, which is then heated and pressurized to form modular boards.
The thermal insulation and storage properties of the boards are ideal for use in a wide range of construction, including as continuous external insulation
Other benefits of using wood fibre insulation include:
Low-toxicity
Embodies carbon
Good thermal insulation
Fire resistance – a char layer forms on the outside protecting the inside. Vapour permeability
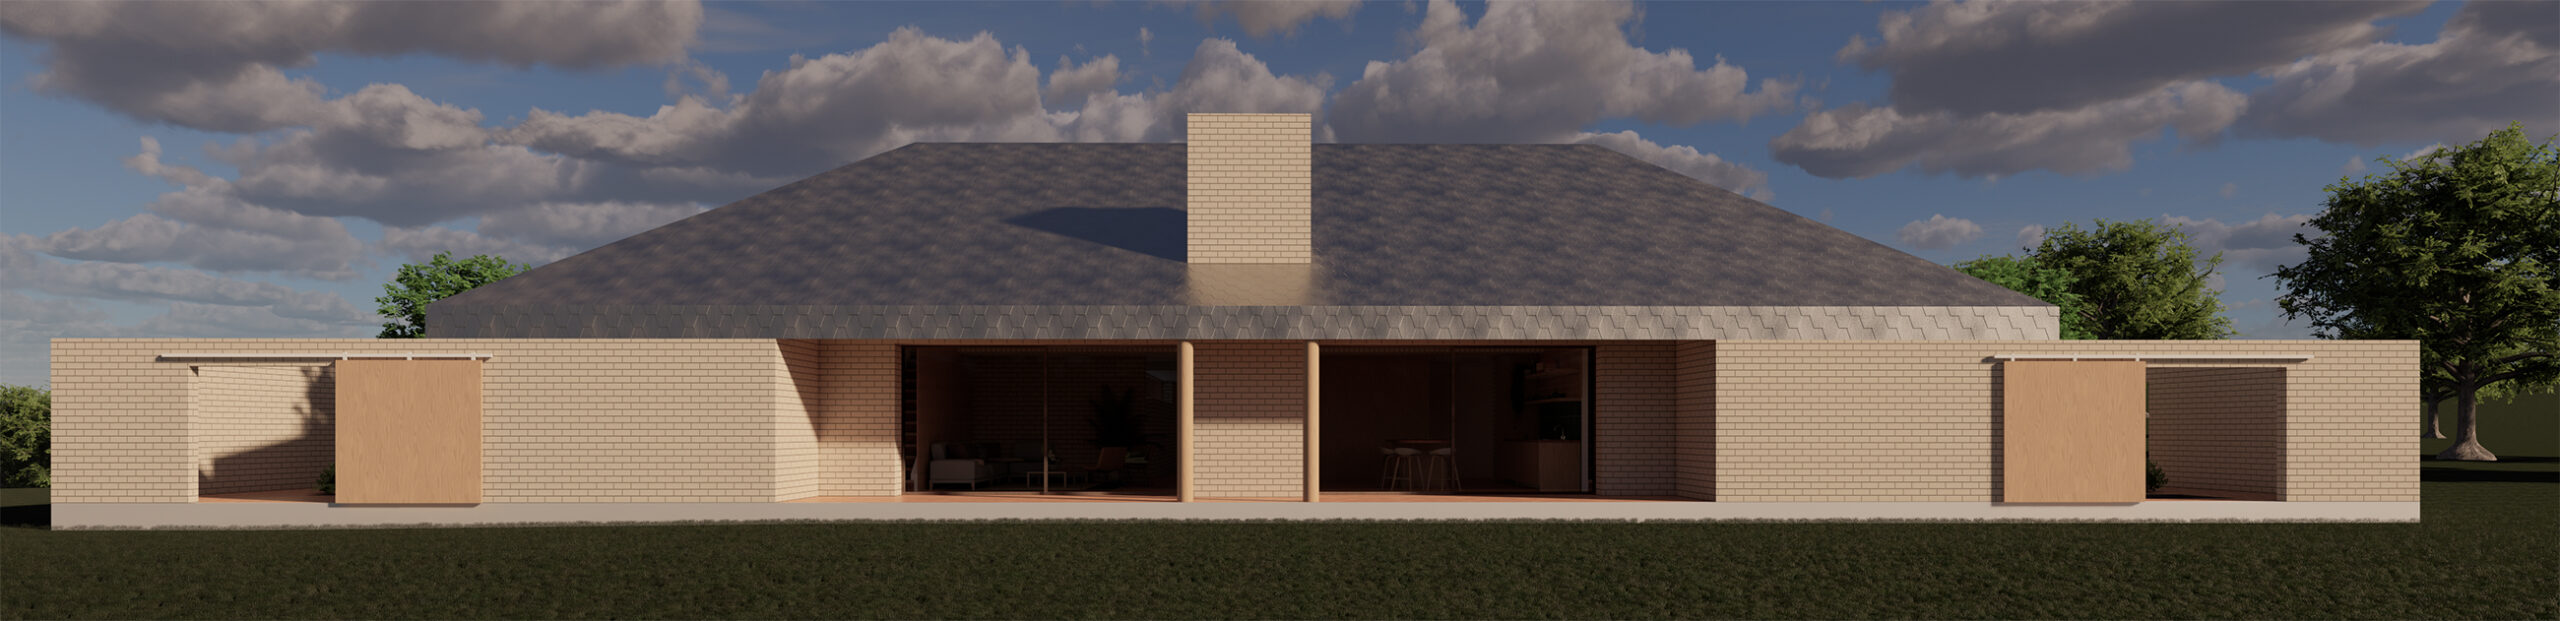
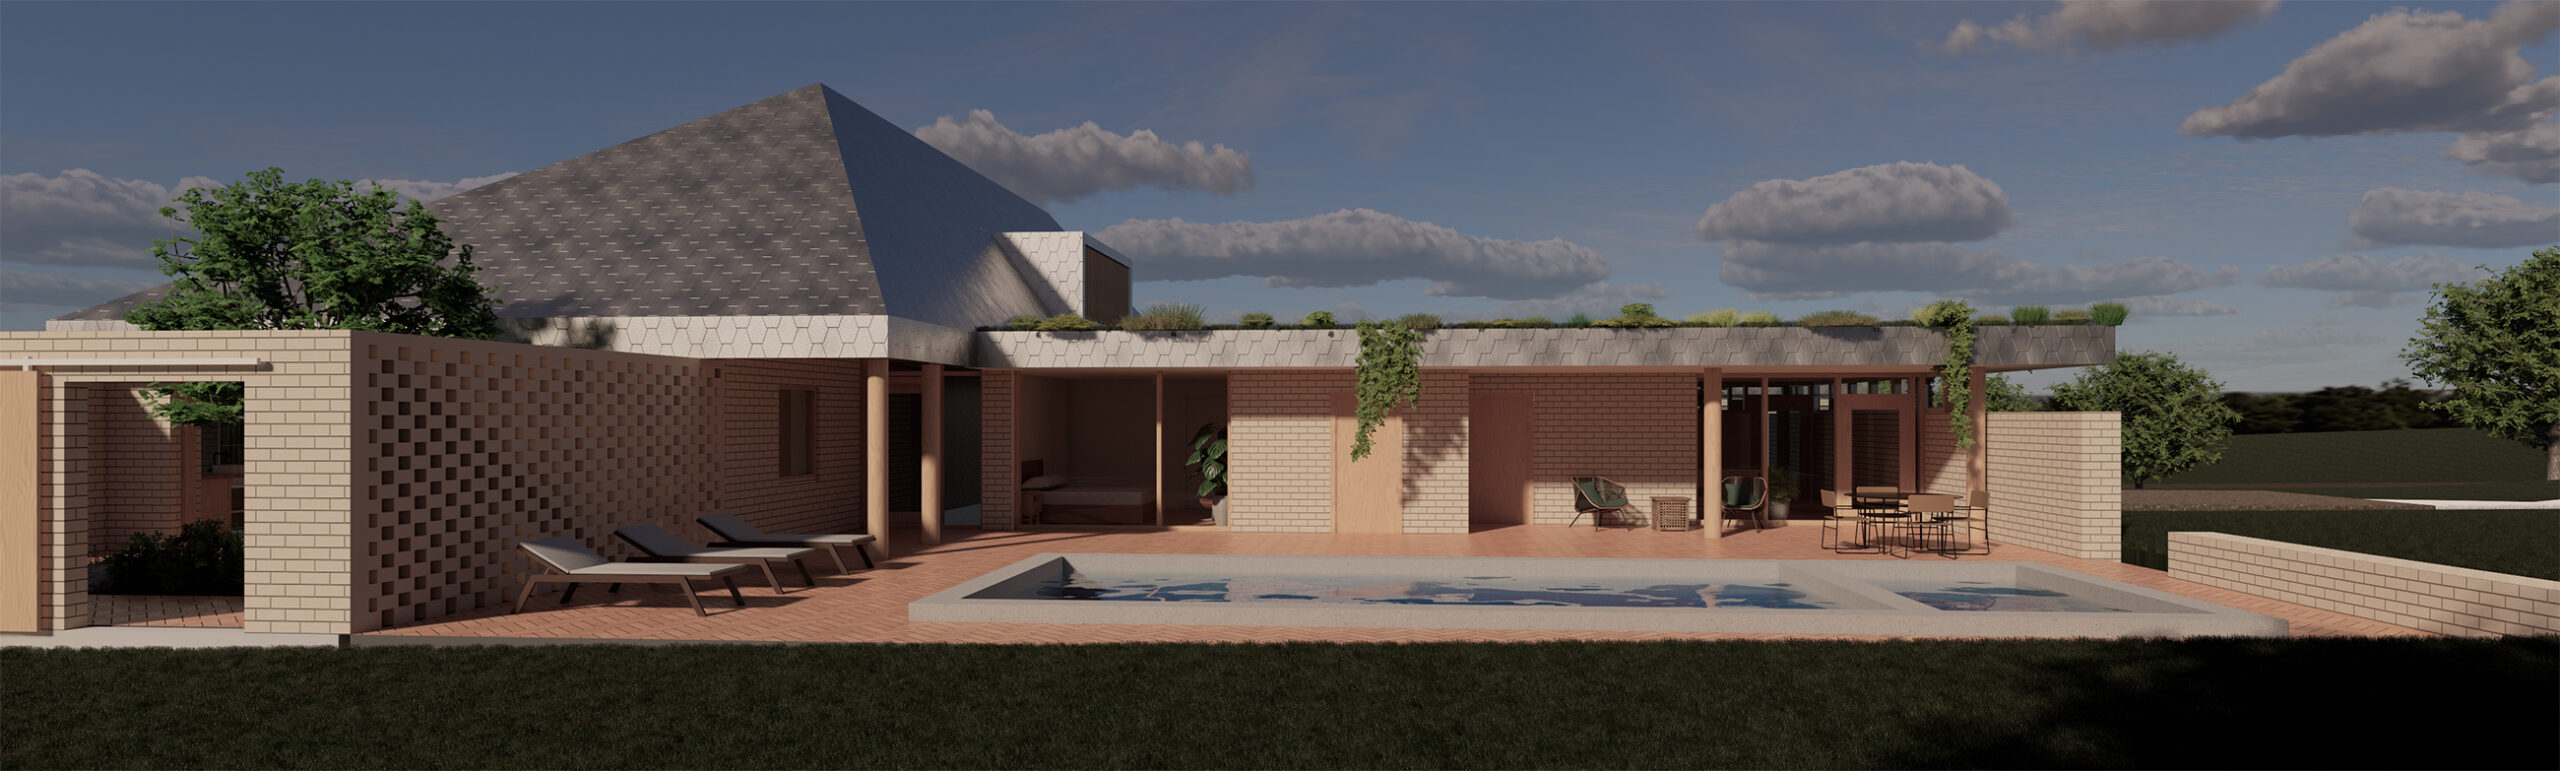
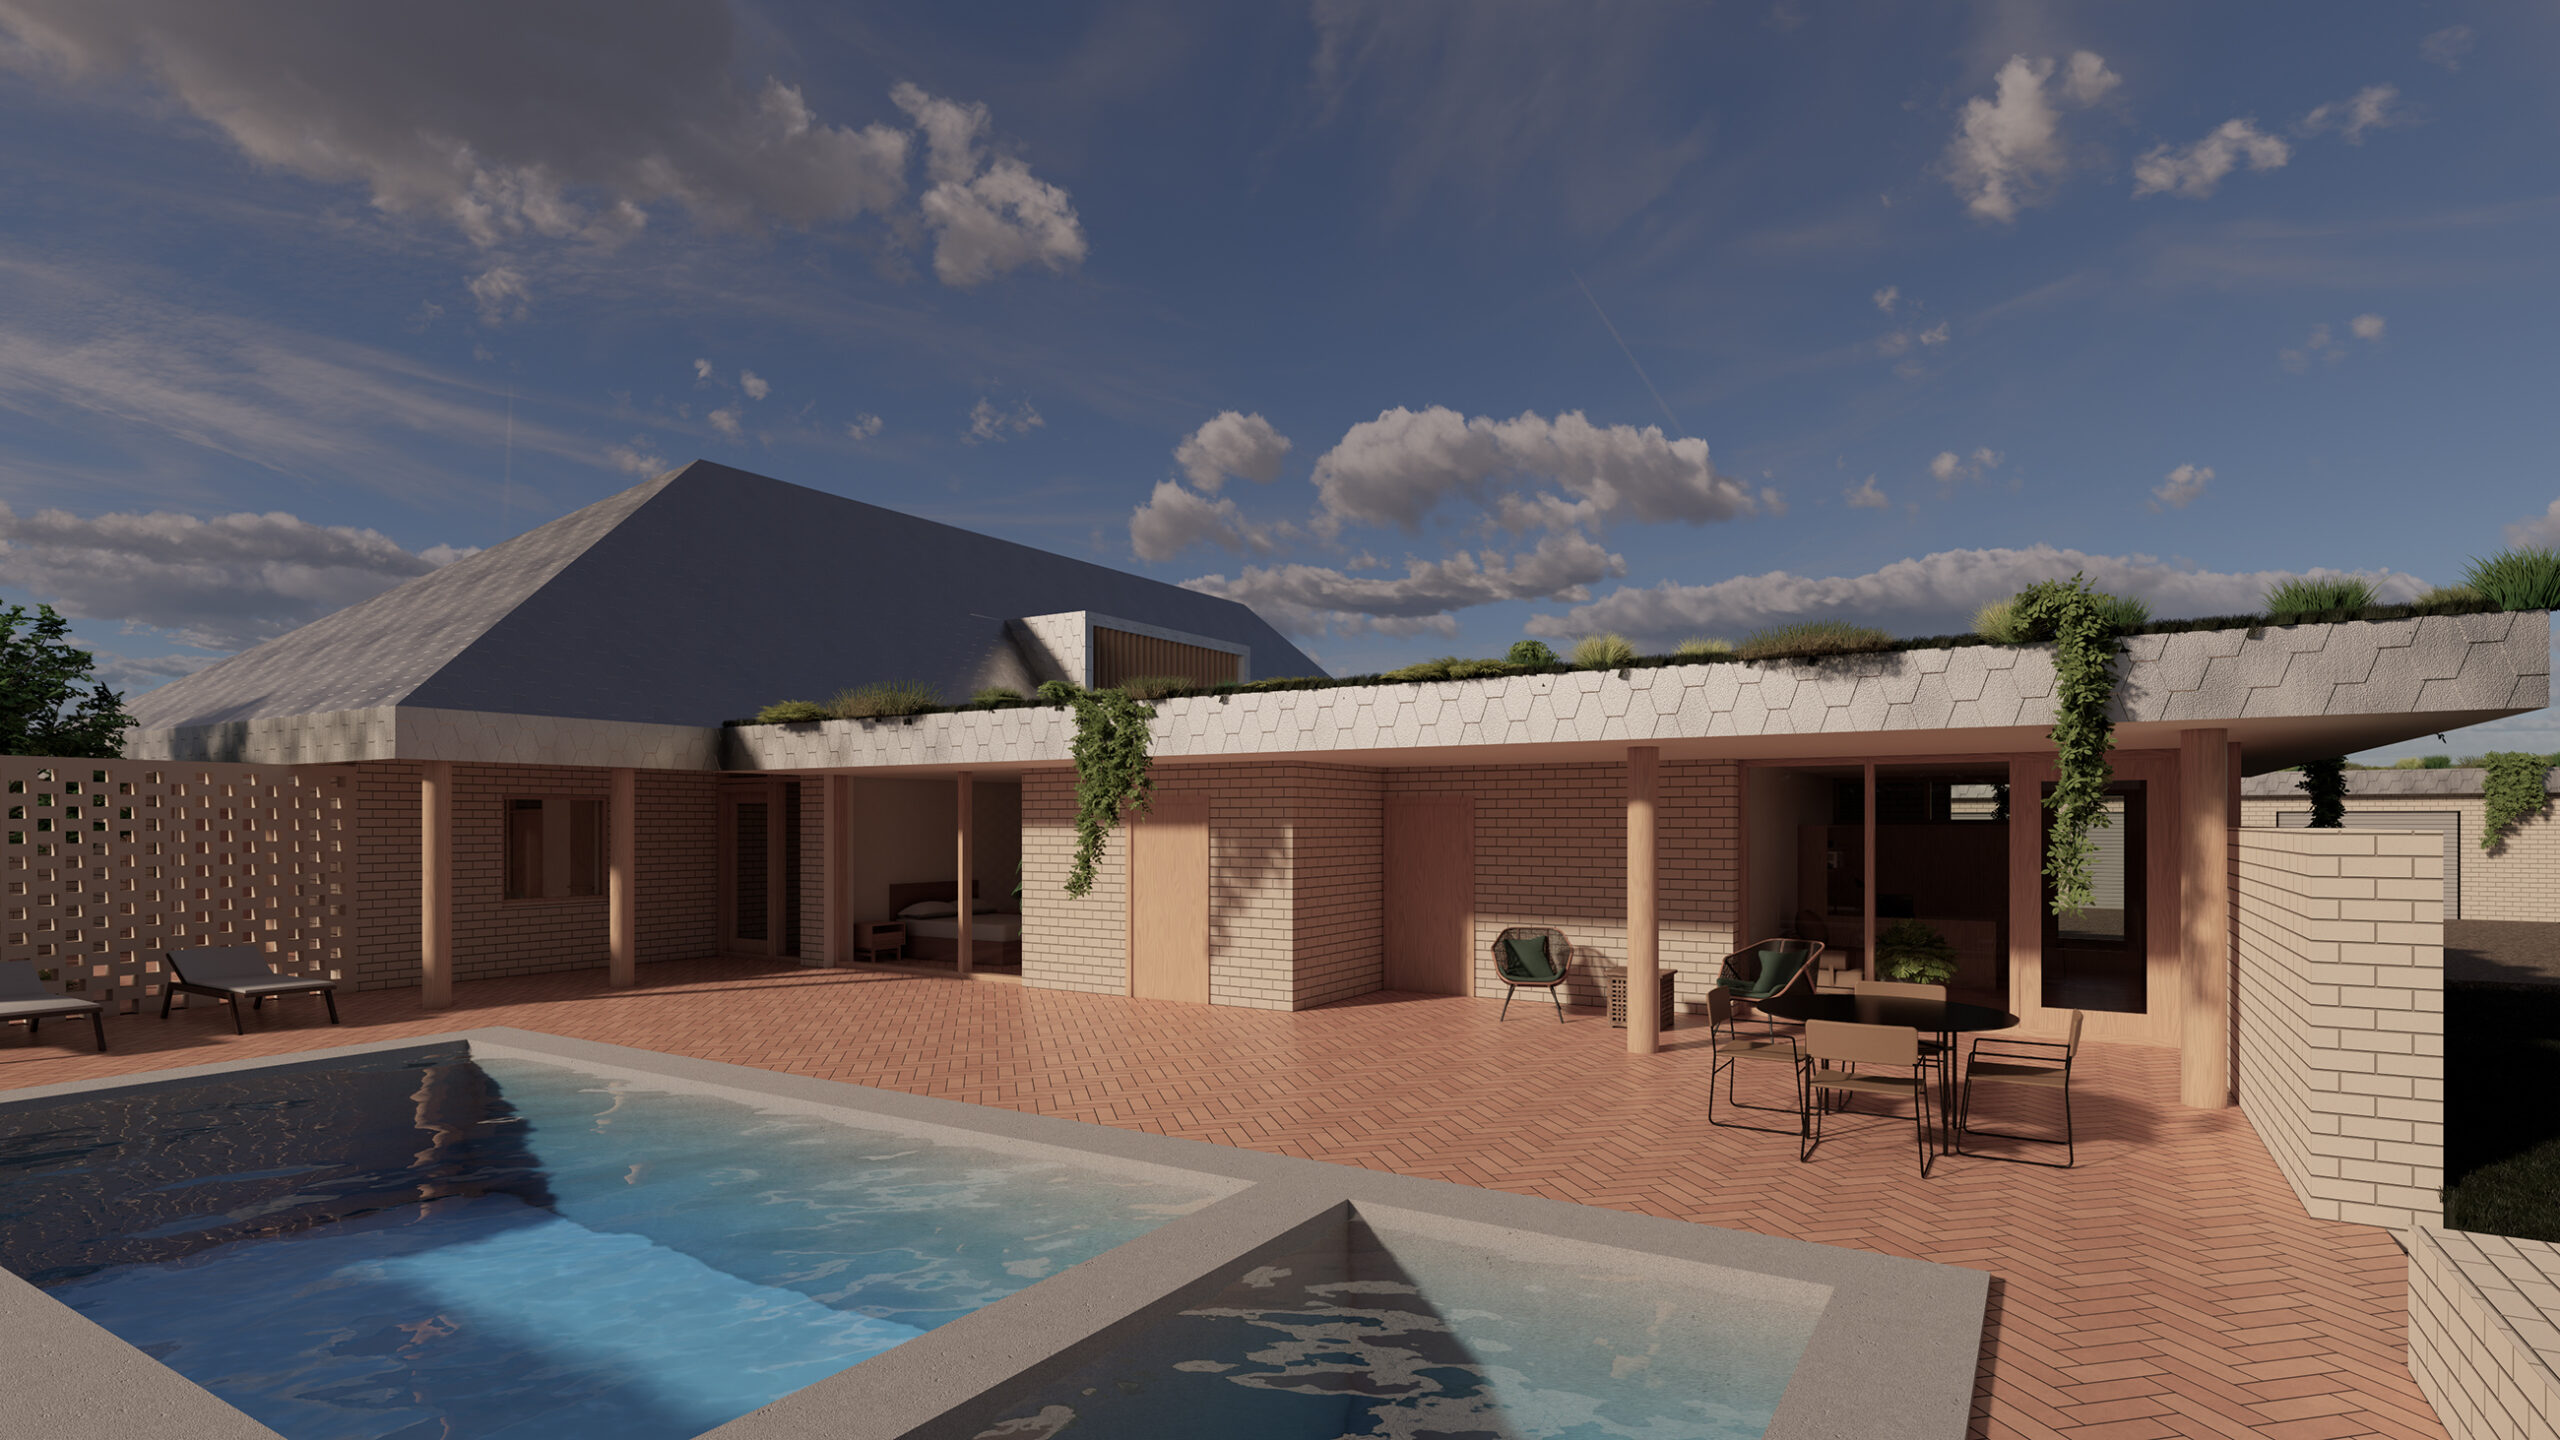
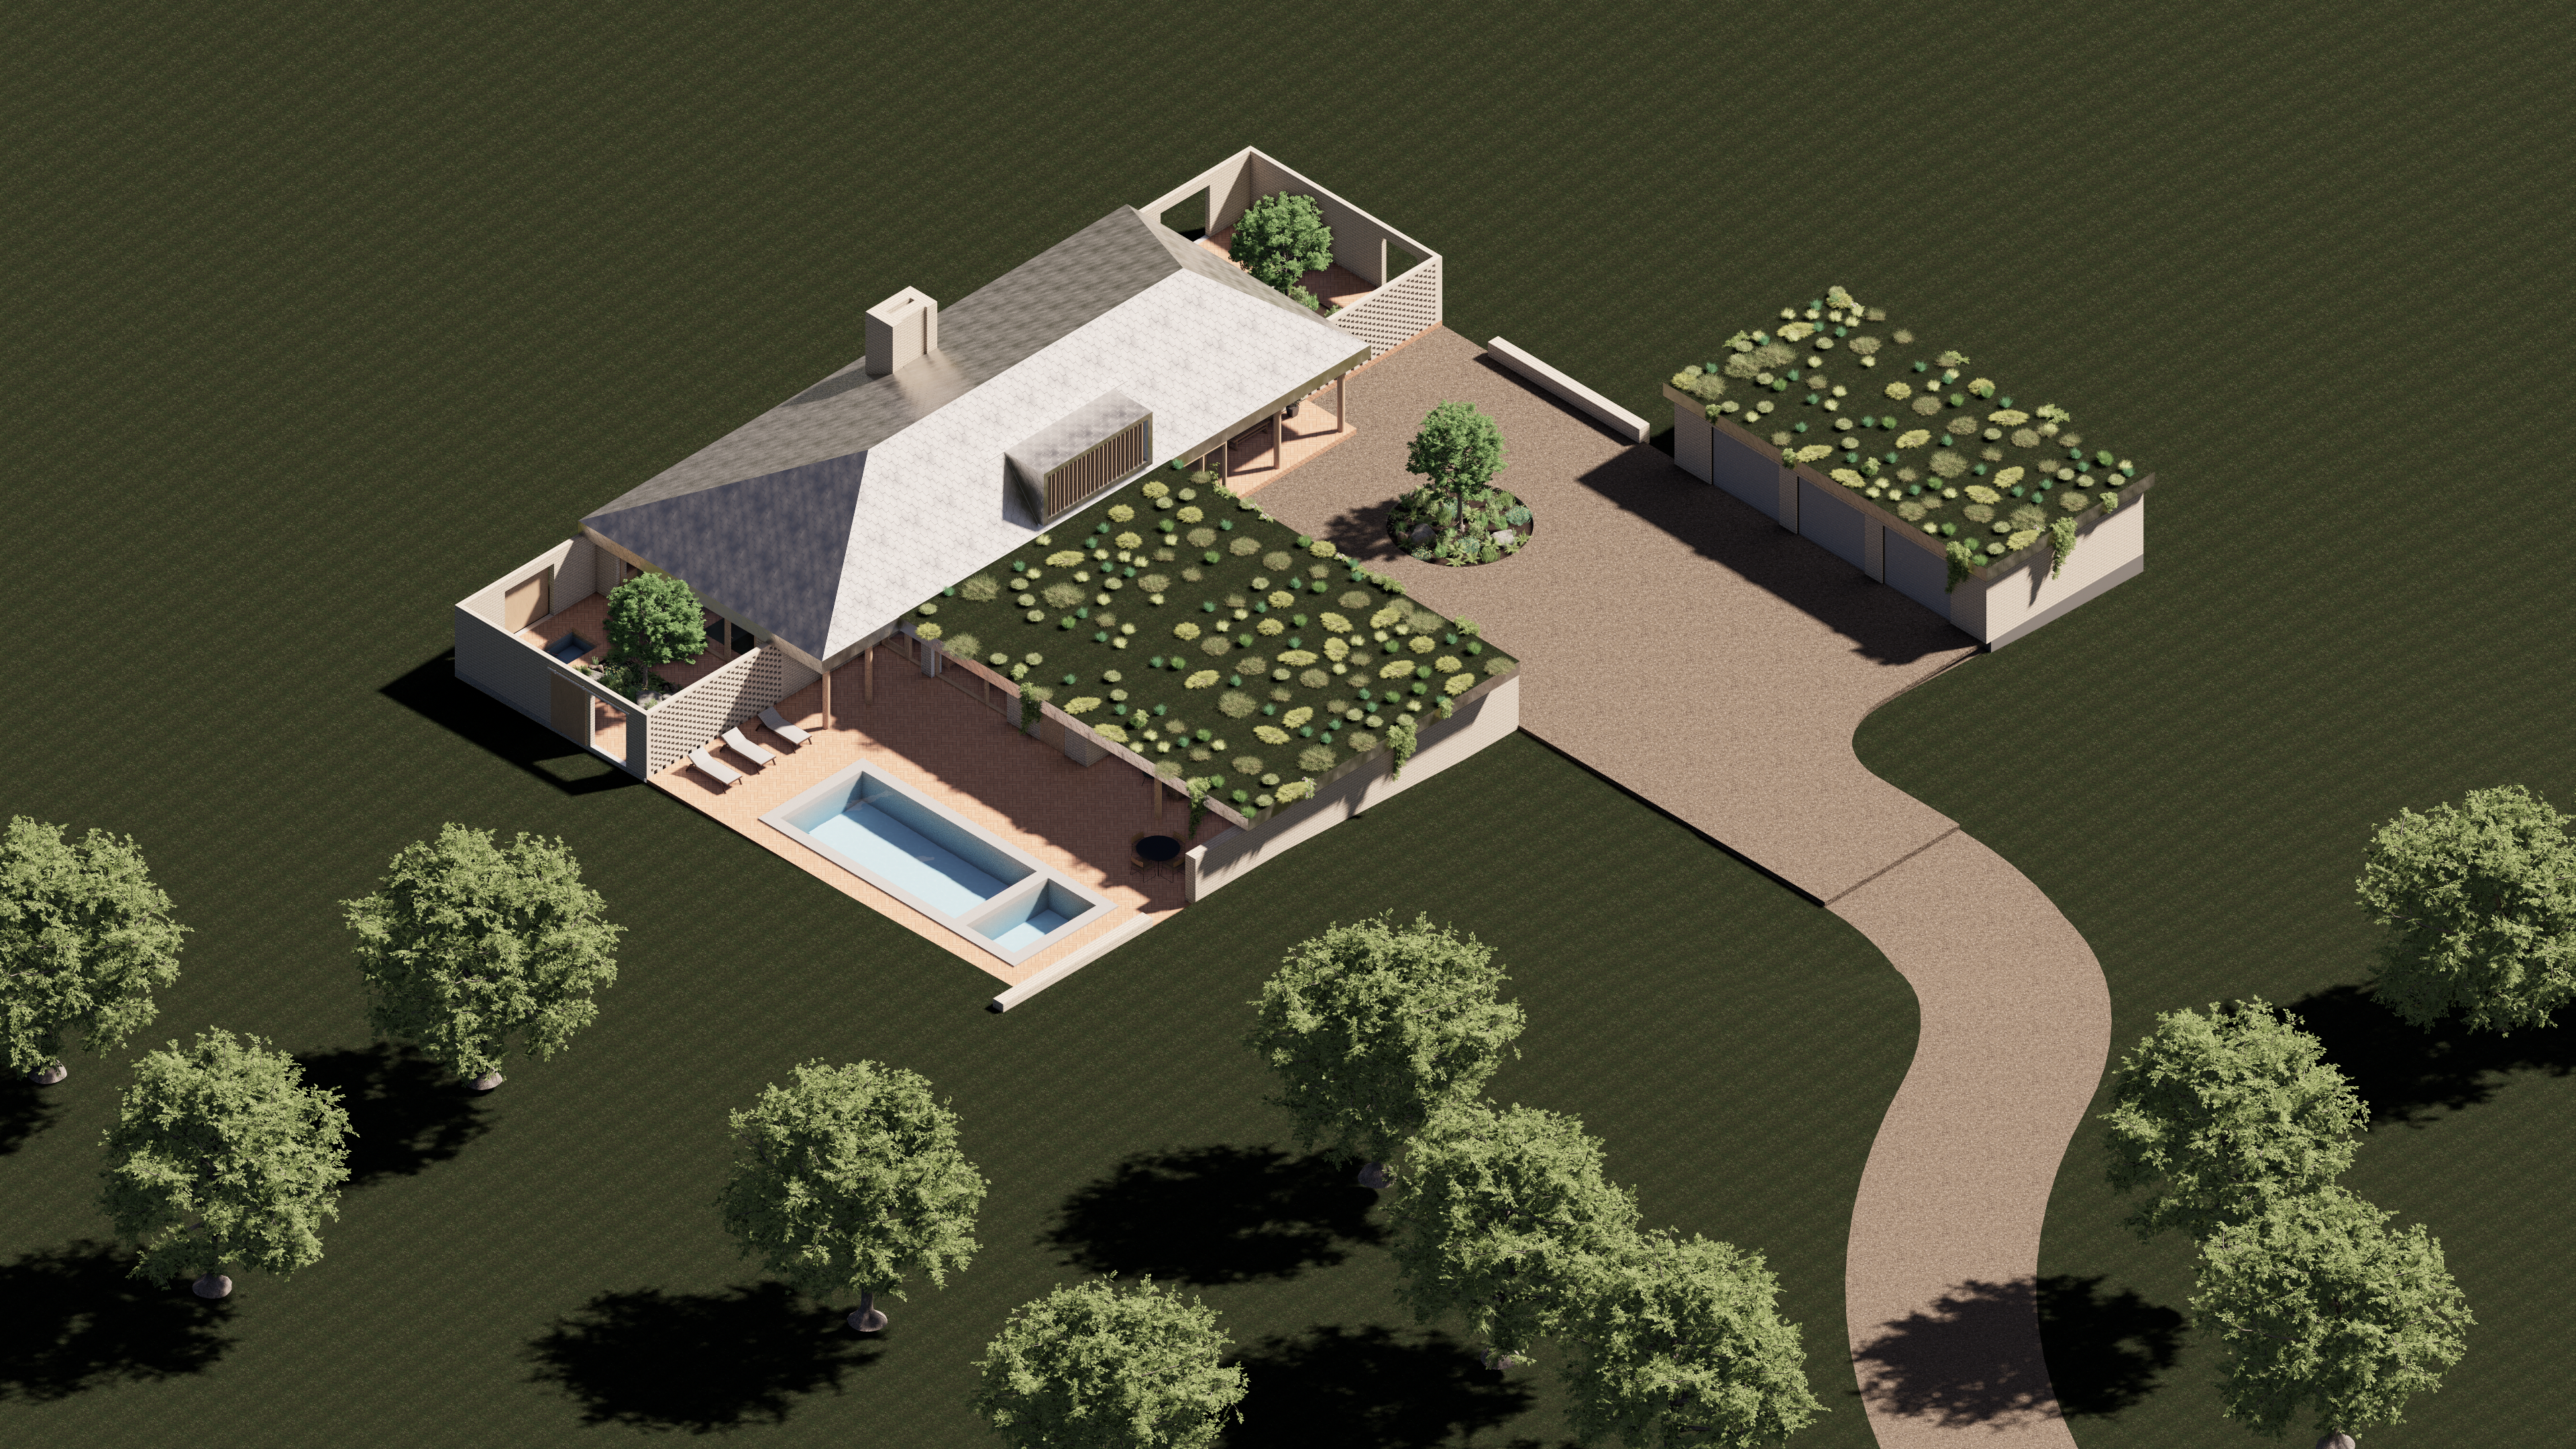
We are delighted to share the first round of design images of a new home proposed outside of Caledon, Ontario. The house is situated at the crest of a paddock overlooking a field, barns, valley, and forest. Trees surround the paddock, and the whole area is connected by many walking trails. The client wants to keep a deep connection to the earth with the use of natural materials, choreographed views out to the paddock and surrounding forest, and courtyard gardens to create a variety of indoor and outdoor spaces.
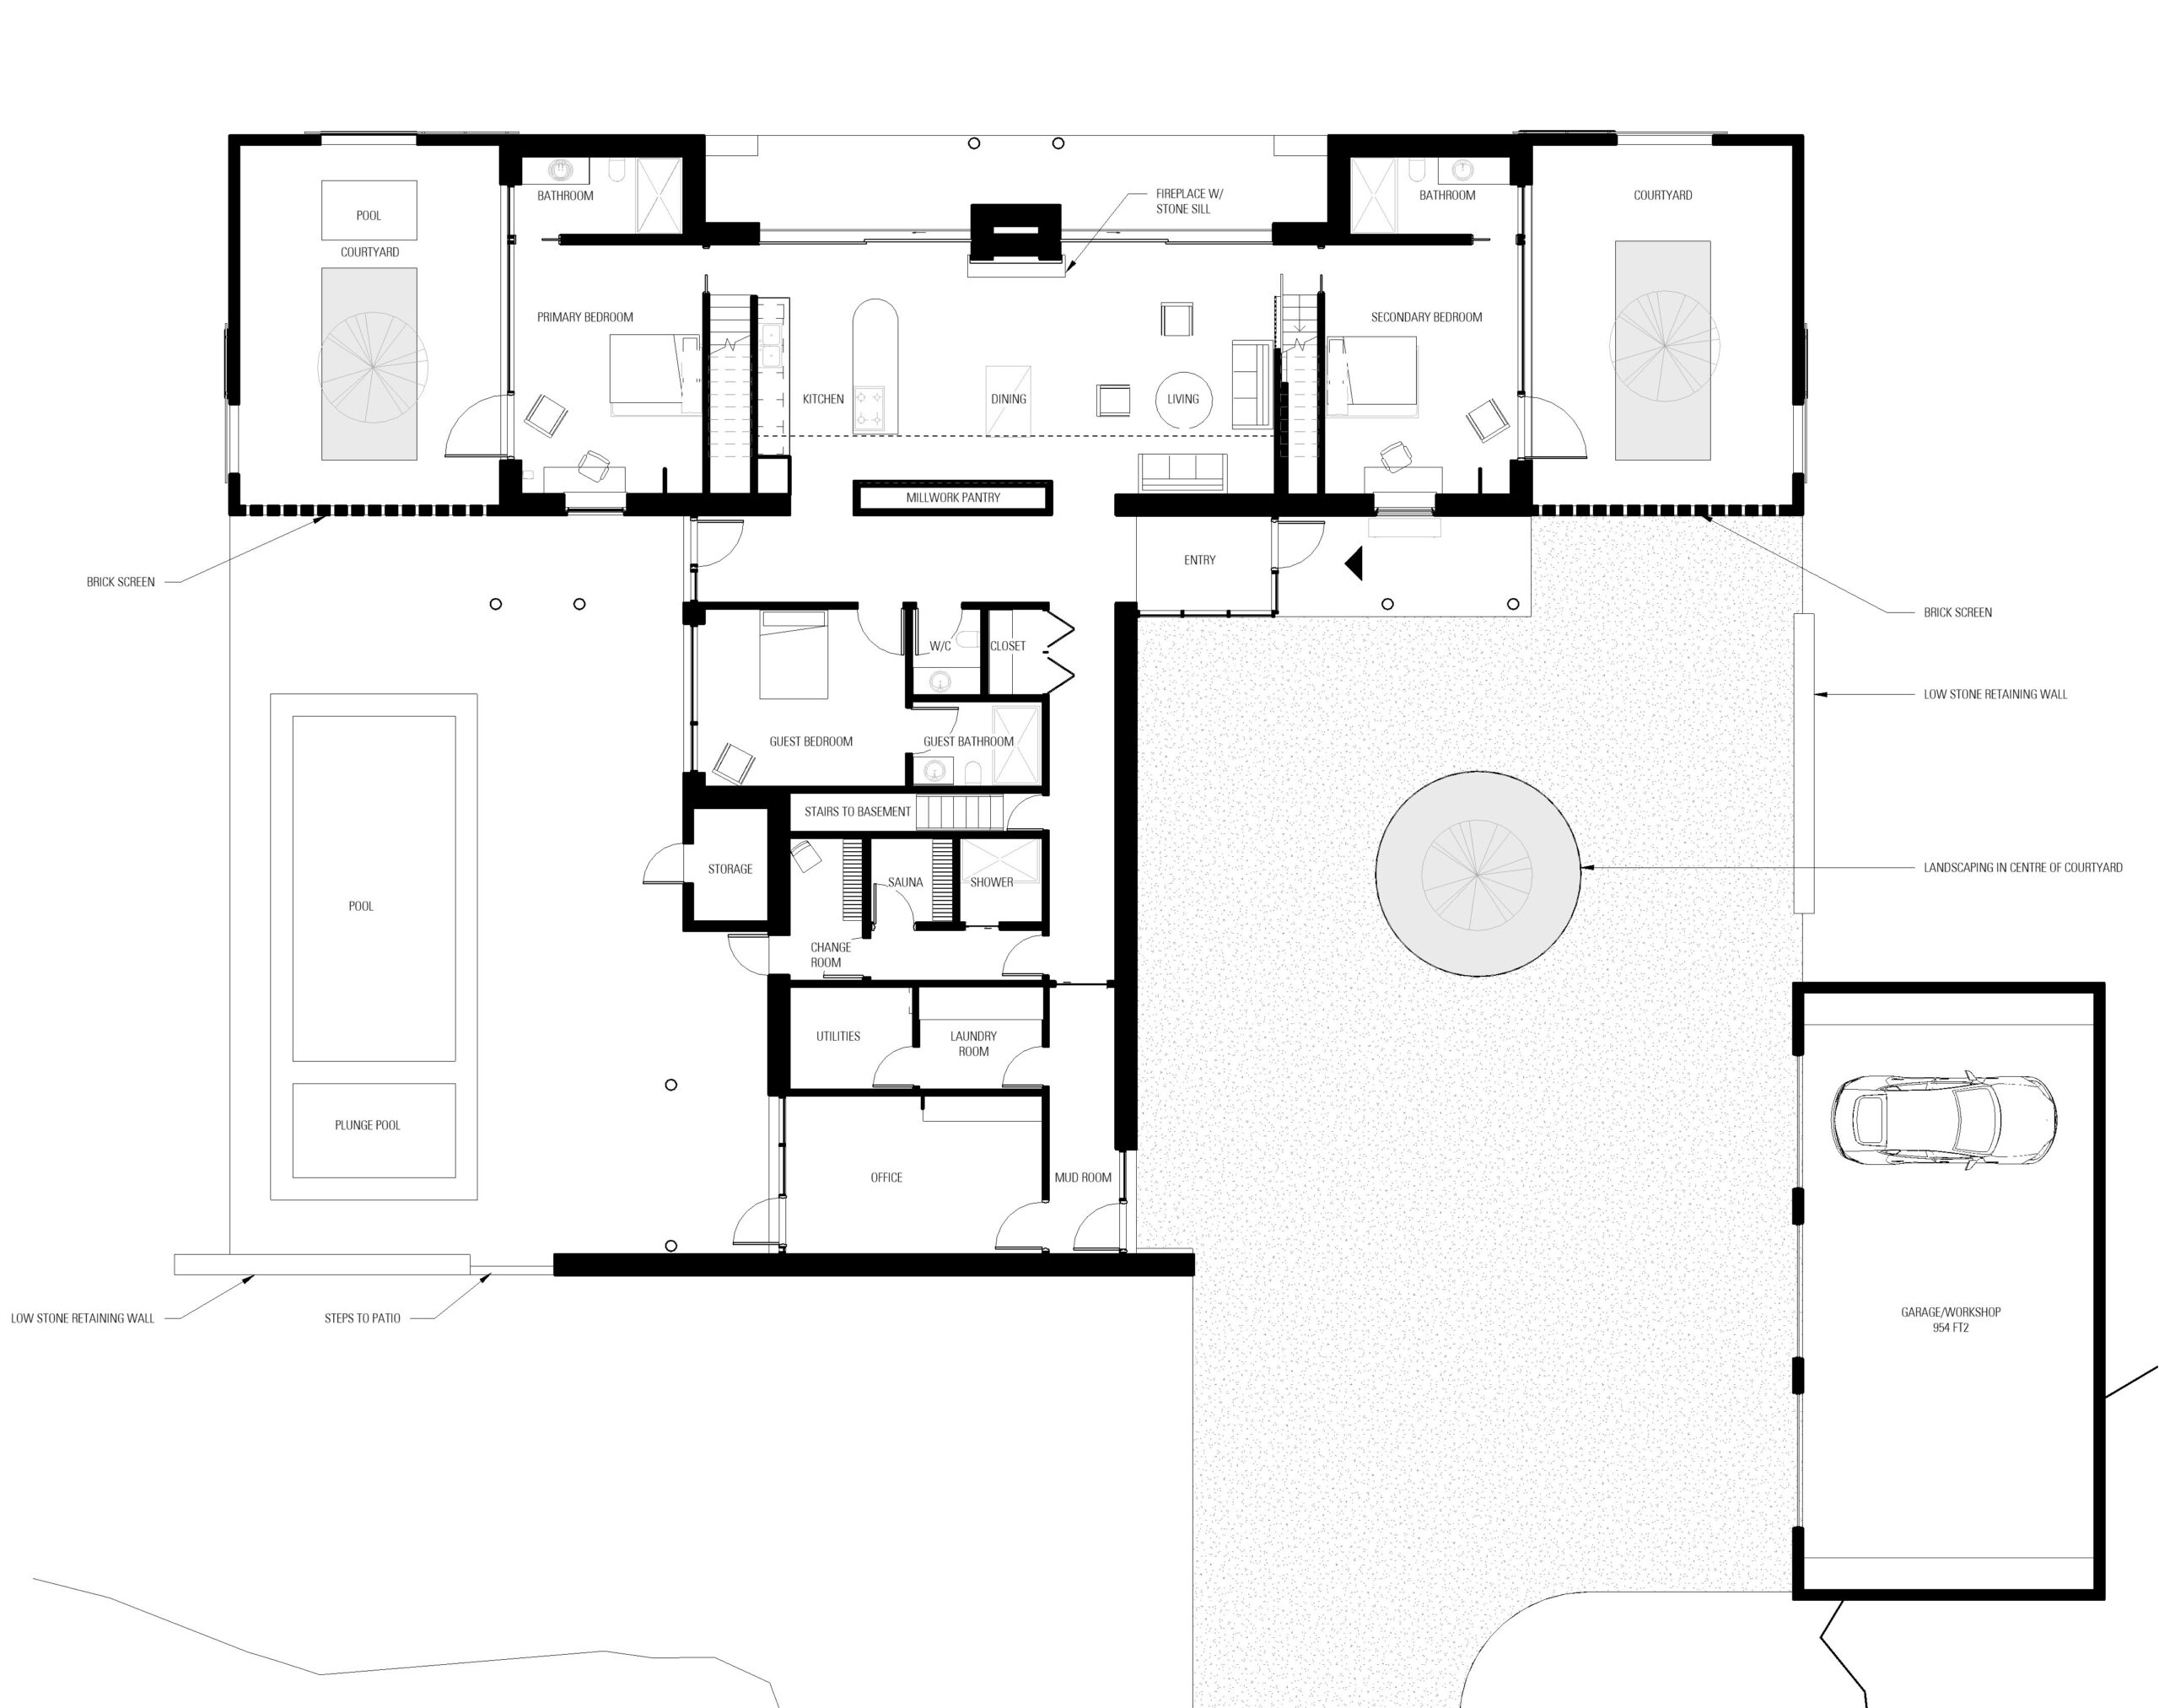
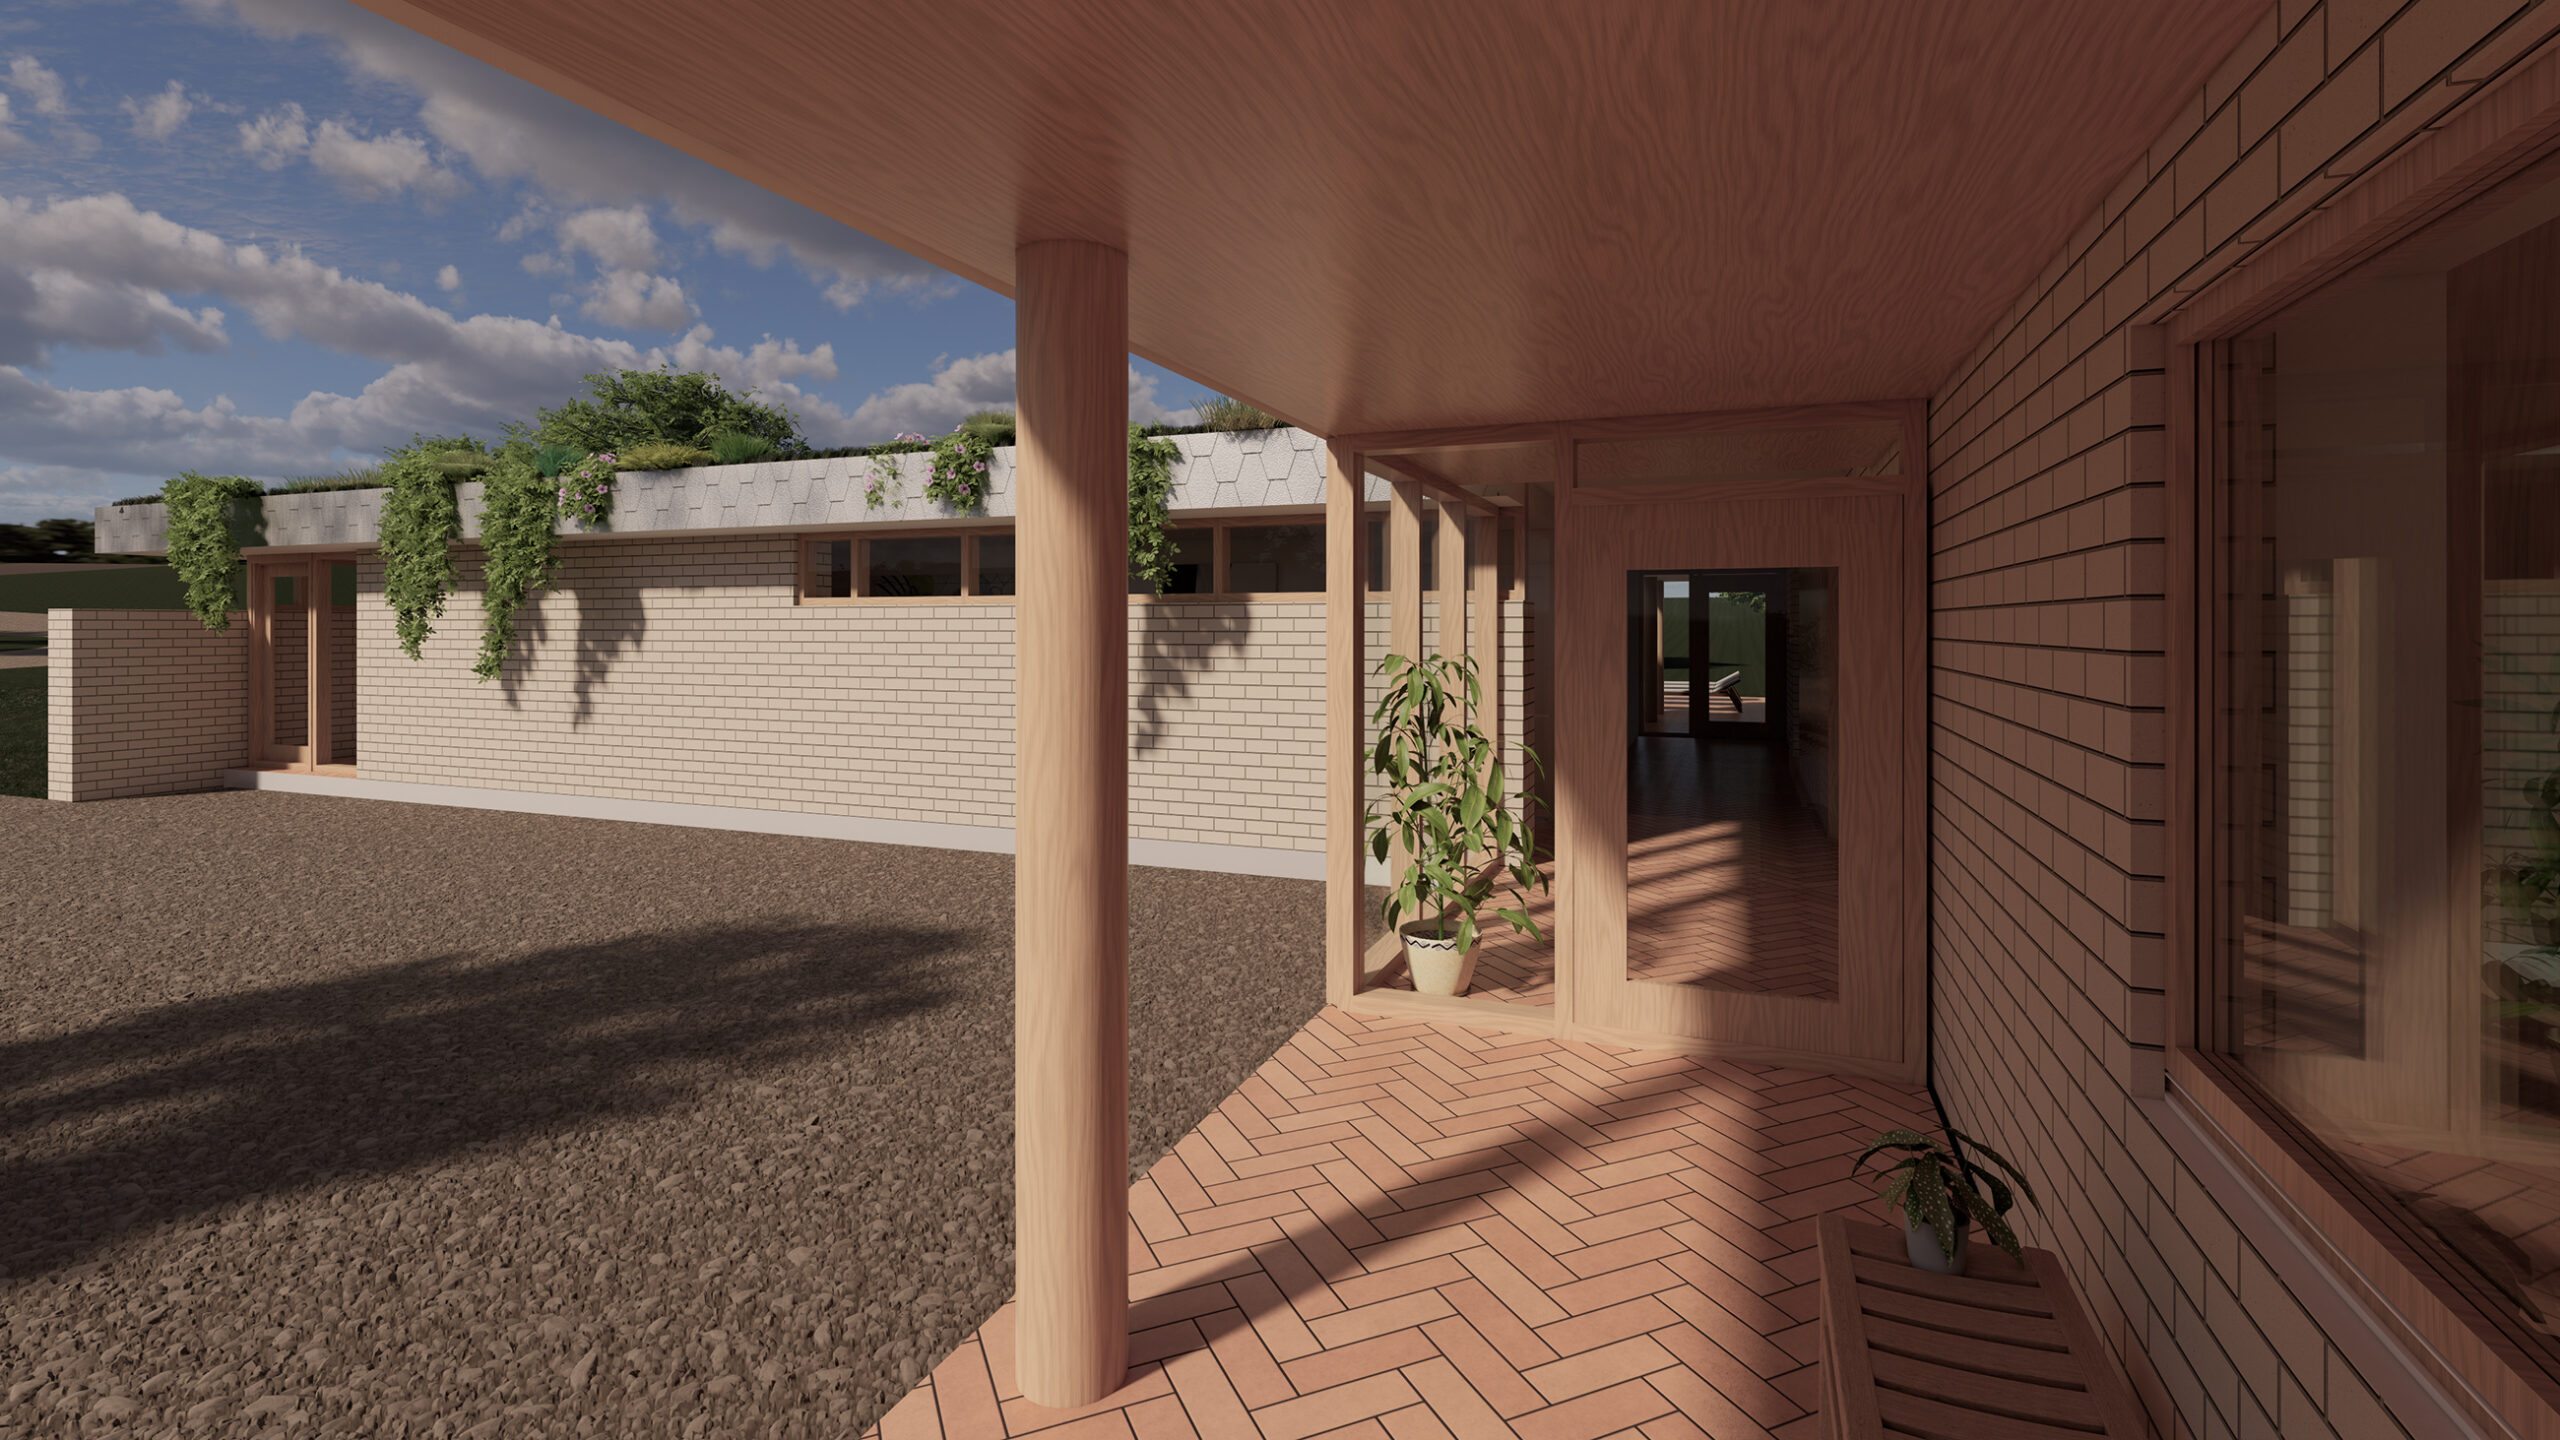
The design process focused on thinking of the sequencing of approaching and using the home. Courtyards have been used in the entry sequence, pool area and bedrooms to provide levels of privacy and contact with the forest and nature. The layout of the house is split into two “bars” of space. The main home, which consists of the main bedrooms, kitchen, living and dining spaces and the second bar which provides additional services for the occupants like a sauna, office and guest spaces. The entry corridor splits these tow bars and provides circulation between spaces.
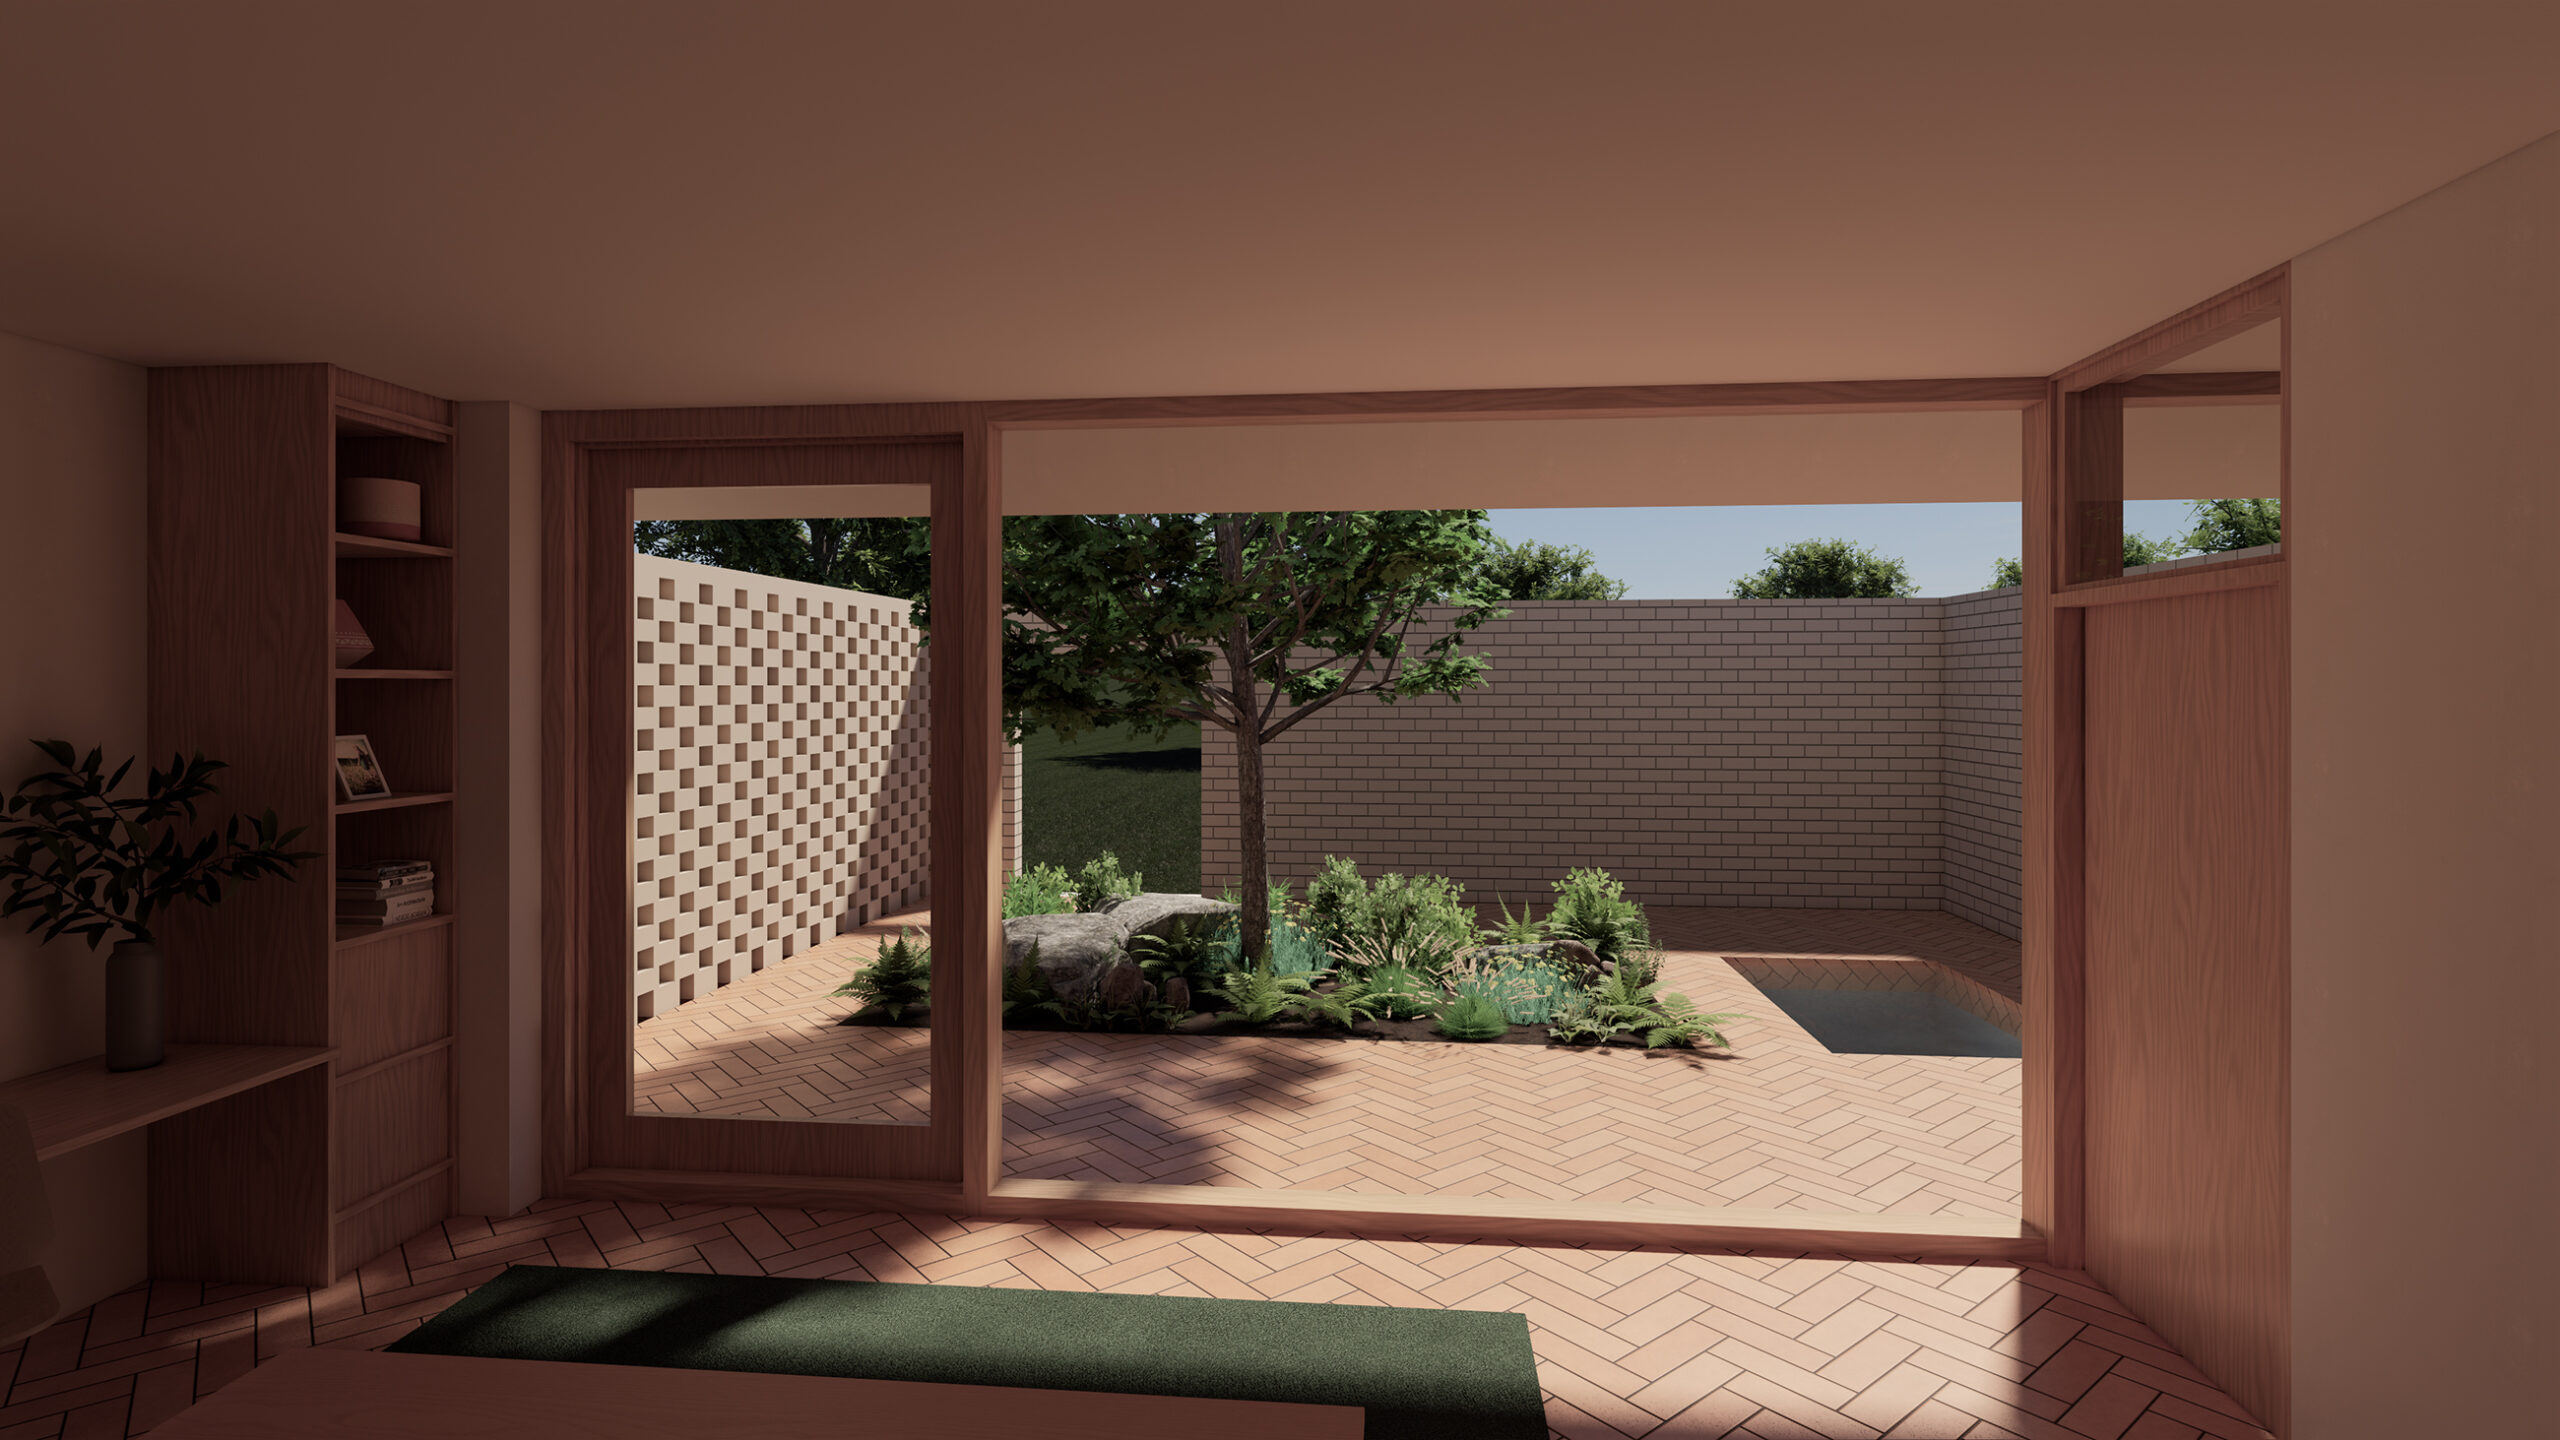
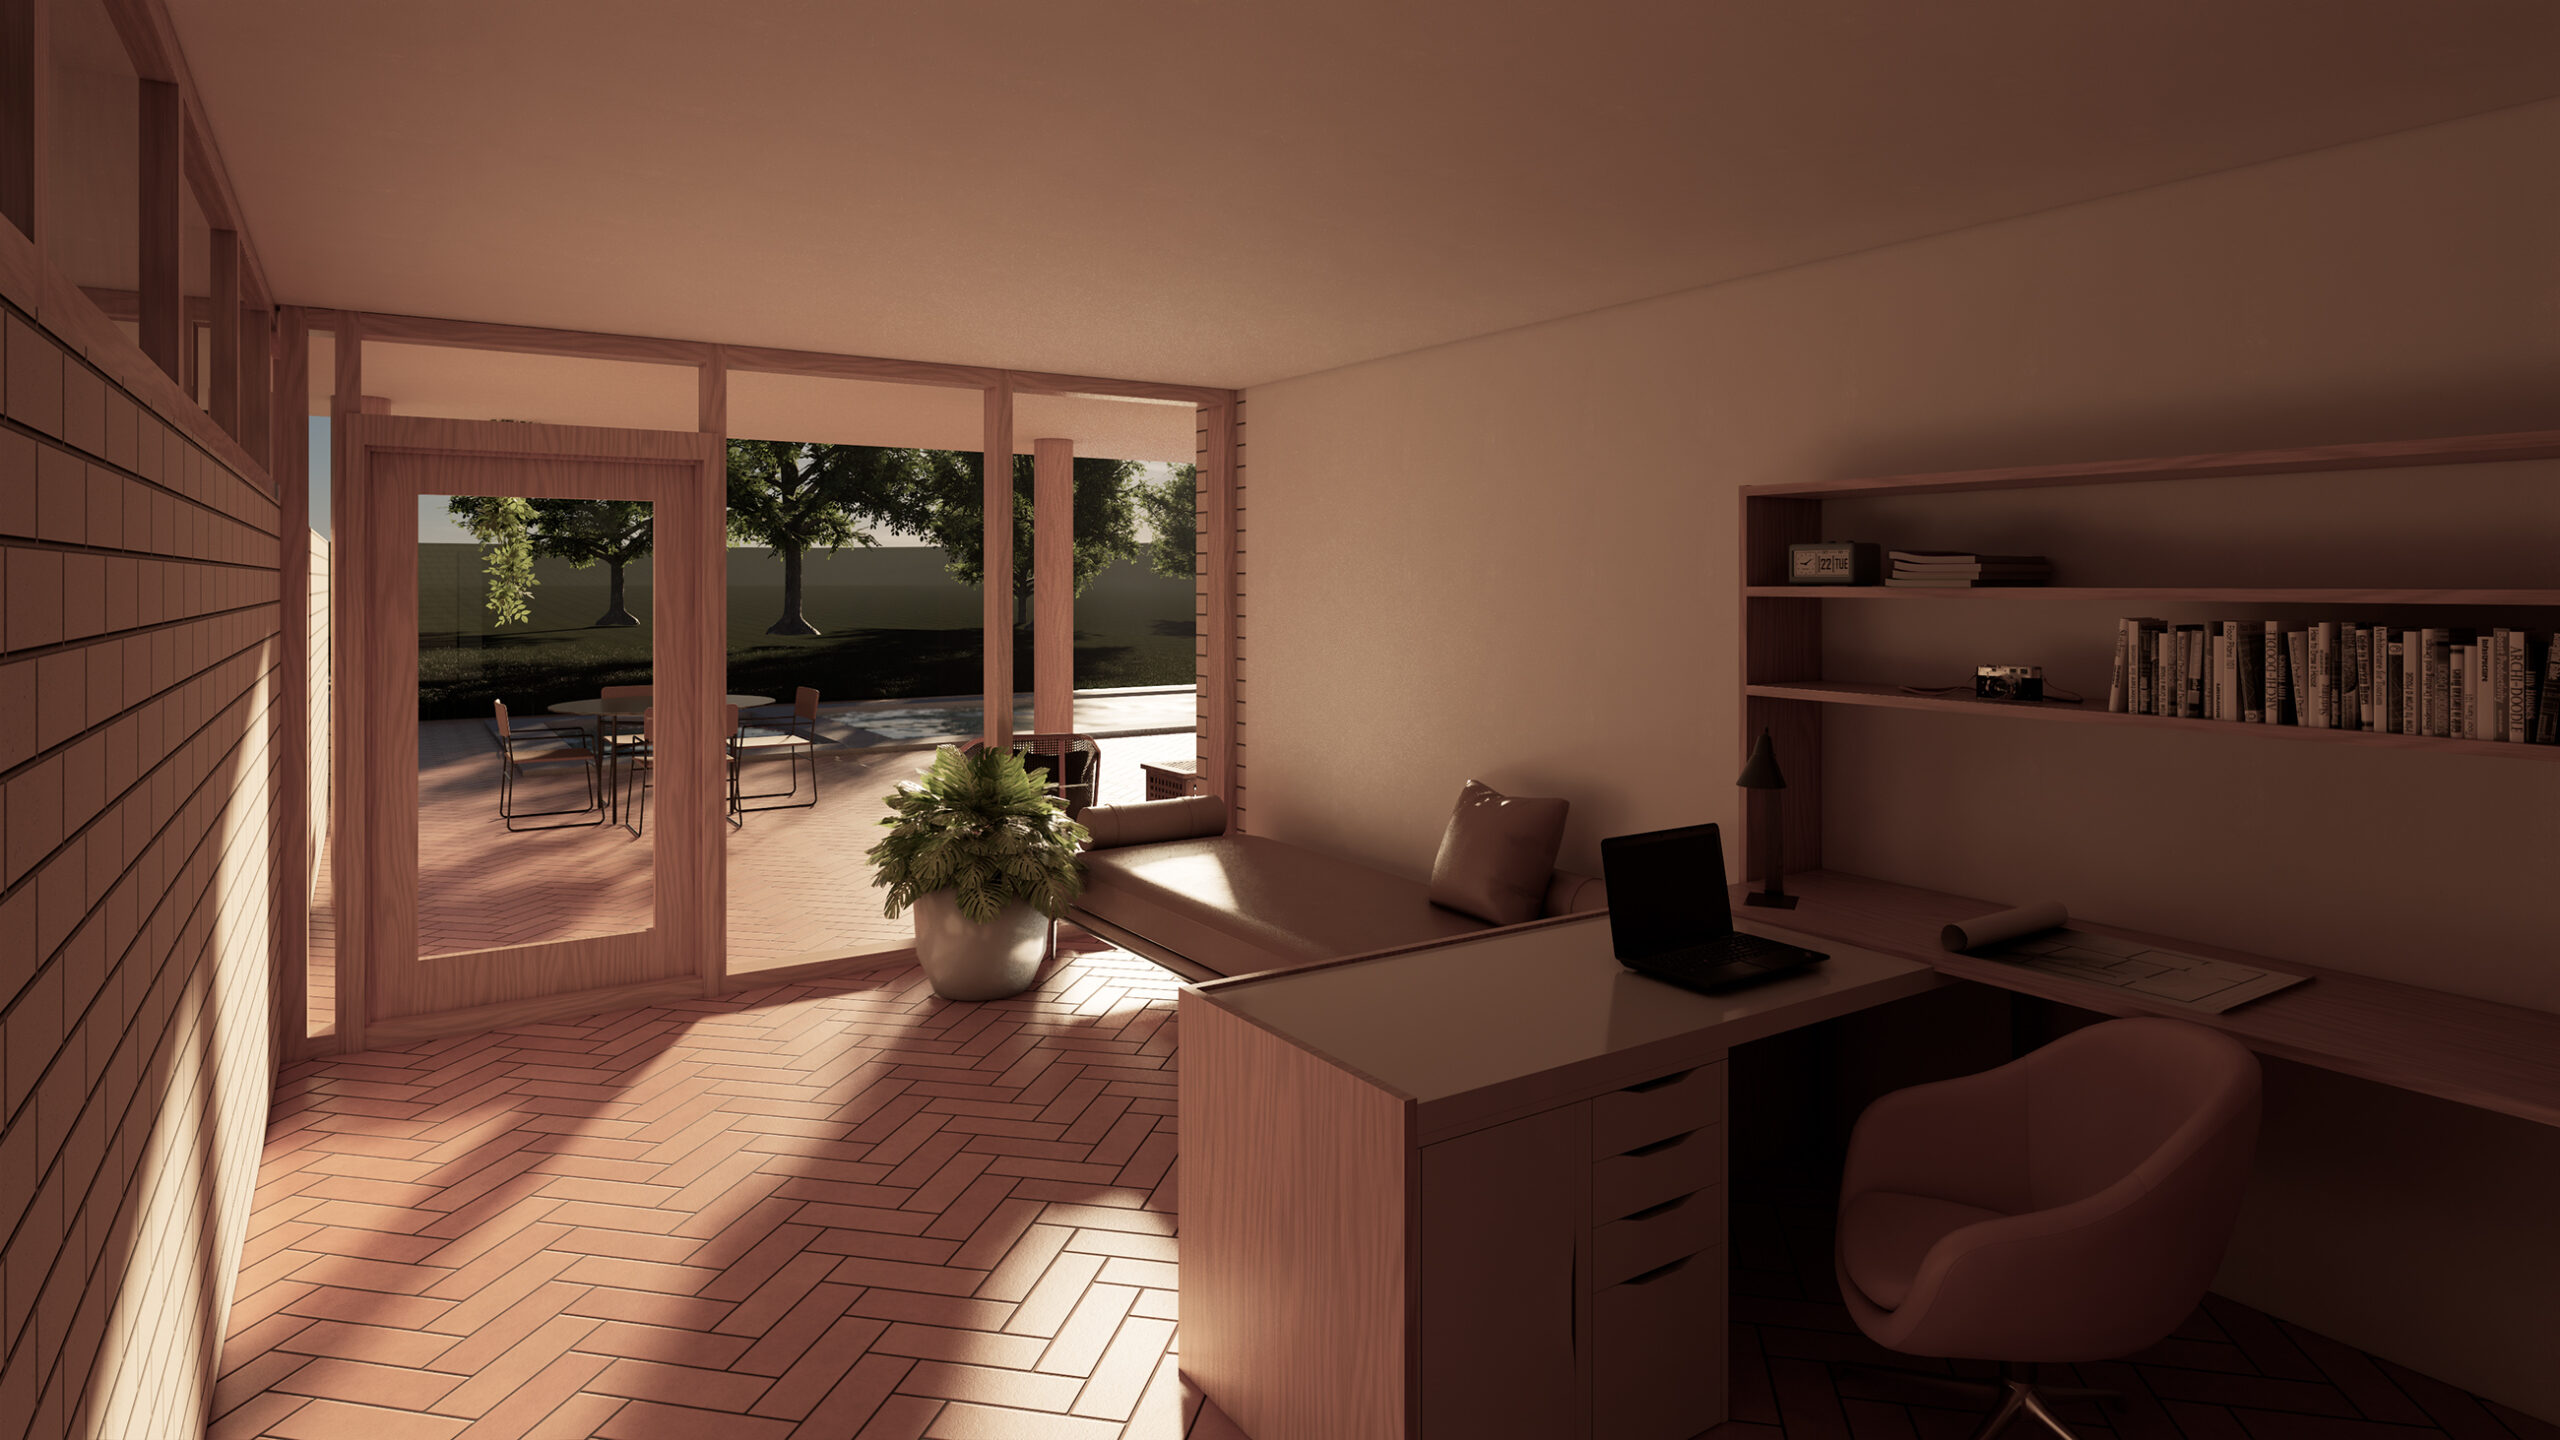
Certain views were integral in the design process of the layout. It was important to provide the occupants with a view from the entry of the home all the way through to the forest beyond. The image above shows what the view from the entrance of the house looks like, through to the pool area and trees.
The Image below shows the view from the main living space to the mud room. The hallway provides natural light via clerestories. This allows for the light from the south to enter the home, but also views of the driveway and provides privacy to the residents. To the right is the entry closet, door to the sauna, and the basement access. The office is located at the end of the hallway with direct access from the mud room. The office has been separated from the rest of the hallway to provide a barrier between work and the main home. The direct access from the mud room allows for business meetings to take place without the need for work related guests to have to access the main house.
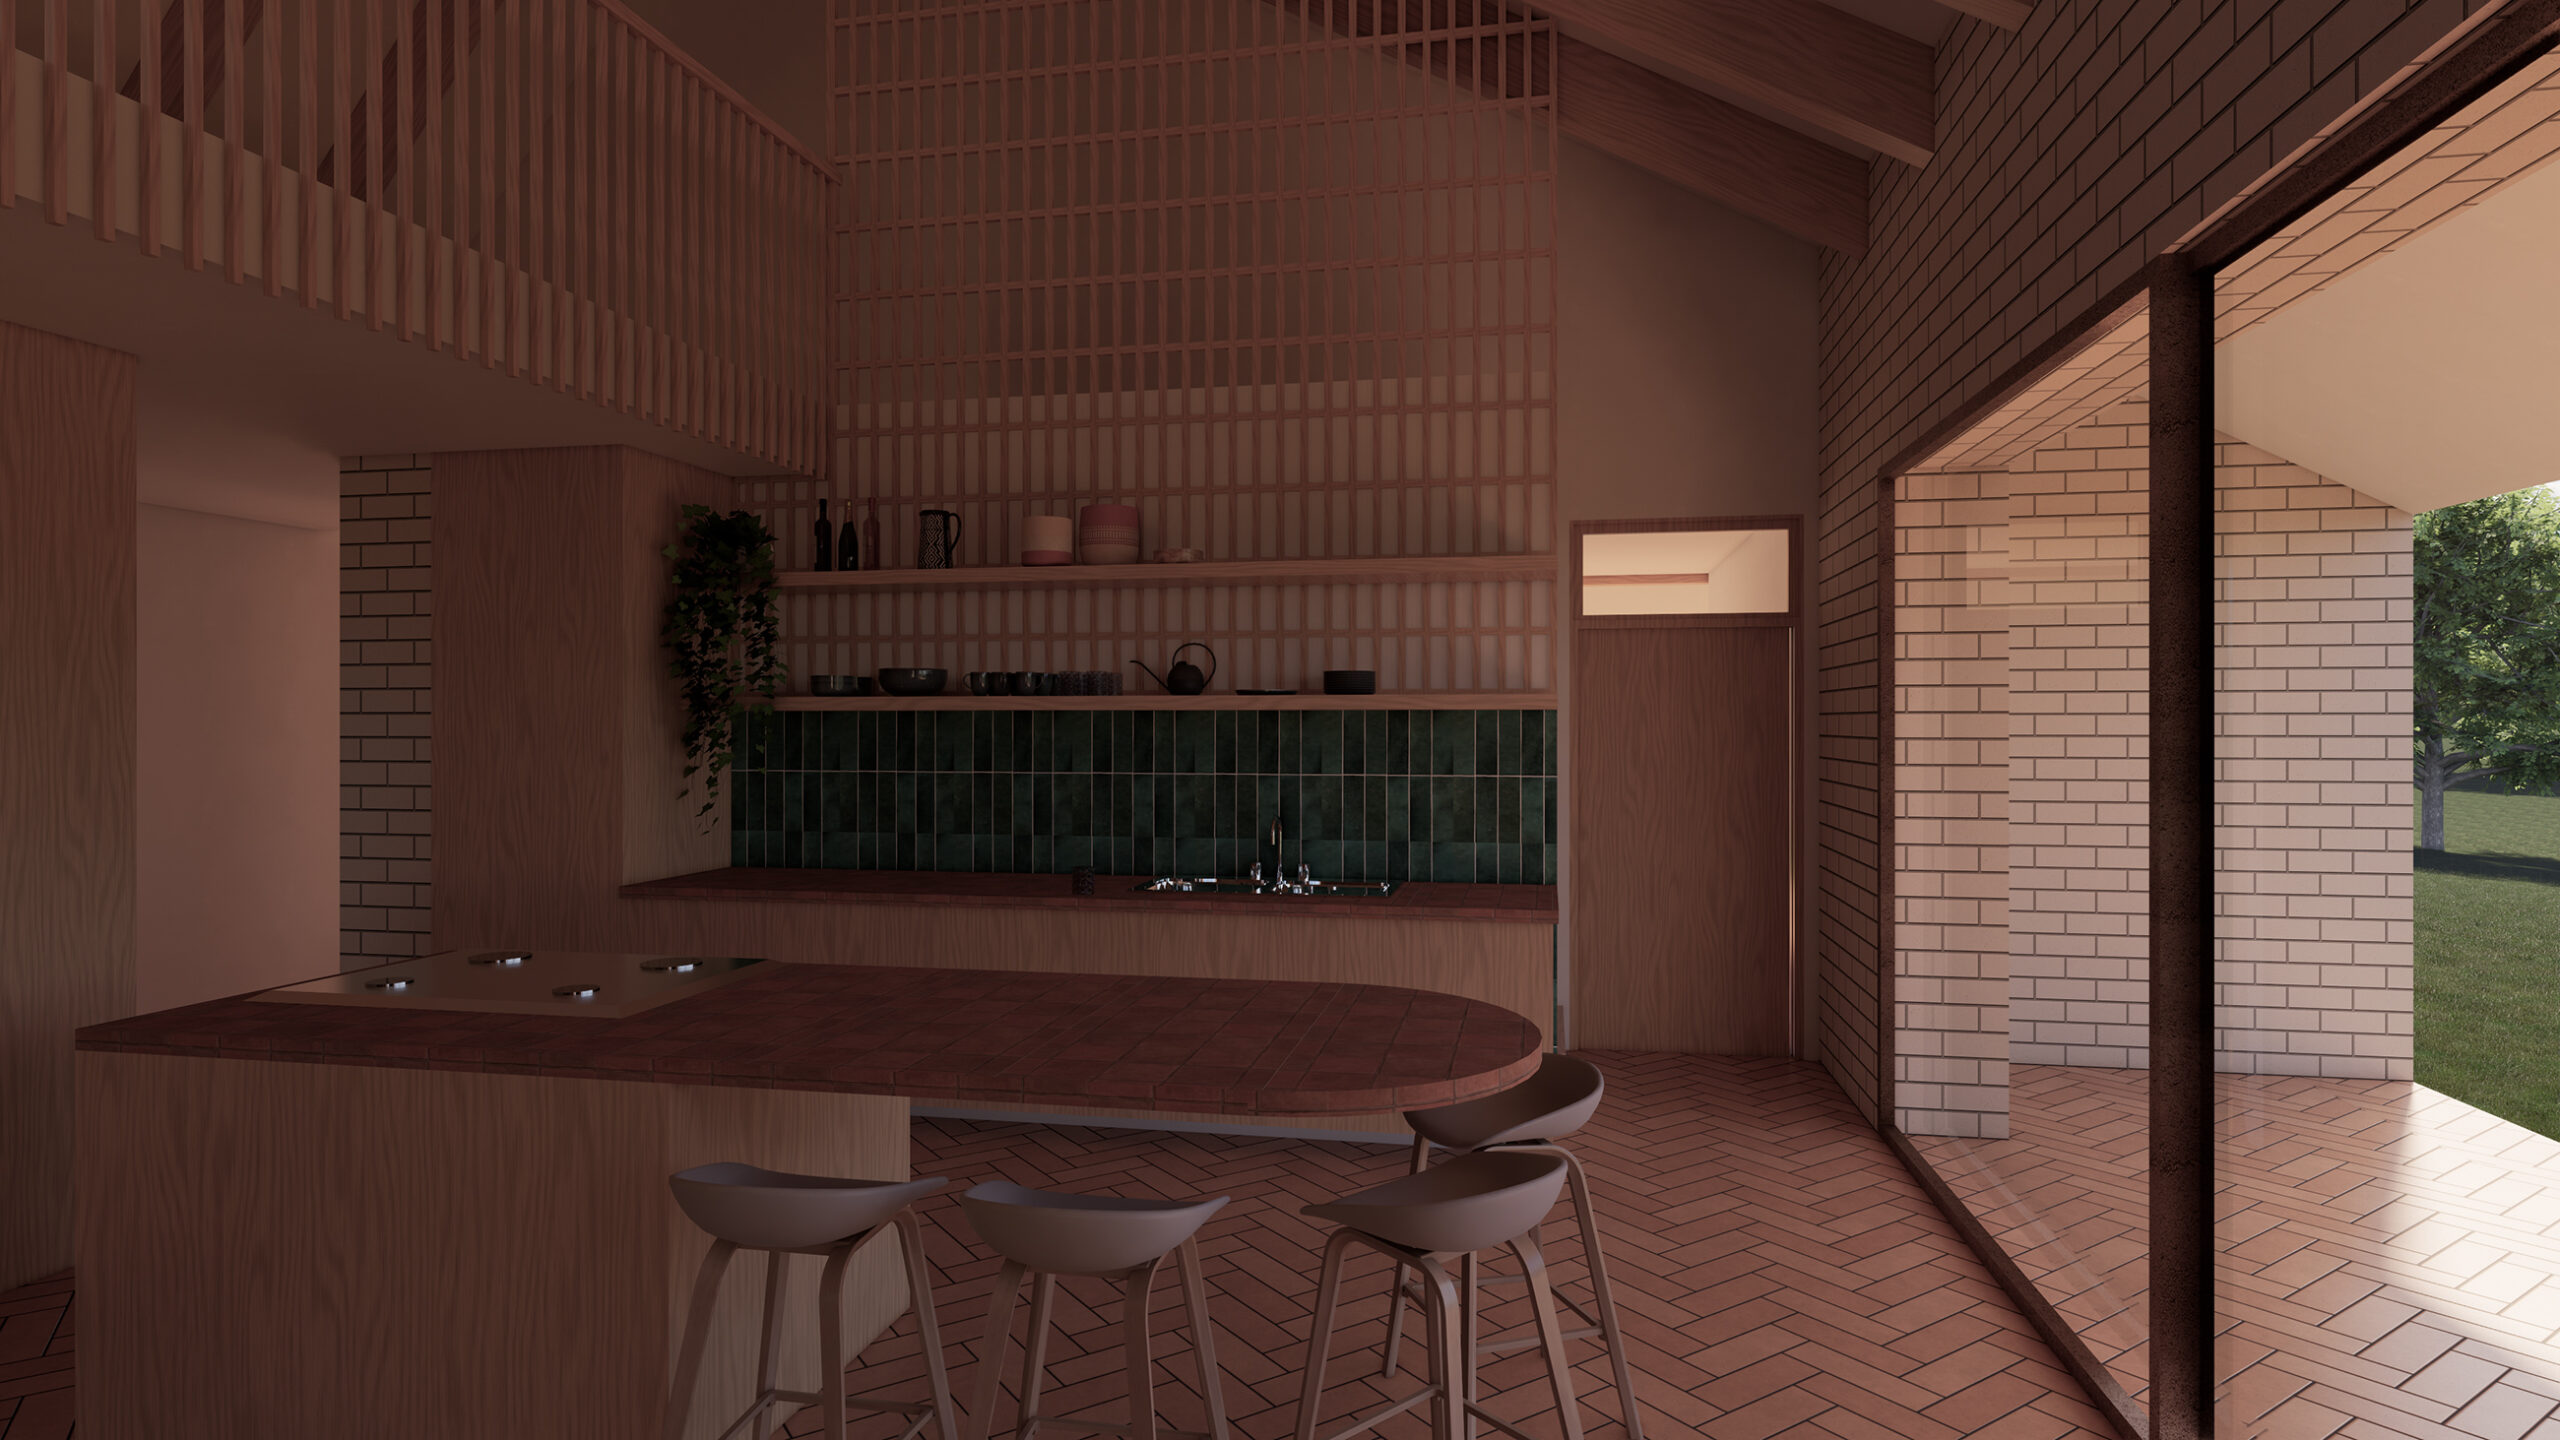
The main living space carries the same materials from the rest of the project. The brick was chosen for the exterior walls and feature interior walls due to the earthen qualities and feeling of solidity. A mix of wood and plastered gypsum will be used in the ceiling and walls. The cabinetry is made of the same wood as the window frames and mullions, to tie everything together. The floor is terracotta tile throughout (and also on the patio).
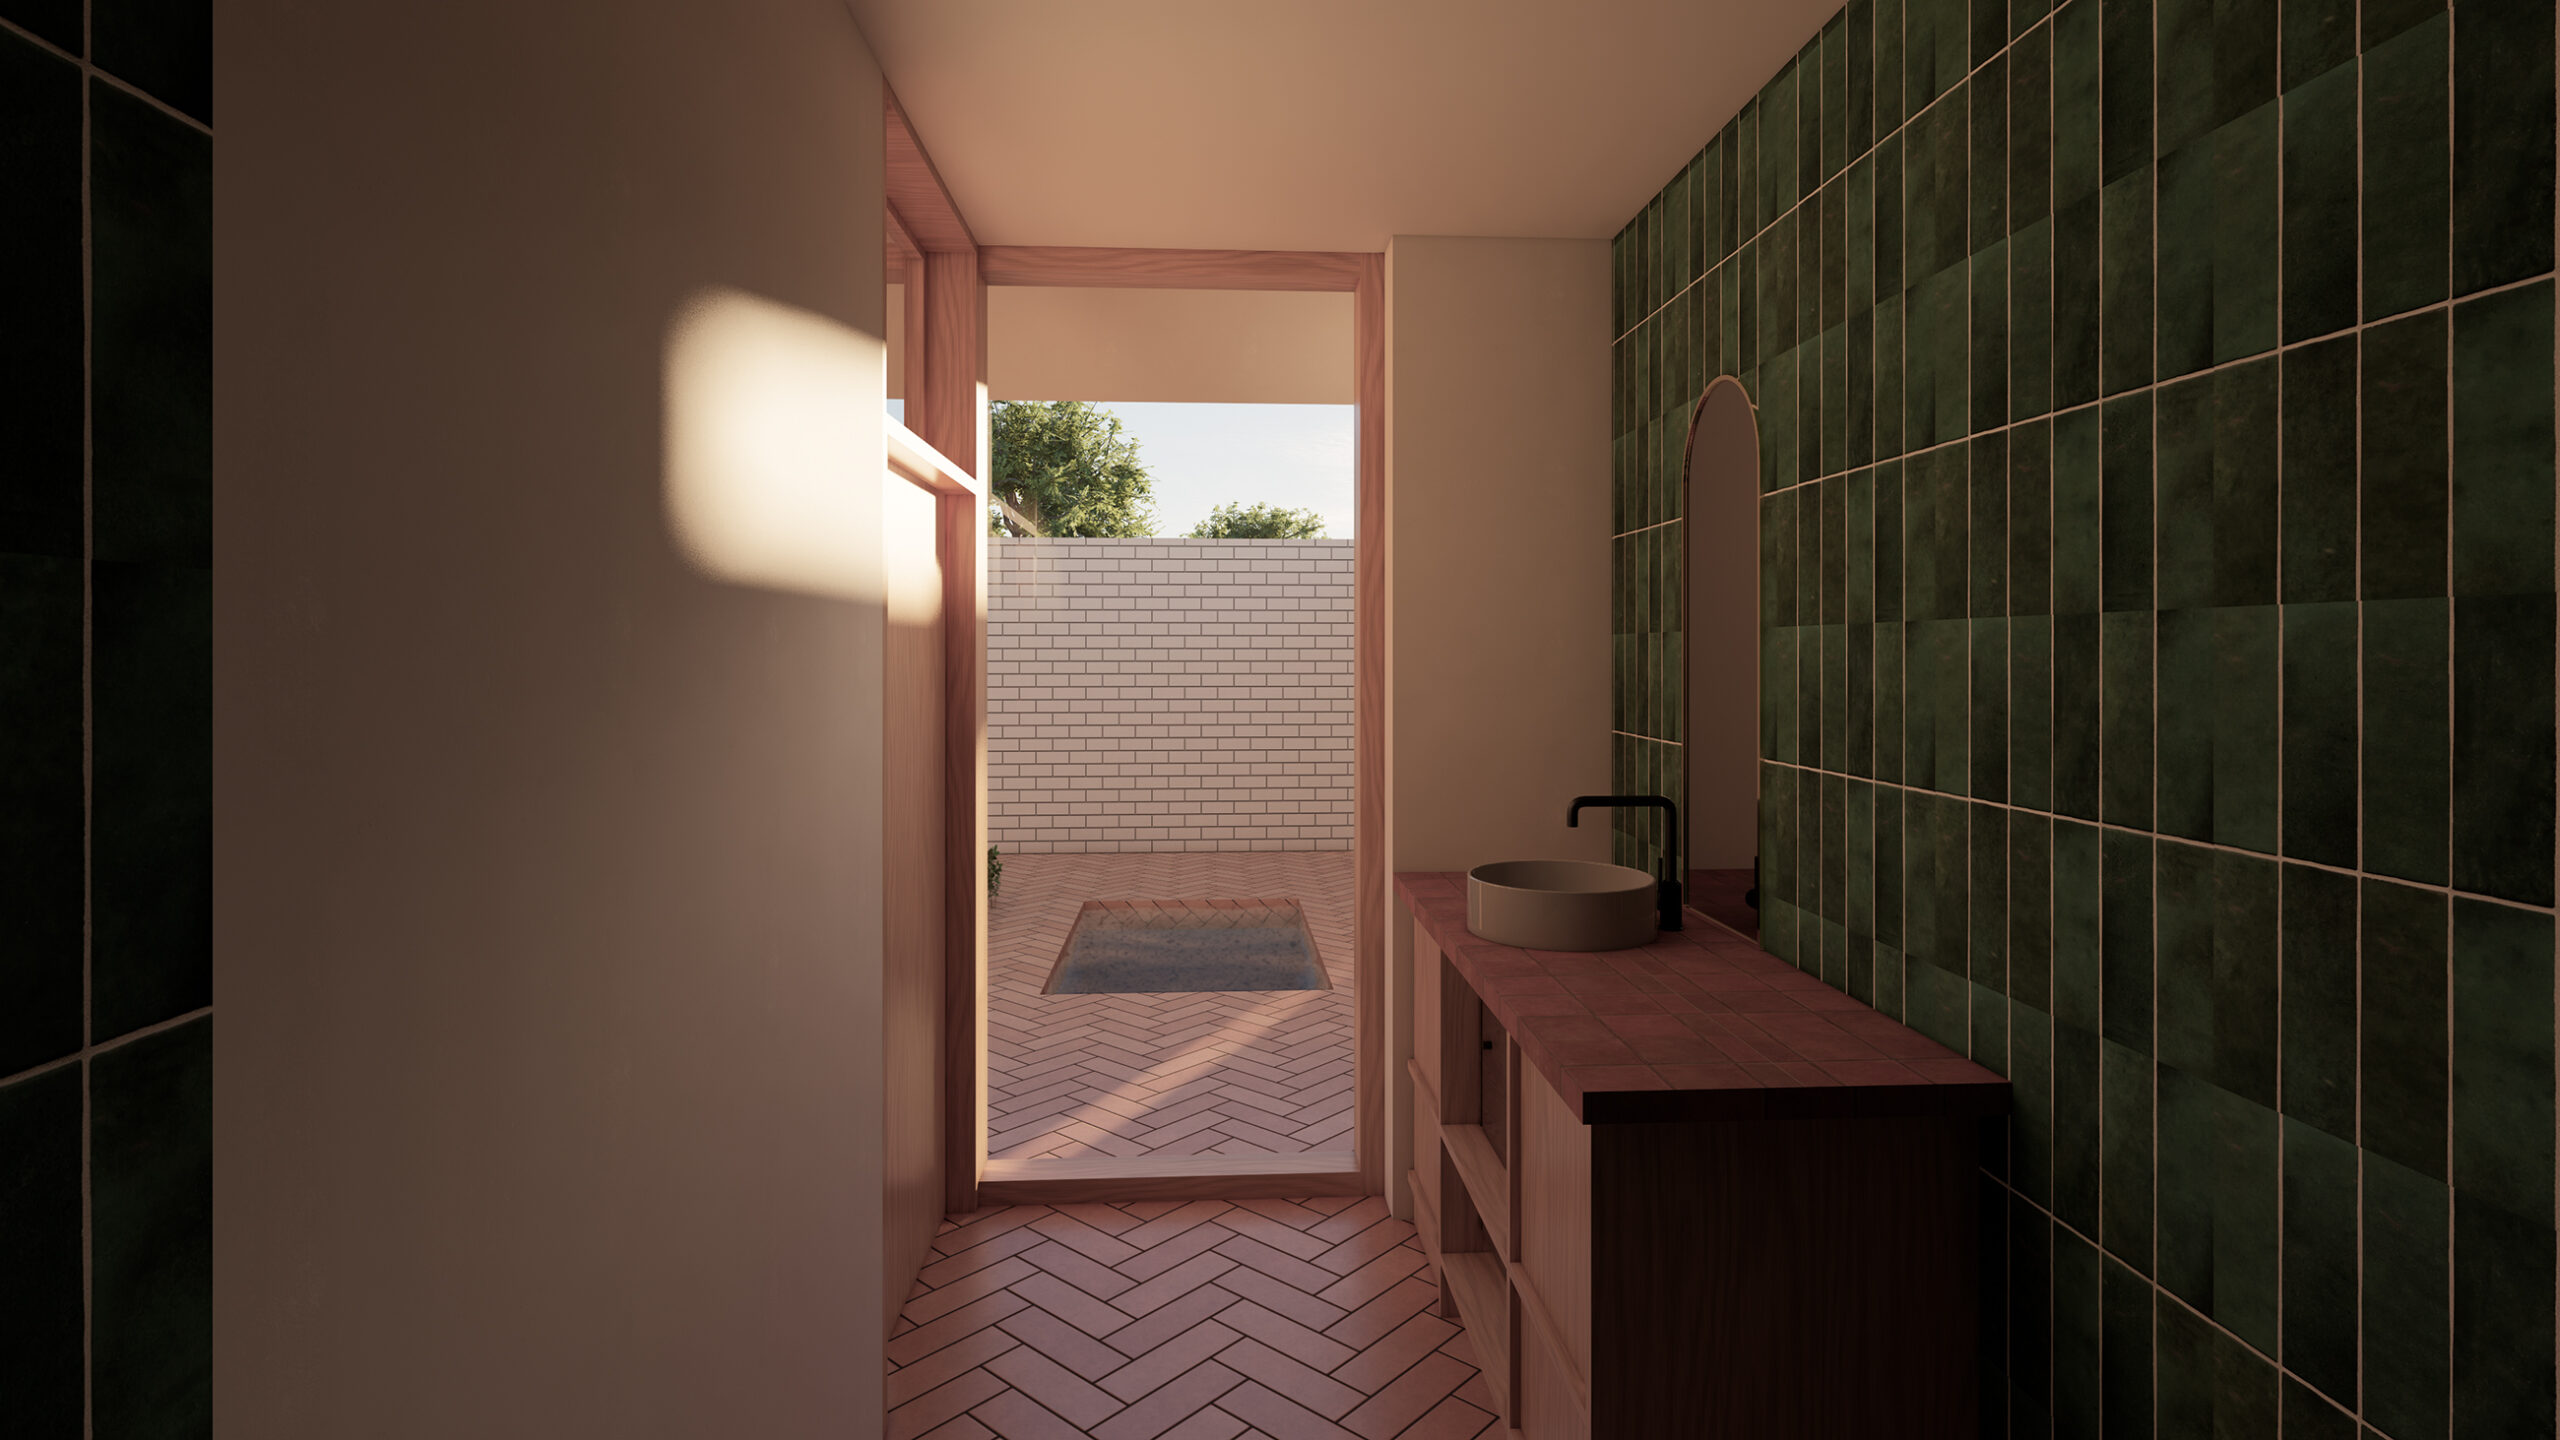
In the kitchen and bathroom, a green subway tile and terracotta counters are used to create accent colours that tie into tones seen in the surrounding landscape. The terracotta tiles are also used as flooring for its texture, colours and durability.
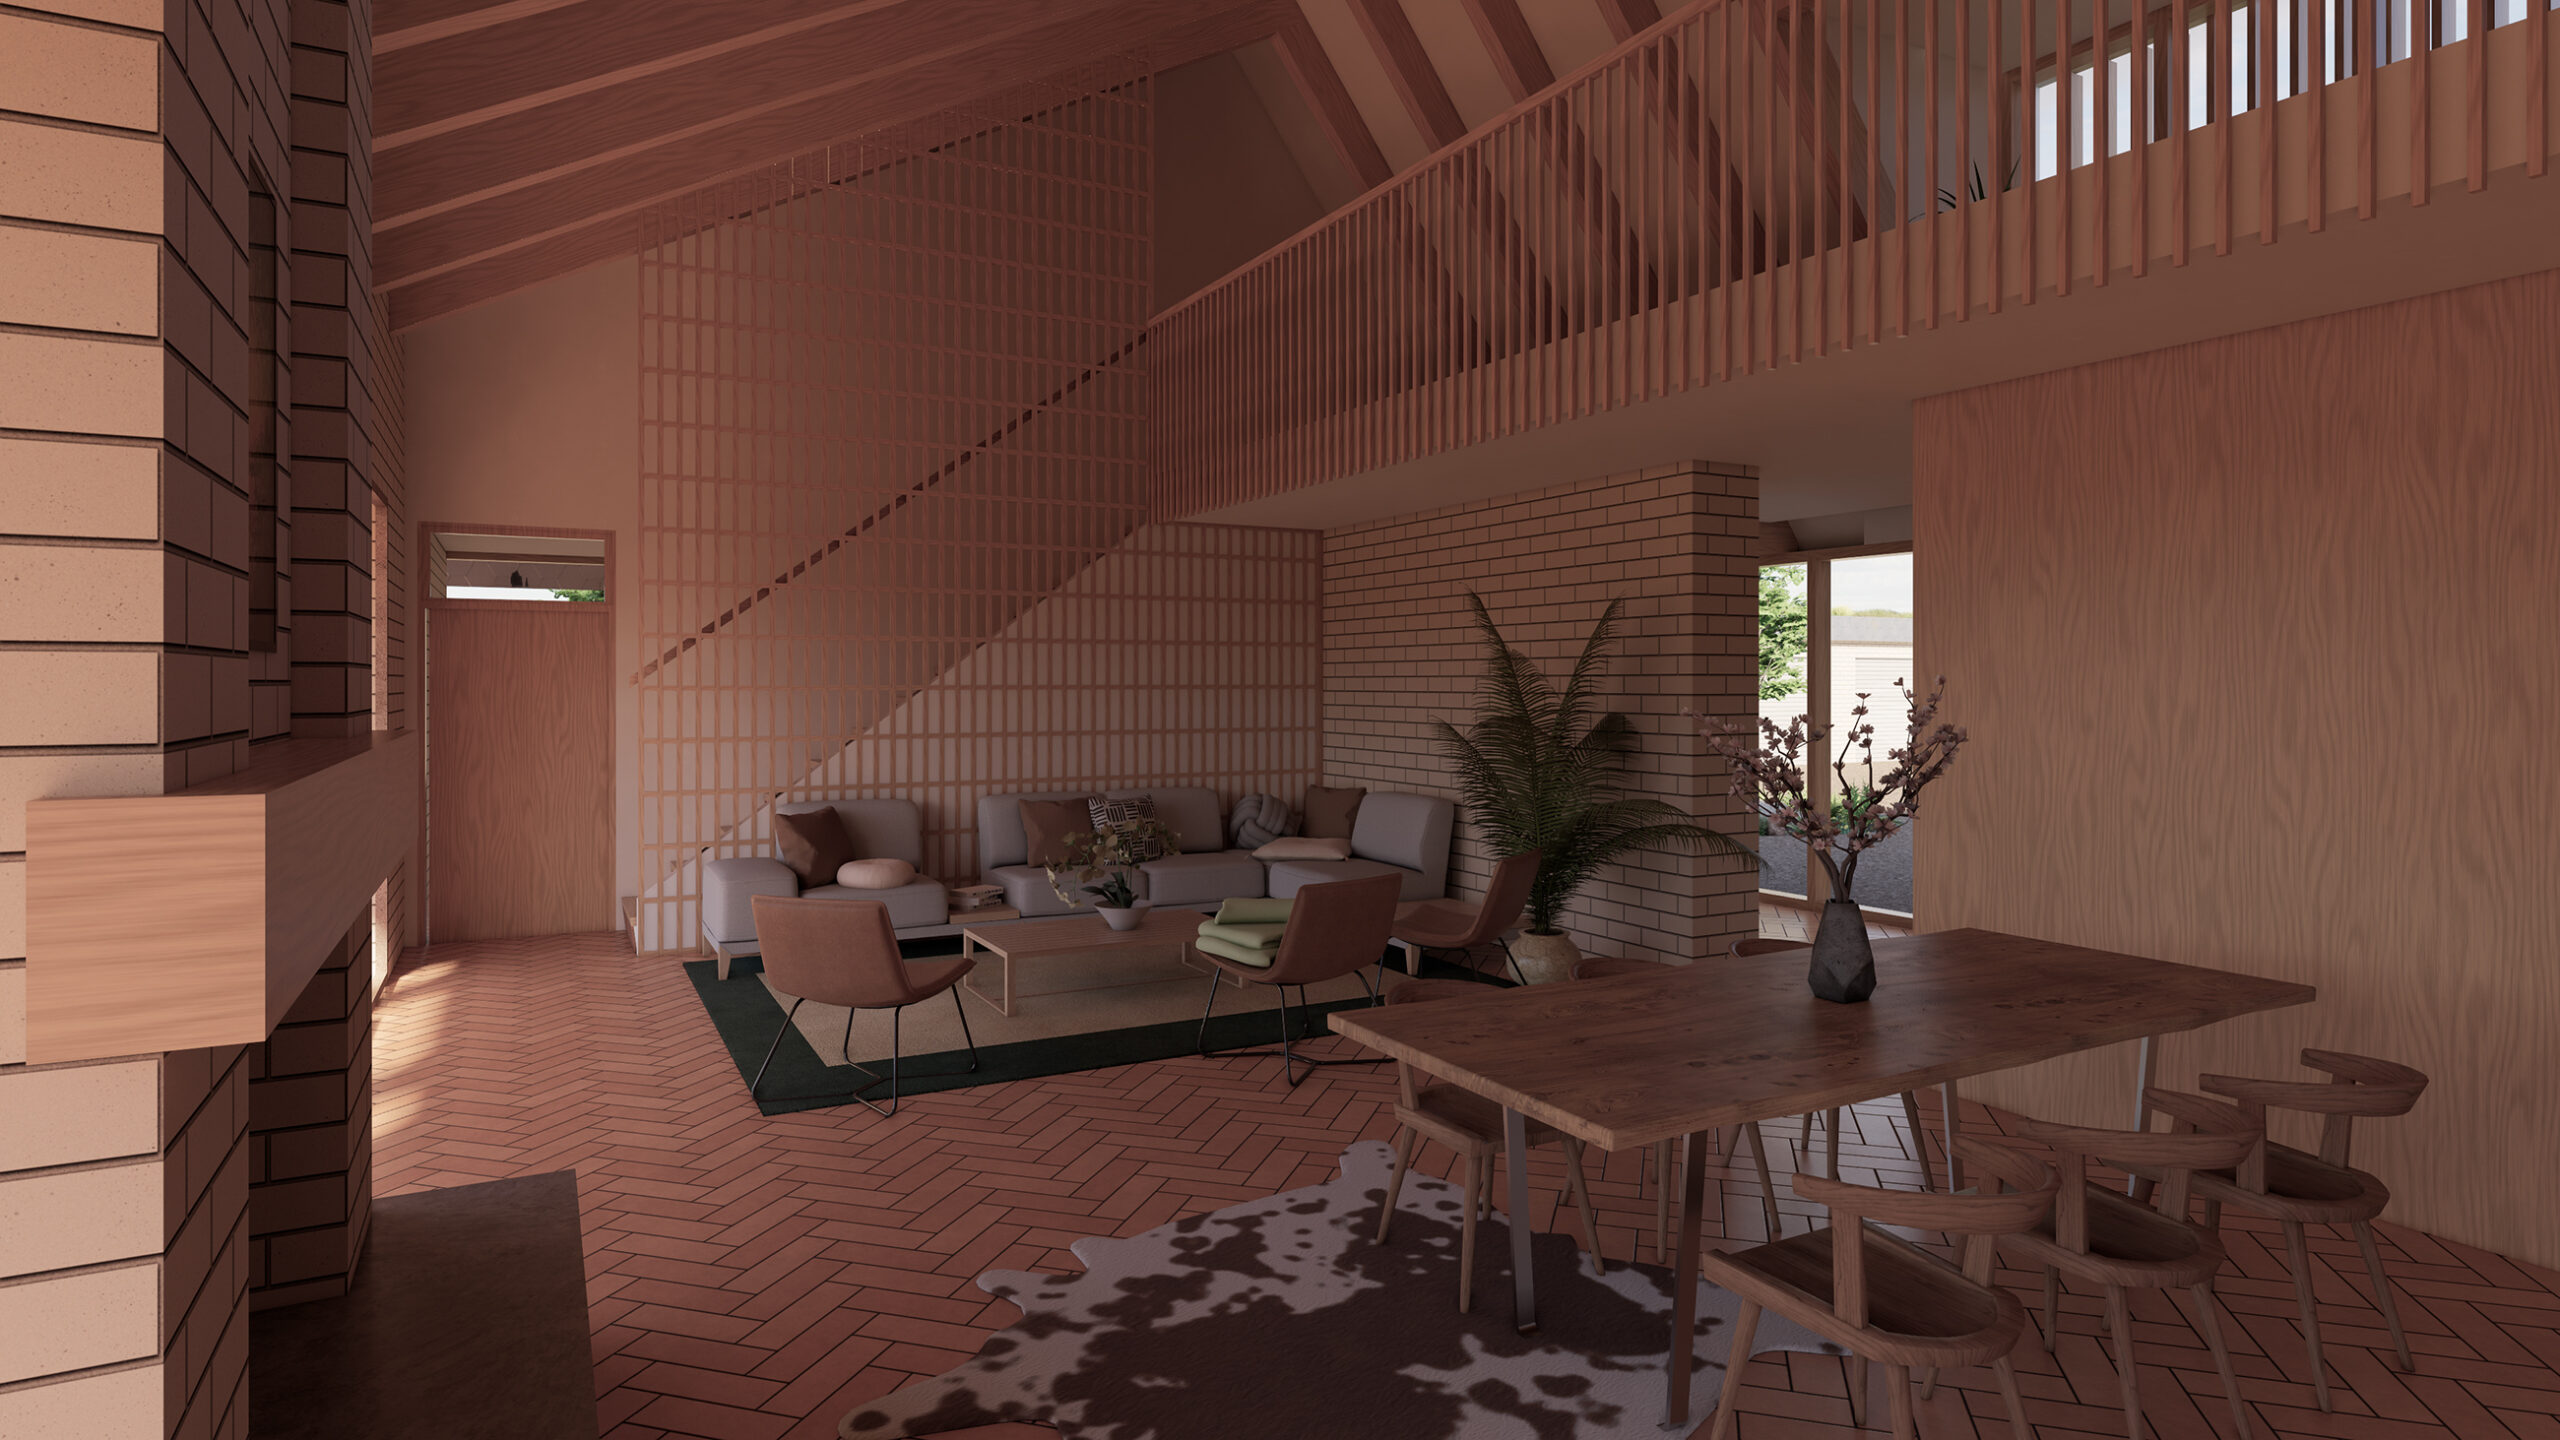
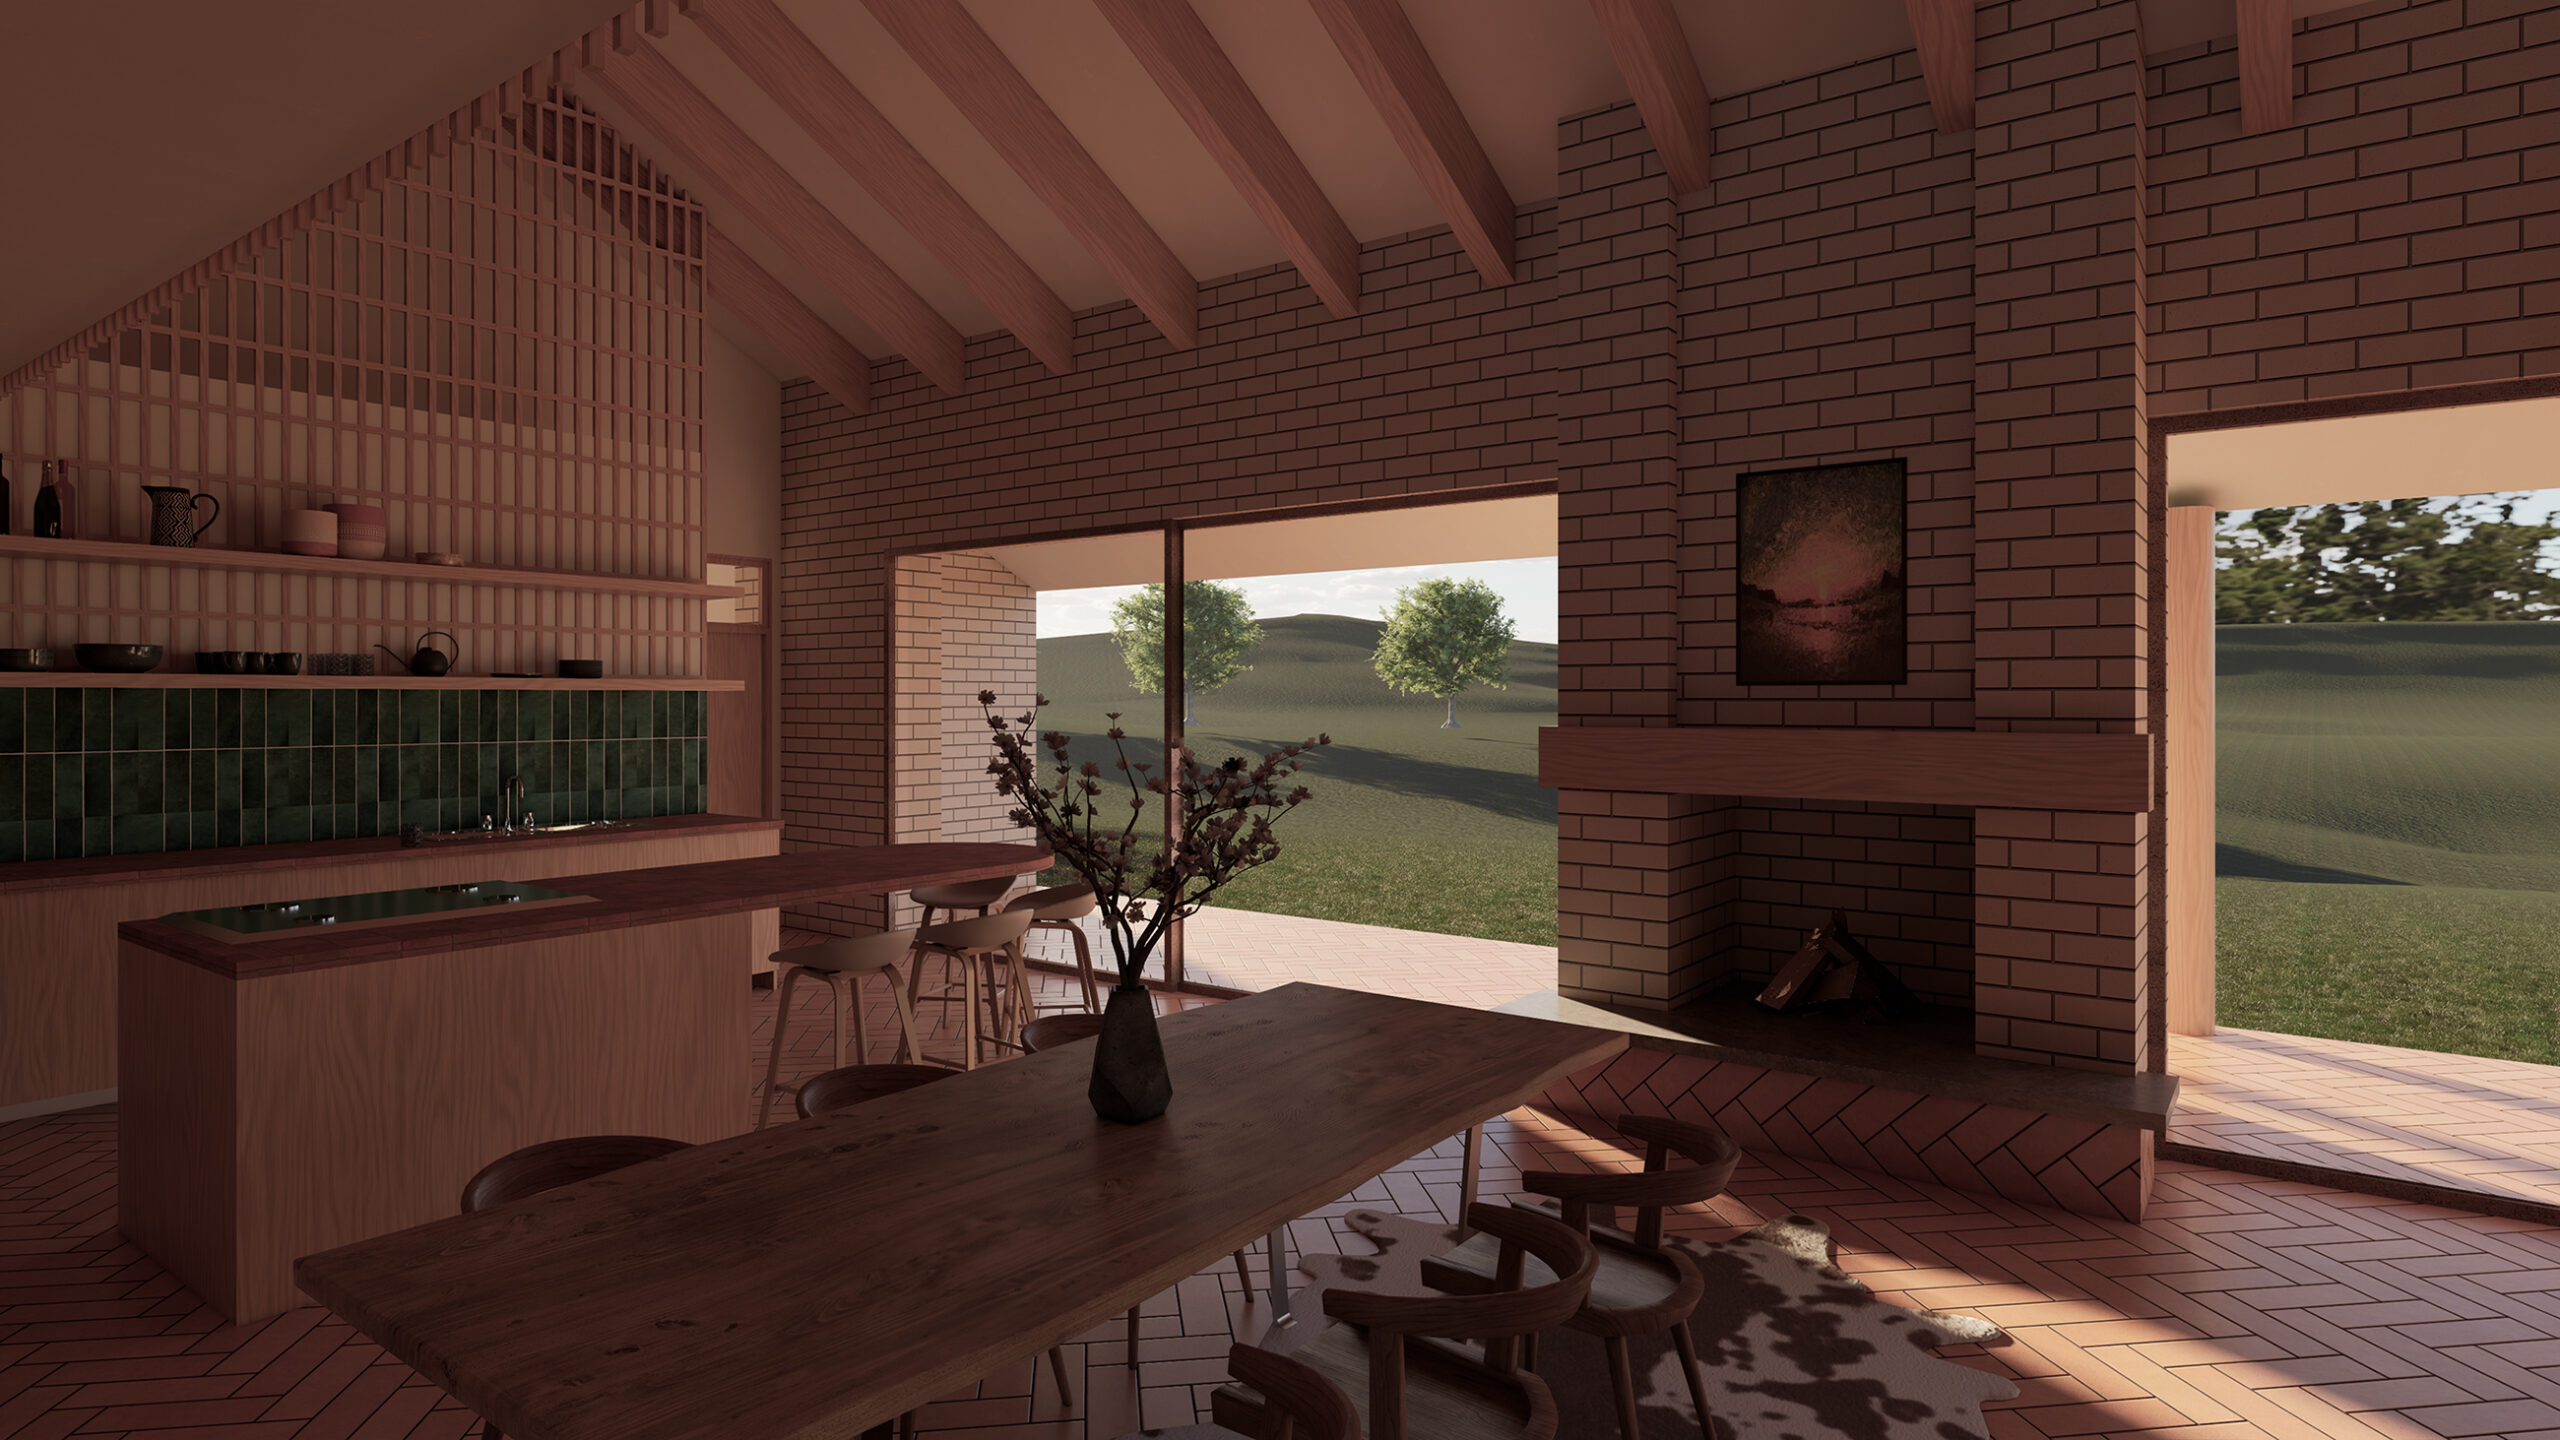
The main spaces boasts of high vaulted ceilings with mass timber beams. The rest of the home has low ceiling heights to help emphasize the change of space when entering the main room. A central fireplace is located in the center of the room, made of the same brick that is featured in the accent walls and exterior.
The view of the fireplace can be seen from all areas of the main room, which helps tie the mezzanine and other living spaces together.
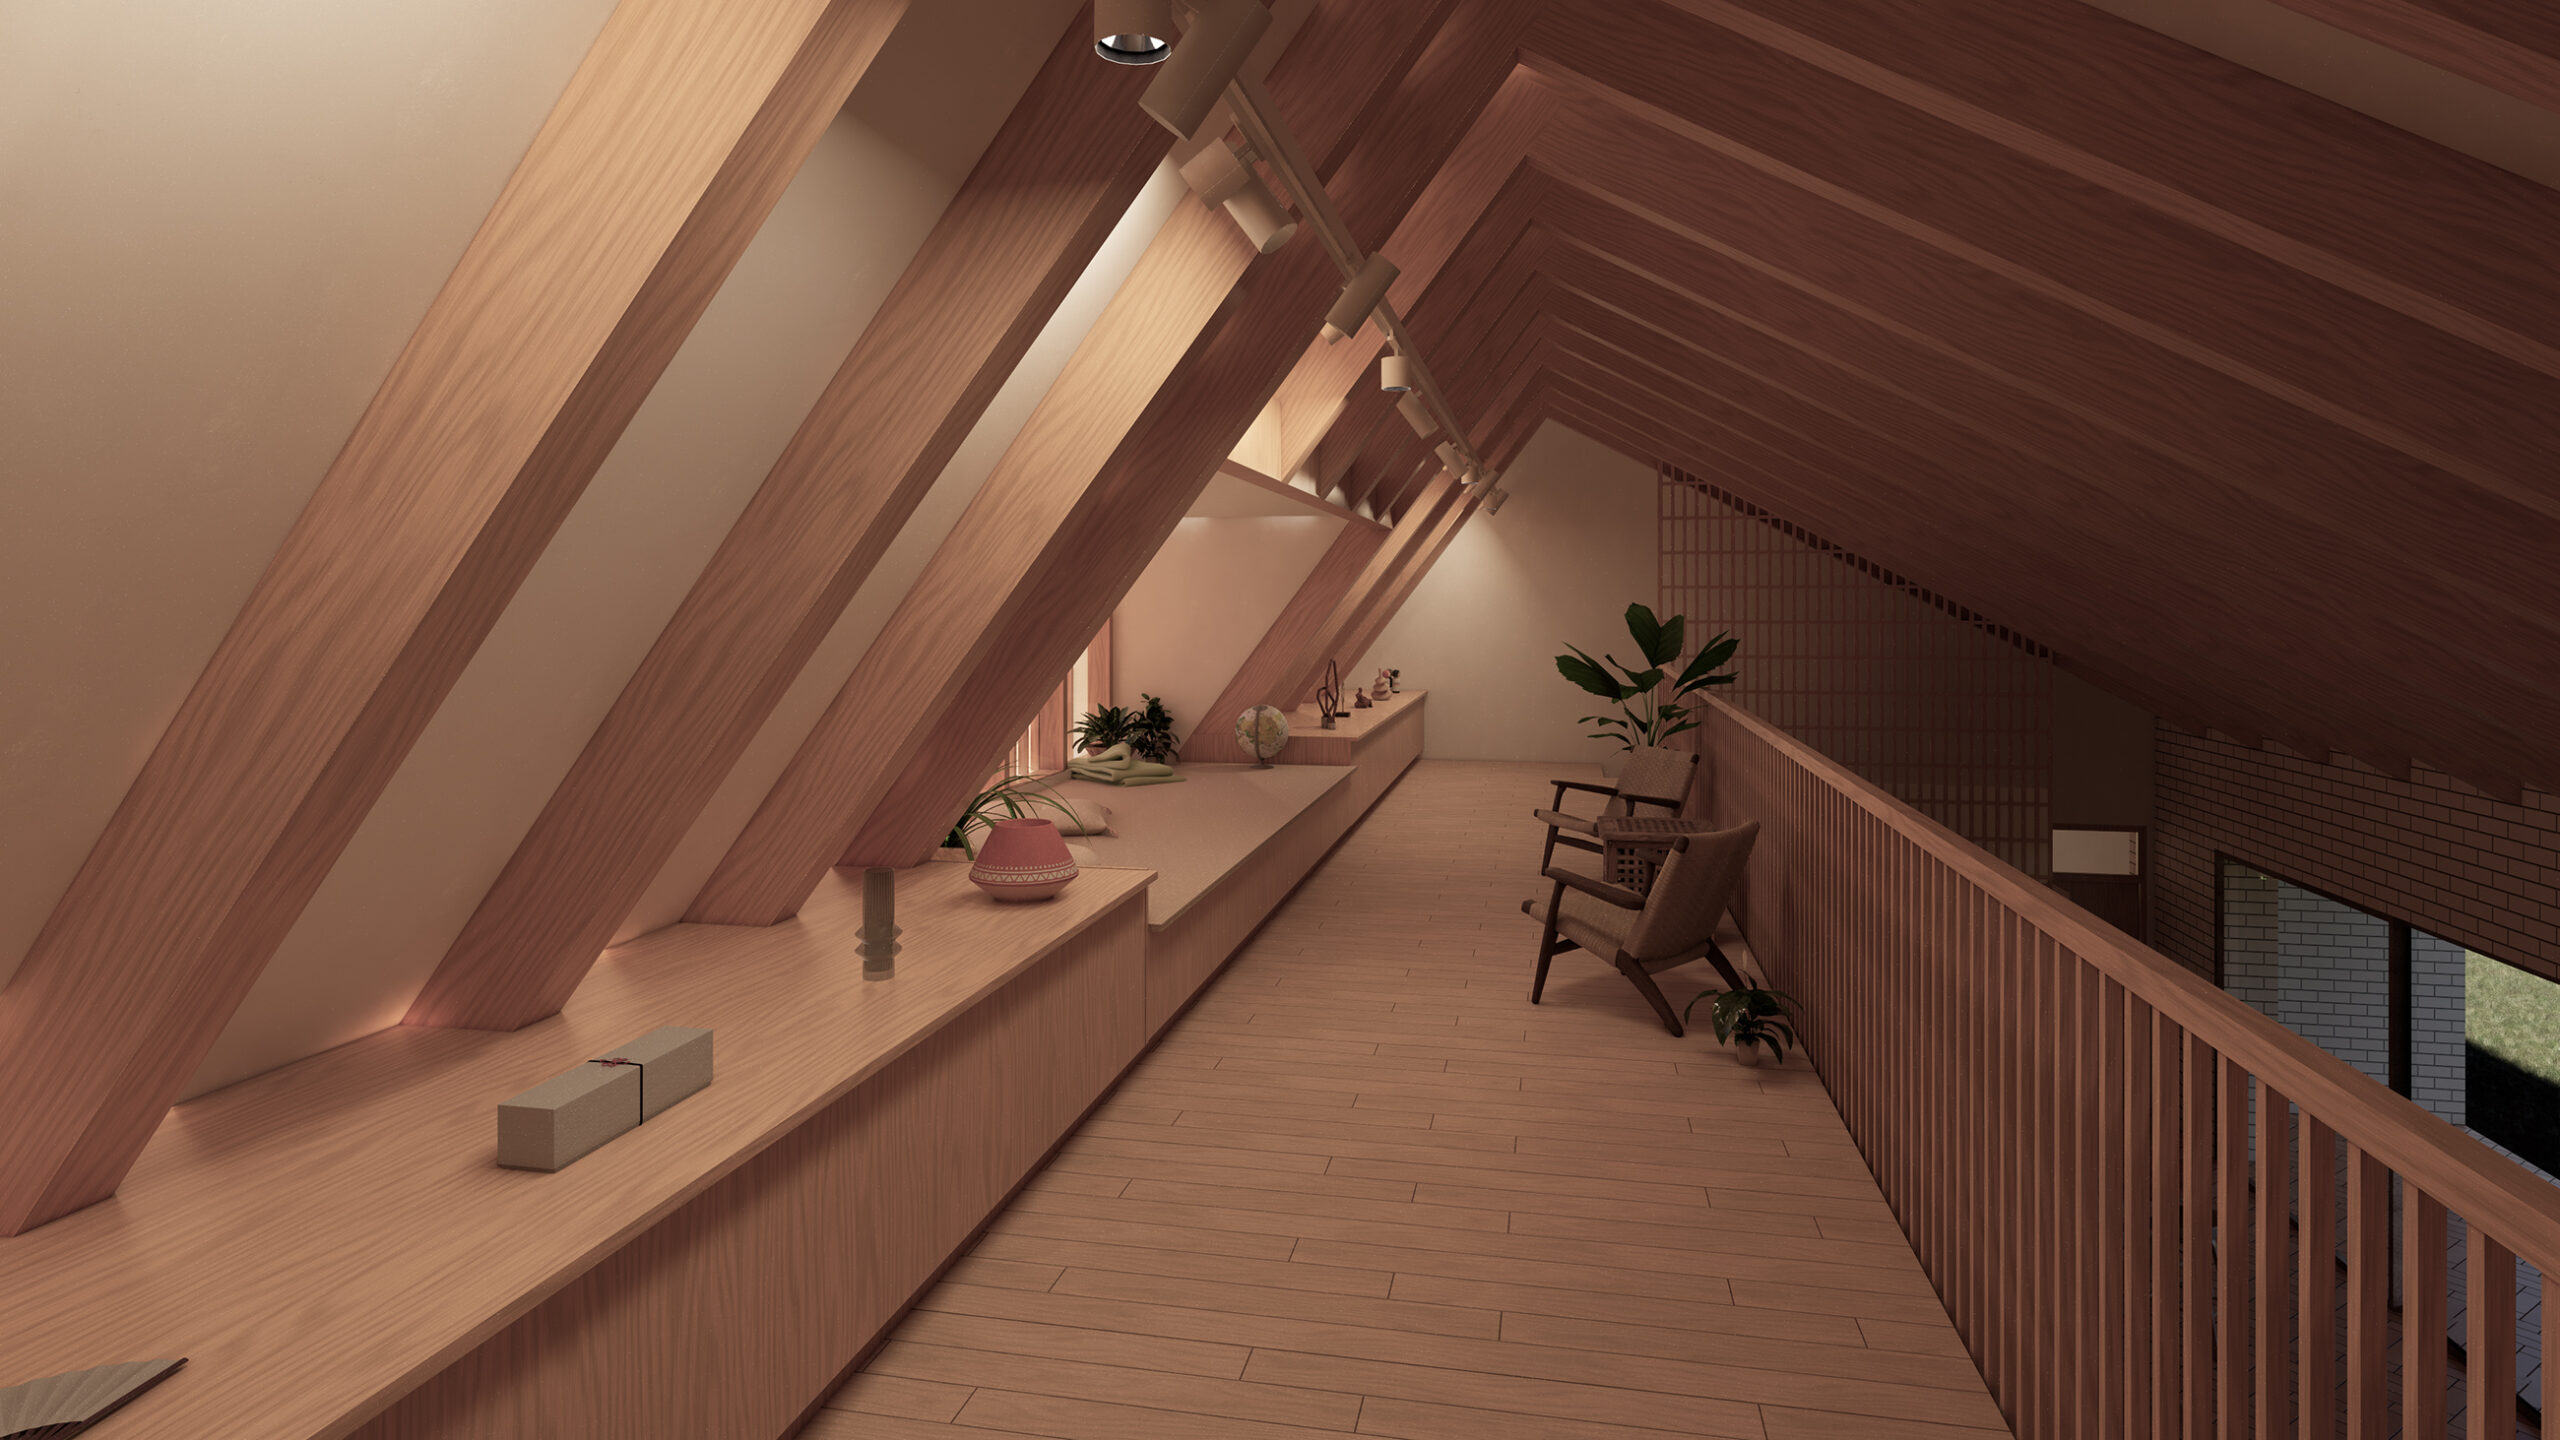
The lofted ceiling in the main room of the home provides space for a mezzanine gallery and lounge/library for the client. There is a bench at the center of a dormer window that looks over a green roof and the driveway going into the forest. On either side of the bench there is space to display archaeological artifacts or artwork that has been collected. Overhead lighting baths the walls and exposed wooden beams. Two sets of stairs lead up the mezzanine, allowing for a smooth circumambulation of the gallery. These stairs are also positioned to provide a physical and auditory barrier between the bedrooms and main living space.
Above is a render of the mezzanine from the stairs. Over head studio lights on a track have been added so that the space can be customized depending on the display. There are wooden fins on the dormer windows to deflect the southern light and mitigate the harsh light during sunrise and sunset.
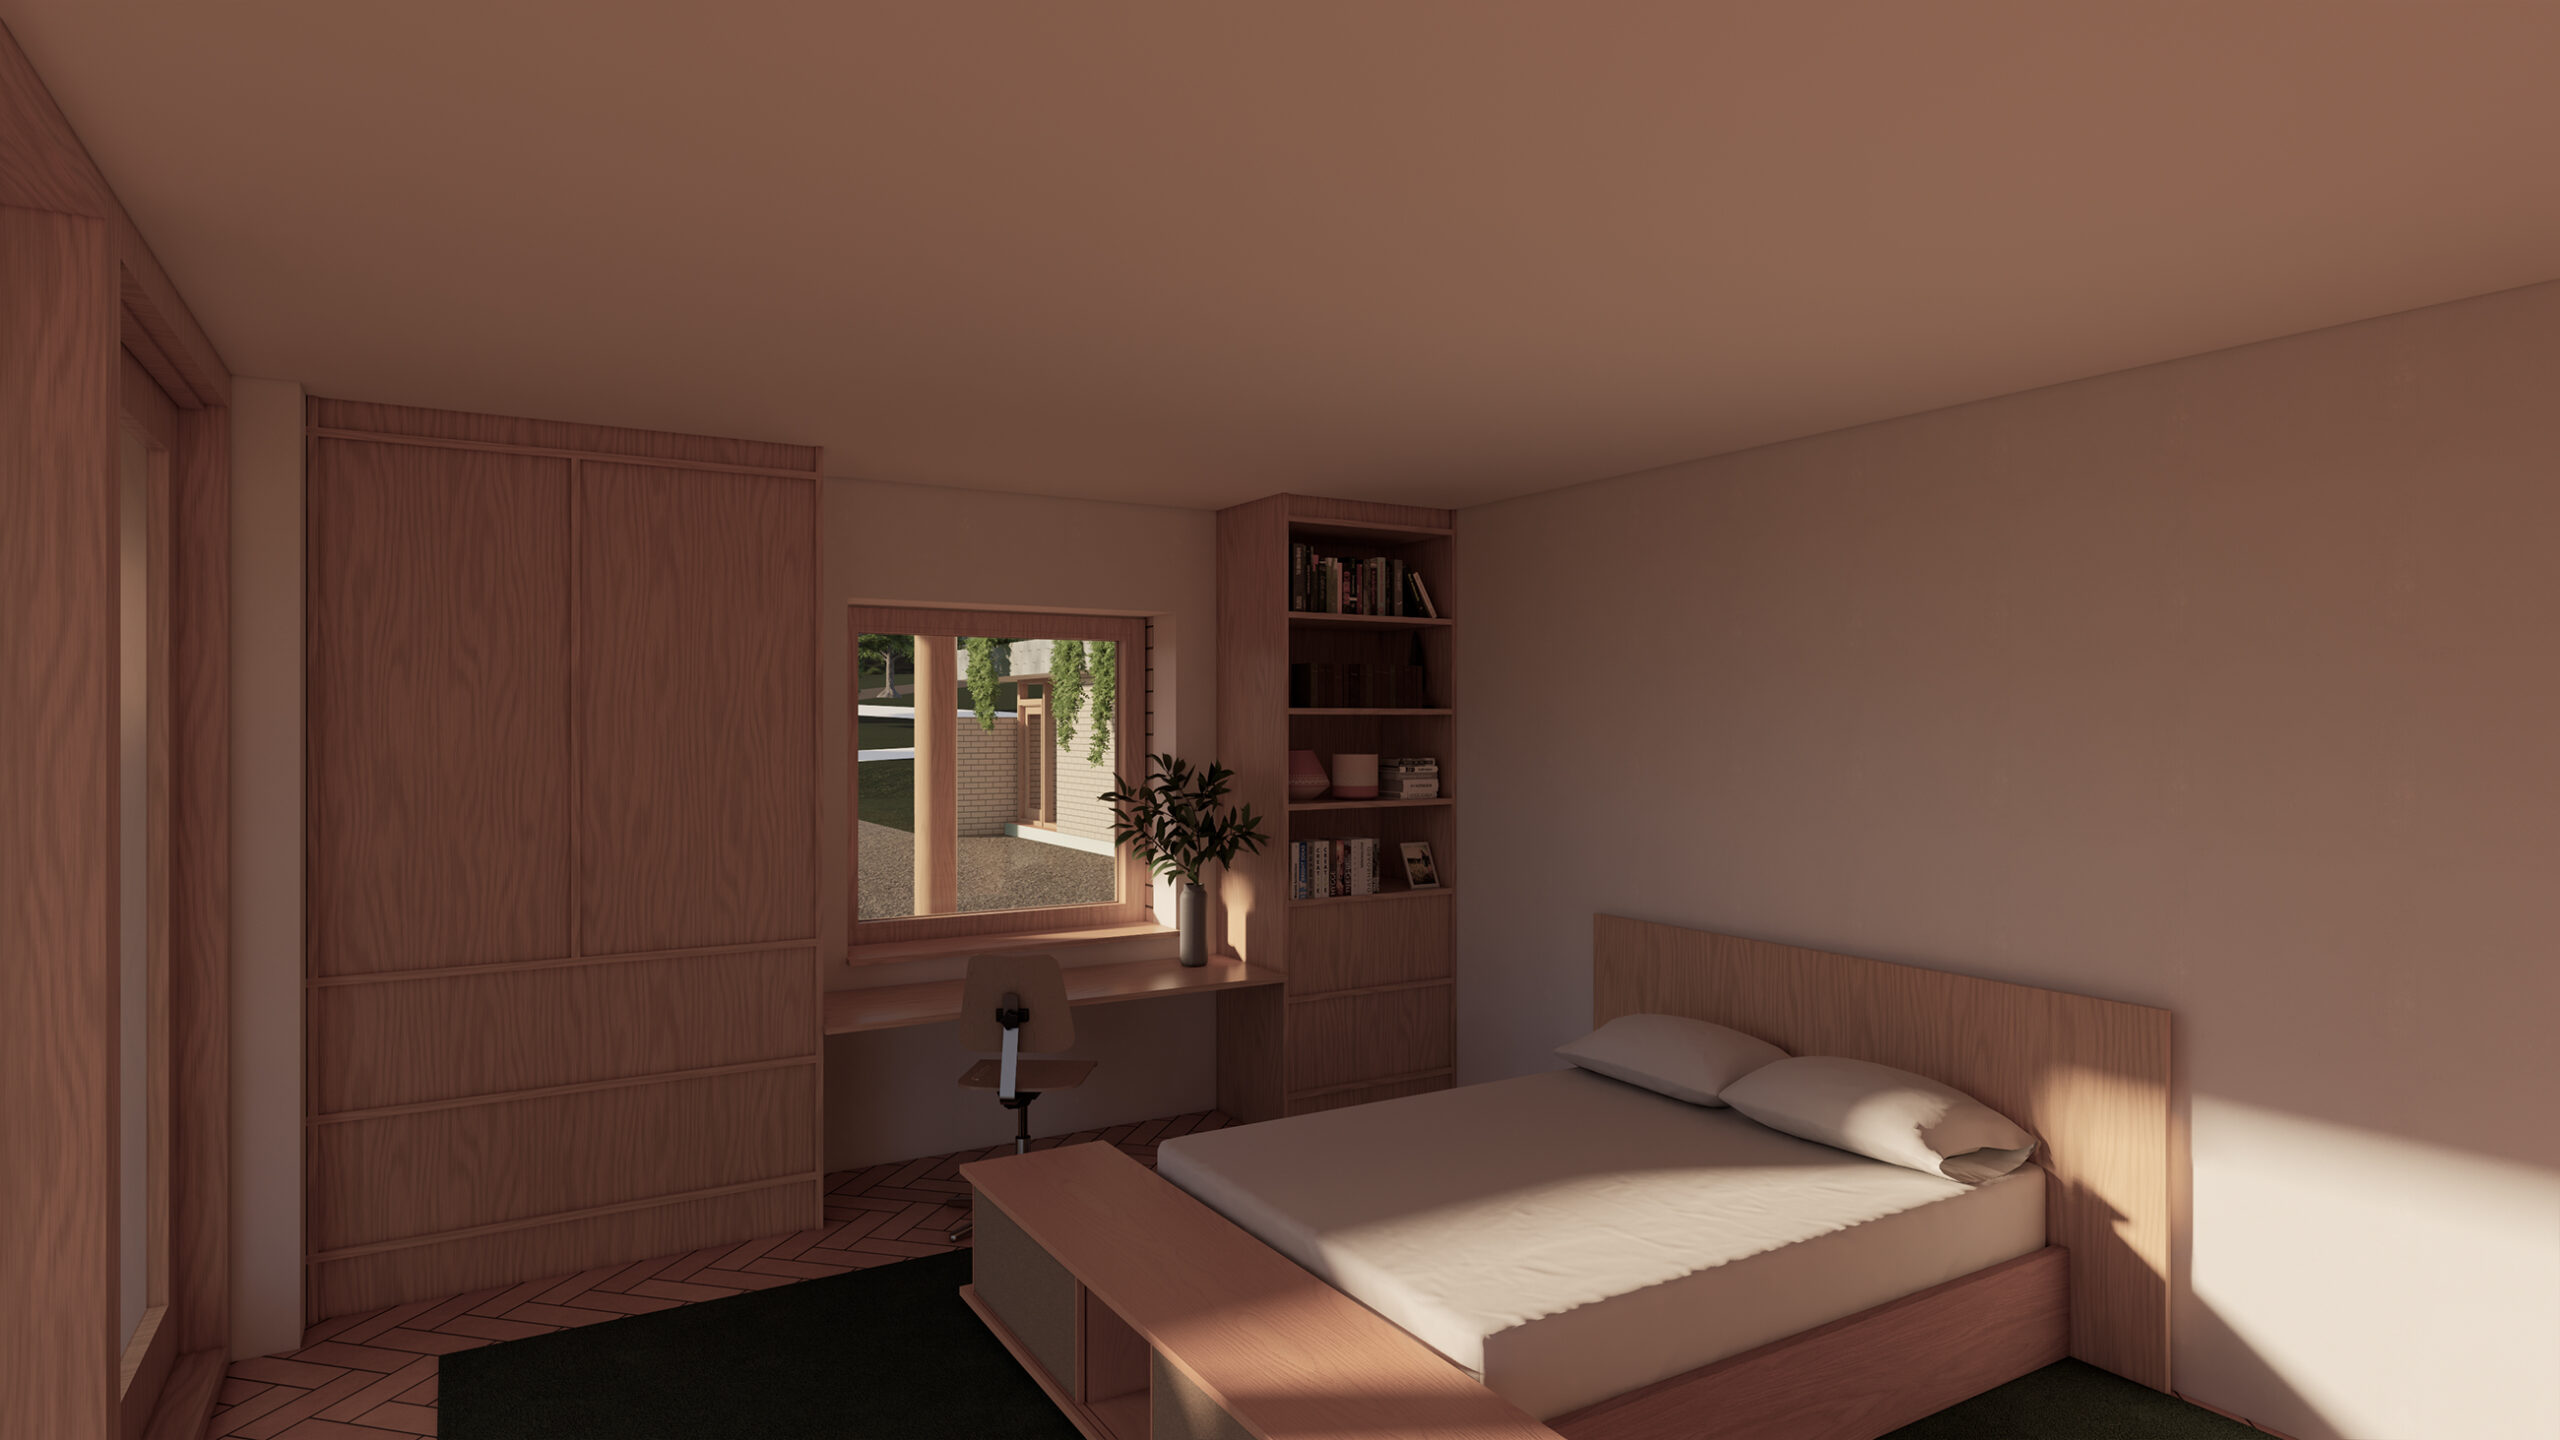
Back on the ground floor, the two main bedrooms off the living space both have their own private courtyards as well as washrooms. The space carries through the same materials as the rest of the house and each contains a desk area and two shelving units, below are some 3D views of the bedroom areas.
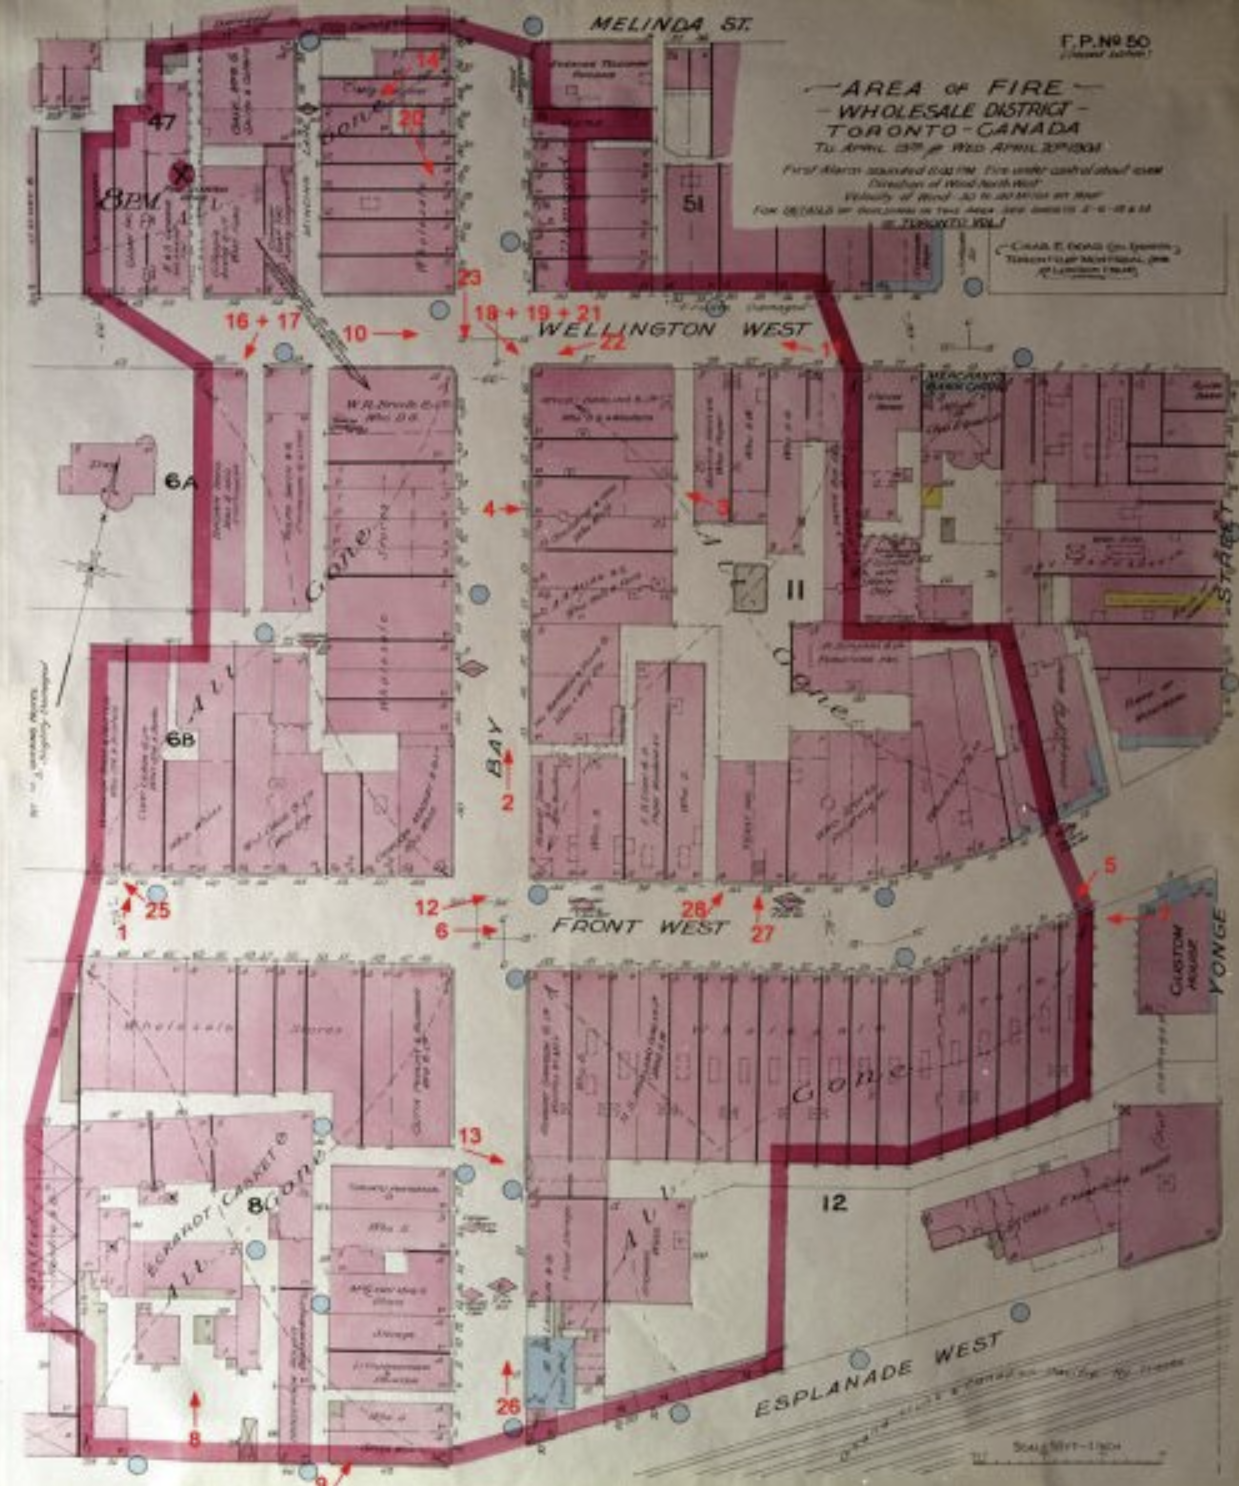
On April 19, 1904, at about 8:00pm, a fire began in Toronto that would forever impact building design safety in Toronto moving forwards.
‘The Great Toronto Fire’ lasted less than 9 hours and destroyed approximately 100 buildings, leveling nearly 20 acres of land. Even in below freezing temperatures and snowfall, the fire spread from building to building with the additional aid of 30mph northwest winds. Firefighters from around Toronto, as far as Peterborough, answered the call to help put out the flames. At 4:30am, the fire was considered under control, but fires would still break out for the next few days and the ruins smoldered for two weeks. The main cause of the fire is unknown, but the reason for the spread was due to the lack of fire separations between buildings that could prevent the spread of fire (such as fire walls or wall assemblies with fire ratings).
Fast forwards 120 years
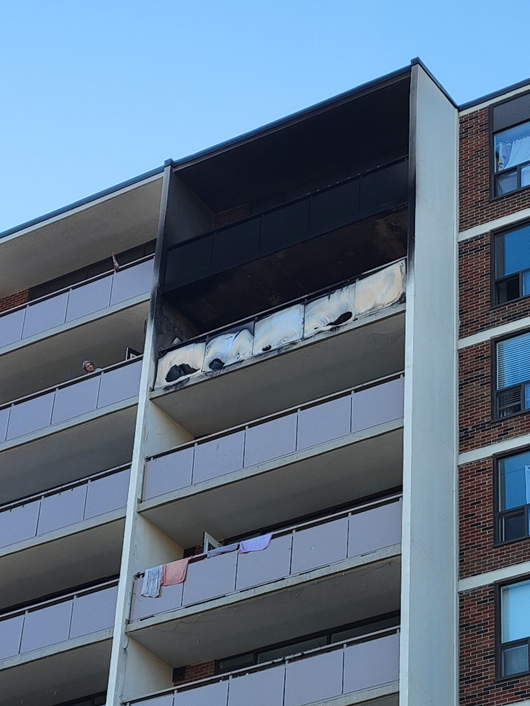
A fire began at 3am in the morning on April 16, 2024, at an apartment building in central Mississauga. Roughly ten fire trucks rushed to the scene, and building occupants stood outside and watched as the clouds of dark smoke and flame burned a balcony of the 11th floor unit of a 12 story residential building. This time however, the fire spread was contained (even though the fire was so hot that it burnt and melted the aluminum balcony!)
As you can see in the image, the fire did not spread below, left, or right. As expected, the burning hot smoke did damage the unit above, but the fire did not have time to catch on the floor. With the help of compartmentalization and fire separations, the design of the building prevented what could have been a much worse situation from occurring. One of our team members lives in the building — so they are needless to say, very thankful for the containment of the fire!
This fire containment is just one example of how the Ontario Building Code (OBC), which was created among other things after ‘The Great Toronto Fire’, has placed Canada’s building safety at a high international standard. The firewalls in the above project (i.e compartmentalization) mean the fire did not spread. Noncombustible cladding, and even tested combustible cladding options that meet the OBC standard are potentially options for slowing the spread of fire. Using the minimum permitted vent-space behind the cladding is another way to mitigate fire spread.
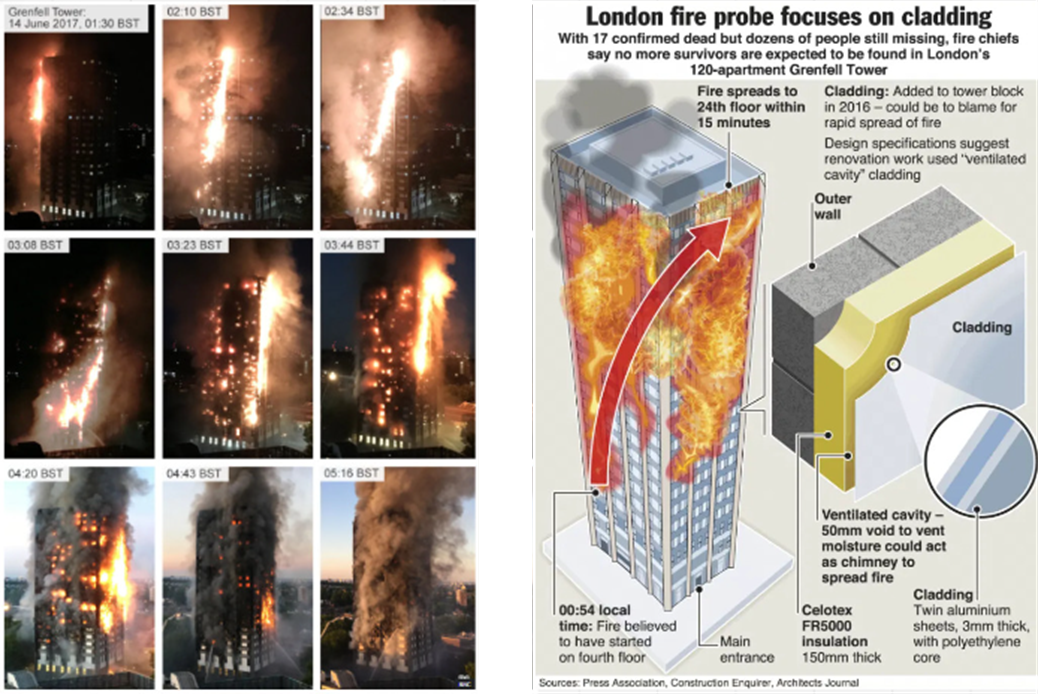
Grenfell
A famous fire event in London highlighted the importance of using the correct cladding and insulation materials. The Grenfell Tower Event started out as a fire in a residential unit in a tower that escalated quickly to engulf the whole building in flame due to the cladding, as well as insulation used. Once the fire spread to the vented cavity in the exterior wall, it quickly spread laterally and vertically around the whole building.
According to the Ontario Building Code, one of the requirements for cladding considered Combustible Cladding is to pass the CAN/ULS S134 test. This test uses a gas burner furnace with a window opening next to the tested cladding to see how fast the fire spreads and affects the material. To pass, no flame spread is to go beyond 5m, and the Heat flux is to be 3.5m < 35kW/m2. Architects are to reference this test when choosing cladding considered combustible.
Additionally, if fire does penetrate into the walls, there are building materials that would not produce (or produce less) toxic gases and chemicals during the event of a fire. For example, alternatives to plastic or aluminum which can expel high amounts of toxic gases and carbon when burnt, or plastic-based insulation.
We are always interested in helping you realize your ideas while keeping safety, health, and the environment a top priority!
Sheena Sharp, a principal here at Coolearth, had an article published today in the National Observer’s opinion piece column about the new Housing Plan the Federal government released last month.
In the article Sheena highlights a few key areas where changes could be made to the policy — changes that could have a huge impact on the housing crisis Canada currently faces.
Windows are the weakest elements of a building in terms of thermal performance due to their low thermal resistance in comparison to other more-highly insulated elements of a building enclosure (wall, roof, floor). Therefore selecting the right windows is an essential aspect of any high performance or Passive House window.
As an architecture firm offering clients high performance and Passive House Buildings, Cooelarth believes having an in-depth knowledge of windows is very important. We have done a lot of research into window suppliers: comparing price, performance, and quality, and have found there can be massive spread in the cost and performance of windows.
This blog post grew from a discussion we were having in the office a few weeks ago about the size of the frames in wood-aluminum “passive house” windows compared to fibreglass windows — the frames are almost twice as thick (this also applies to PVC windows, whose frames can be just as larger, or larger, then wood-aluminum windows). The content of the discussion was largely based around the following three points:
1.) The thermal performance of wood-aluminum windows is generally much higher than fibreglass… but at a significantly greater cost.
2.) With wood-aluminum window frame’s being thicker then fibreglass this means you need to order larger windows in order to keep the glazing area the same… and therefore you will have lesshighly insulated wall area.
3.) Taking the two points above this means with wood-aluminum windows you end up substituting cheap highly insulated wall insulation with costlier poorly insulated window frames in order to acheive the same glazing area as fibreglass.
After the discussion we decided to pursue this line of inquiry further to understand the implications, which seemed interesting and novel.
To guide this analysis, we formulated the following hypothesis:
When comparing wood-aluminum windows with fibreglass windows, if we keep the glazing area the same size for both, the decreased thickness of the fibreglass window frame will result in more area of wall insulation, which will improve the effective thermal resistance of the fibreglass window when compared to the wood-aluminum window.
Before we launch into heart of our analysis, we’d like to explain the three main elements which compose a window:
1.) Glass. In the ‘industry’ glass is called “glazing” and even more accurately in the case of a double or triple-pane window, “Insulted Glazing Unit (IGU)”. An IGU is composed of multiple panes of glass with inert gas between the layers for added thermal resistance (typically argon). The glass panes are seperated by a Thermal Spacer which is what creates the space for the gas. The area of the window with the highest thermal performance is the “centre of glazing”, and more generally is the IGU itself.
2.) Frame and Rails. The frame and rails in windows can be made of wood, aluminum, a combination of wood and aluminum, fibreglass, and PVC, to name the most common. The frame supports the IGU and the mechanism, and include the gaskets for air-sealing and drainage channels for moving water away from the interior.
3.) Hardware. Including the opening mechanism, hinges, locks, screens, etc.
We strove to conduct a data-based analysis of the windows using available data to figure out their effective thermal resistance to test the above hypothesis.
Methodology of Analysis
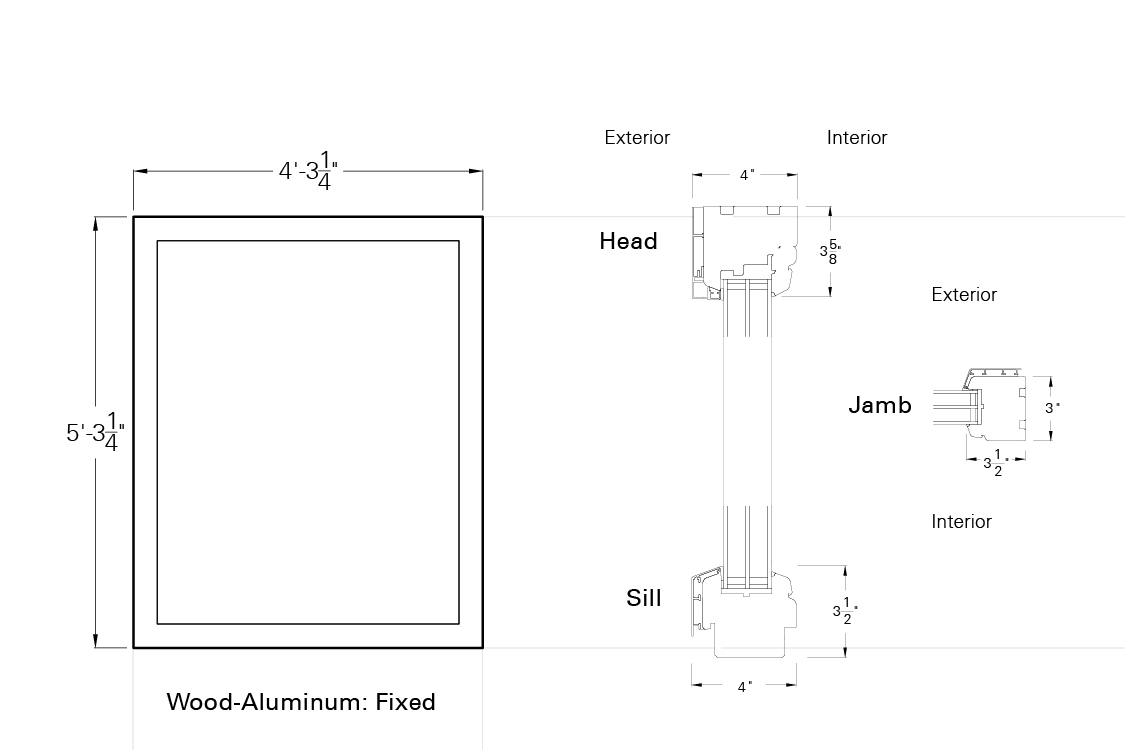
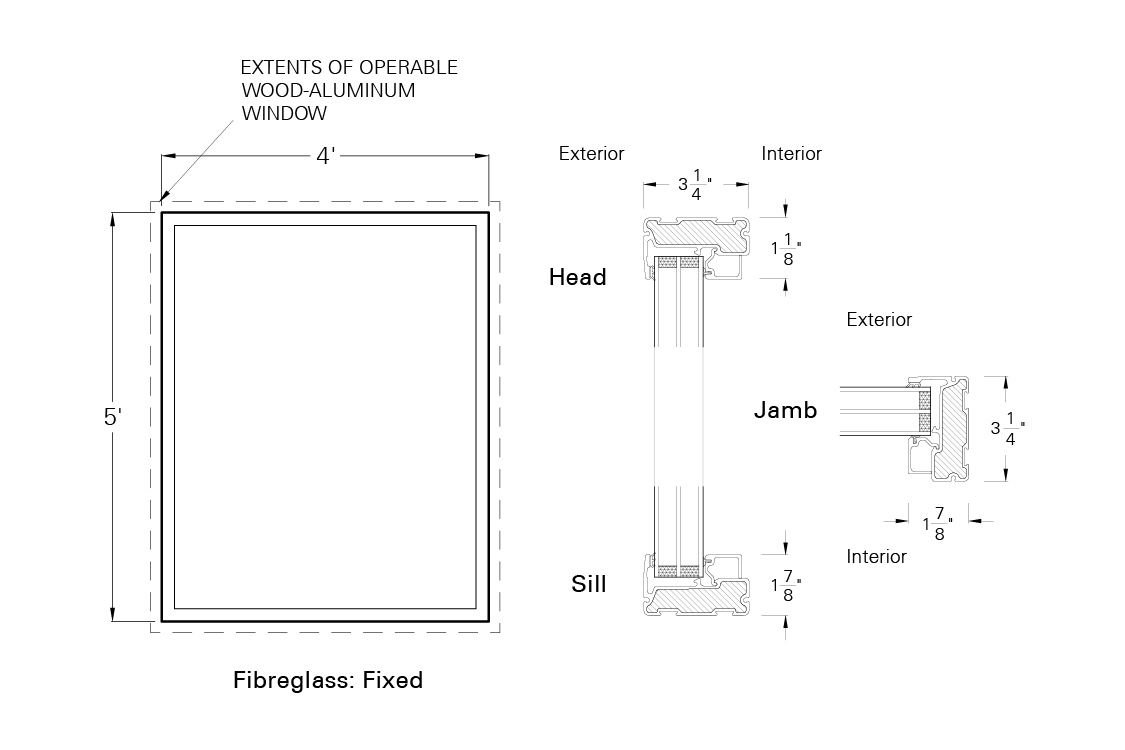
The fibreglass and wood-aluminium windows were compared with the same glazing dimensions. The width of the frames, thermal resistance of the frame and glazing, and cost were based on real windows from suppliers we like and have used multiple times at Coolearth. We assumed the wall construction would be a typical stud wall with 6″ of external mineral wool insulation. For the fibreglass windows we assumed that the difference in the area of the fibreglass frames versus the wood-aluminum frame would be insulated wall.
The following thermal resistance (R-value’s) were used for the starting point of our analysis:
Fixed wood-aluminum window
R-7.81
Operable wood-aluminum window
R-7.58
Fixed fibreglass window
R-6.39
Operable fibreglass window
R-6.17
Wall insulation
R-25.2 (6″ external mineral wool insulation)
Table showing R-value of materials
Similarly, the total cost of each assembly was calculated using the following rates:
Wood-Aluminum window
$121.80/ft2
Fibreglass window
$82.00/ft2
Insulation
$6.42/ft2
Table showing cost per ft2 of window types and insulation
The total cost of each assembly is as follows:
WINDOW TYPE
COST
% COST DIFFERENCE TO WOOD-ALUMINUM
Fixed Fibreglass
$1,656.13
-41%
Operable Fibreglass
$1,763.45
-43%
Fixed Wood-Aluminum
$2,742.02
–
Operable Wood-Aluminum
$3,142.54
–
Table showing the cost difference between the windows assuming the windows are 4ft by 5ft.
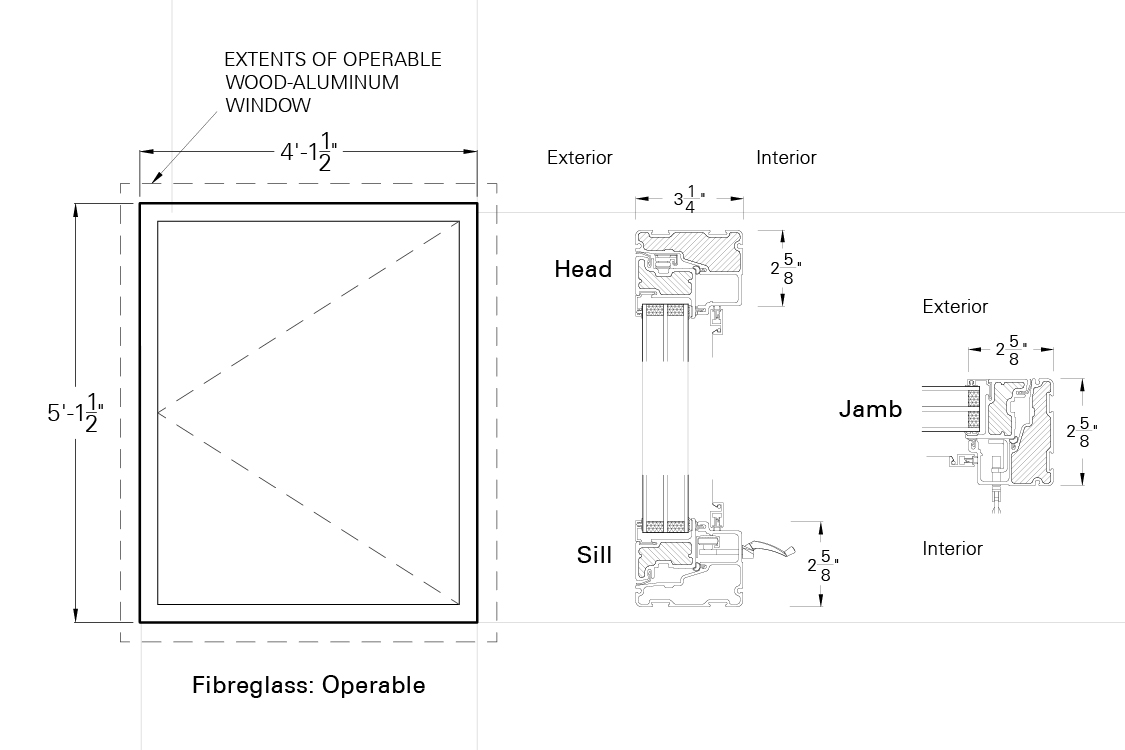
The following dimensions and profiles were used for each window:
Fixed Windows
Operable Windows
Results and Analysis
Based on our analysis the smaller frames of the fibreglass window, when compared to the thick frames of the wood-aluminum window, allows for additional wall insulation which improves the effective performance of the window beyond the initial stated R-value.
WINDOW TYPE
INITIAL WINDOW R-VALUE
% PERFORMANCE DIFFERENCE TO WOOD-ALUMINUM
EFFECTIVE WINDOW R-VALUE
EFFECTIVE % PERFORMANCE DIFFERENCE TO WOOD-ALUMINUM
Fixed Fibreglass
R-6.39
-18%
R-6.97
-12%
Operable Fibreglass
R-6.17
-23%
R-7.14
-6%
Fixed Wood-Aluminum
R-7.81
–
R-7.81
–
Operable Wood-Aluminum
R-7.58
–
R-7.58
–
For instance at face value, the fixed fibreglass window performs 18% worse then the fixed wood-aluminum window. However by including the area of the wall that the wood-aluminum window frame would occupy as part of the R-value of the fibreglass window, this improves the effective thermal performance of the fixed-fibreglass window by 6%, resulting in the fixed-fibreglass window performing only 12% worse then the wood-aluminum instead of 18%.
A bigger increase in performance is seen when looking at the operable windows — due to the larger size of the wood-aluminum window frames when compared to those of the operable fibreglass frames. In this case, a 17% performance improvement is seen when the operable windows are considered.
Conclusion
For both fixed and operable windows, the wood-aluminum window gas a greater R-value than a fibreglass window “on-paper”. However, when the additional wall insulation permitted by the smaller fibreglass frame is taken into account, this performance difference decreases. Considering that the fibreglass window costs 40% less this is an interesting result.
In projects with strong budget constraints the fibreglass windows are worth considering.
Next Steps
One interesting result of this analysis is the realization that if fibreglass window suppliers could increase the thermal resistance of their IGU’s, they could outperform wood-aluminum windows, likely at a significant cost advantage.
For instance, the IGU of the fibreglass window used in the above analysis has a thermal resistance of R-7.1, whereas the IGU of the wood-aluminum window has R-8.7. If the fibreglass window was to have the same IGU as the wood-aluminum window, the results of our analysis would be as follows:
WINDOW TYPE
INITIAL WINDOW R-VALUE
% PERFORMANCE DIFFERENCE TO WOOD-ALUMINUM
EFFECTIVE WINDOW R-VALUE
EFFECTIVE % PERFORMANCE DIFFERENCE TO WOOD-ALUMINUM
Fixed Fibreglass w/improved IGU
R-7.44
-8%
R-8.08
0%
Operable Fibreglass w/improved IGU
R-7.08
-10%
R-8.14
+4%
Fixed Wood-Aluminum
R-8.12
–
R-8.12
–
Operable Wood-Aluminum
R-7.83
–
R-7.83
–
These results suggest that fibreglass window frames with IGU’s equivalent to those available on Passive House wood-aluminum windows could match or even out-perform wood-aluminum windows at likely a substantial cost discount, when taking the wall area into account.
However, considering that the IGU for the fibreglass windows is 1-1/2″ whereas the wood-aluminum IGU is 1-7/8″ the fibreglass frame profile would need to be modified to fit the thicker IGU.
Further Research
We will be continuing our in-depth analysis of windows over the coming weeks, by doing a blog post looking at the benefits of over-insulating window frames to increase the effective R-value. Stay tuned!
Special Thanks to Cindy, Renée, and Andrea for their help in research for this post!